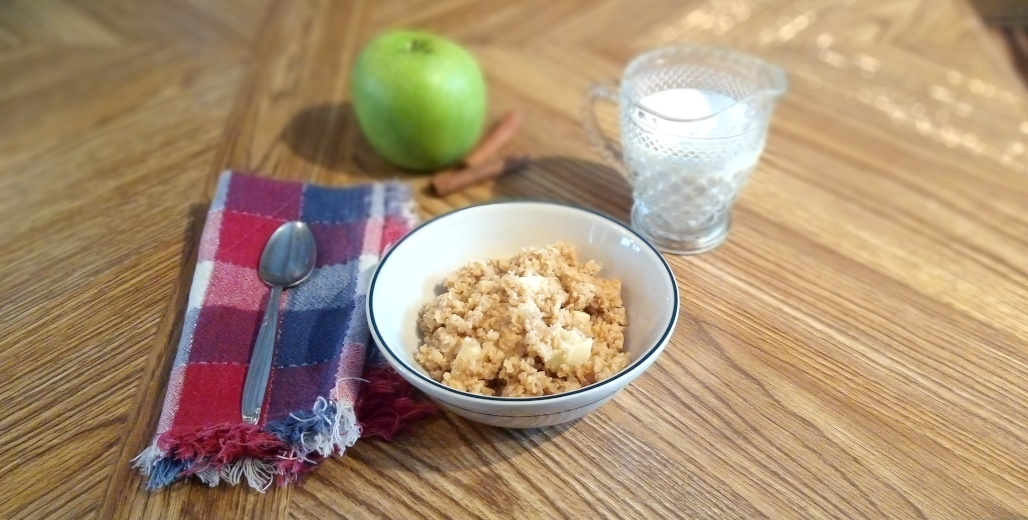
Wake up to a warm, comforting breakfast when you prepare this apple cinnamon baked oatmeal the night before! Just perfect for chilly mornings when you need something satisfying. Breakfast is in the oven!
I love waking up to a warm, comforting breakfast on chilly mornings. But I don’t always have time to prepare something fancy, especially on weekdays. That’s why this overnight baked oatmeal is a perfect choice when you need to feed your family something filling and nutritious that doesn’t take much time to prepare. Just take it out of the refrigerator and pop it in the oven when you get up, and enjoy a delicious breakfast in less than half an hour!
If you have some time to spare in the morning, you can still mix it up while the oven is heating. The batter is very simple, and it only takes a few minutes to stir everything together.
Best of all, you can change up the flavors very easily. I adapted an Amish recipe for a simple baked oatmeal, and added fruit and spices. You can use peaches instead of apples, dried fruit instead of fresh, maple extract instead of vanilla… whatever strikes your fancy!
I hope your family enjoys this warm, cozy breakfast as much as mine does. Be sure to serve it with plenty of milk and cream for extra protein and creamy goodness!
If you have a picky eater who doesn’t like the texture of oatmeal cooked on the stove, try this baked oatmeal recipe! It’s crumbly rather than sticky and mushy, so your picky eater might just love it!
Apple Cinnamon Baked Oatmeal with plenty of cream… that’s what perfect mornings are made of!
Method
Melt the butter in a microwave or on the stovetop. Cool slightly and pour into a large mixing bowl before adding the brown sugar and eggs. Mix thoroughly and set aside.
In another bowl, combine the quick oats, salt, baking powder, and spices. You can use cinnamon alone, or with nutmeg, or go all out and add cloves and ginger as well! If you do choose to use more spices, stick to 1/4 teaspoon of each additional spice. Stir well to evenly distribute the spices.
You can certainly substitute regular rolled oats for the quick oats if you are preparing the oatmeal the night before. Regular rolled oats don’t work so well if you prepare the oatmeal right before baking, because they don’t have as much time to soak up liquid, and the resulting texture is a bit chewy.
Pour the oat mixture into the butter mixture and stir well to combine. Add the milk and vanilla extract, if desired.
If you are mixing this up at night, use 1-1/3 cups of milk. If you are mixing it in the morning just before baking, use only 1 cup of milk. The reason is that the oats will soak up more liquid as they sit, so the oatmeal will dry out too much if you leave it overnight with only 1 cup of milk.
Last, mix in the chopped apple pieces. Feel free to add some chopped nuts if you like; 1/2 cup should be enough.
Butter a 13×9″ baking dish. Pour the oatmeal mixture into the dish and cover tightly with plastic wrap. Refrigerate overnight.
In the morning, preheat your oven to 350 degrees F. Remove the plastic wrap from the baking dish. Bake uncovered for 25-30 minutes, until the center is set and the edges are just beginning to brown.
Serve warm with milk and cream. You can serve this apple cinnamon baked oatmeal straight from the oven; the milk or cream poured over the oatmeal will cool it enough for even the littlest mouths!
Warm, spicy apples and cinnamon mixed with oatmeal in a make-ahead dish you prepare the night before makes this comforting breakfast easy as pie!
Prep Time10 minutesmins
Cook Time25 minutesmins
Refrigeration8 hourshrs
Total Time8 hourshrs35 minutesmins
Course: Breakfast
Cuisine: American
Keyword: Apple, Cinnamon, Oatmeal
Servings: 8
Author: kimberly
Ingredients
1/2cupbuttermelted
2/3cupbrown sugar
2eggs
3cupsquick oats
2tspbaking powder
1tspsalt
1/2tspcinnamon
1/4tspnutmegoptional
1-1/3cupmilk
1tspvanilla extractoptional
1small tart applepeeled and chopped
Instructions
Combine melted butter and brown sugar in a large mixing bowl. Add eggs, stirring well to combine.
In another bowl, combine oats, baking powder, salt, cinnamon, and nutmeg if desired. Mix thoroughly.
Pour oat mixture into butter mixture, stirring well. Add milk and vanilla extract, if desired.
Stir in the chopped apple pieces.
Butter a 13×9" baking pan. Pour oatmeal mixture into the pan. Cover tightly with plastic wrap and refrigerate overnight.
In the morning, preheat your oven to 350 degrees F. Bake the oatmeal uncovered for 25-30 minutes, until the center is set and edges are just beginning to brown.
Serve warm with milk and cream.
Notes
You may substitute regular rolled oats for quick oats if you prepare this the night before.If you are preparing this dish in the morning, reduce milk to 1 cup.
Does your house need a refresh? Sometimes organizing and rearranging is all that’s needed to make you happy in your home!
Around February or March every year, I get the urge to change things up around my house. Maybe it’s due to the long Alaskan winters, when I’ve just spent several months inside. Maybe it’s some ancient instinct for cleaning and tidying in anticipation of spring. Maybe it’s just my fickle nature that likes to see something new once in a while. Whatever the reason, I always seem to find lots of energy to thoroughly clean, tidy, and reorganize our cabin this time of year.
This desire to see something new sometimes makes me want to go out and buy things to make my house look pretty. But this isn’t always the best solution. I like to see what I can do with what I already have, before heading out shopping. You can too, and you might be surprised at what a change you can make to a familiar space just by a few simple fixes.
Disclosure: This post contains affiliate links. If you click the link and make a purchase, I may receive a small commission at no extra cost to you. Please read my full disclosure here.
1. Clean and Discard
This is usually the first step. Take one room at a time, and one cabinet, shelf, or counter in turn. Take everything out and clean it before putting the items back.
As you put the items back, ask yourself if you really need them. Is there any expired food in your kitchen? Are you keeping clothes that are worn out or you’ve never worn? Have you ever opened this textbook you saved from college? How many blank notebooks does one really need?
Discarding some items always helps with organization later! During your initial cleaning and discarding, you might find yourself with empty boxes or storage containers. Save these! You might find a different area to use them during a later step of the process.
The cleaning step doesn’t have to mean completely turning your house upside down and cleaning every nook and cranny. If you don’t want to combine tidying with spring cleaning, I understand. Spring cleaning is a big enough job on its own! However, I can’t take everything out of a cupboard to organize it and NOT wipe down the cupboard while it’s empty.
So, you have two options: you can either consider this organization spree as getting a head start on some of your spring cleaning (without trying to tackle it all), or don’t think about spring cleaning at all, and just clean messes as you come to them in the course of organizing.
2. Step back and look at each room
Sometimes this step actually has to come first, before you take everything apart to clean. (This is true for areas that are already messy.) Are there problem areas in a room, places that are always messy? How can you reorganize the items in that space to make them fit better, or reimagine the space to make it less of a dumping place?
(Sometimes this can take a while. I’ve sat and stared at an overflowing bookshelf for longer than I care to admit before inspiration struck!)
Here’s where your saved storage containers and boxes come in handy. Even cardboard boxes can be helpful to visualize whether or not a rearrangement idea will work in a particular space. For example, if you’re trying to organize a shelf that’s always messy, some baskets or boxes placed on the shelf can help keep things contained better. But if you don’t have enough pretty baskets or bins lying around, you can use cardboard boxes as a temporary solution.
I know it’s not pretty, but this prevents you from running out and buying more storage containers before you’re finished organizing the whole house. Remember, you might find more storage containers in a different room that could be repurposed! It’s a good idea to wait until the whole house is organized before you buy anything new.
Give each shelf a purpose
Sometimes the answer to a problem area is that you just need to change or define its purpose. If a table or shelf doesn’t have a specific function, it can easily become a place where random objects get set down and forgotten.
I had a shelf in my kitchen that didn’t have a specific purpose, and it was always messy. Papers piled up there, objects that needed to be put away, things that didn’t have a home… it was always an eyesore! I decided that since I obviously didn’t need that shelf for storing kitchen things, I would turn it into a decorative shelf. Now it’s the prettiest place in my kitchen, and (almost) never messy.
Think about whether or not any of your problem areas need a real purpose. This can be a great opportunity to find decorative spaces you didn’t even know you had! You can even use prominent tables or shelves for extra storage, if you need it. Find pretty baskets or boxes to arrange neatly, and you’ve created an appealing space that also serves a useful purpose.
3. Try different furniture arrangements
Even if there are no specific problem areas, you may want to look around the room and imagine some different furniture arrangements. If the furniture isn’t too heavy, you might enjoy moving it around to different places, just to see what looks nice.
You could discover that different furniture arrangements make more sense in the spring and summer, as the light changes and the trees eventually get their leaves. Perhaps you could move your favorite chair closer to a sunny window, which might have been too chilly in the winter.
You might think this step is a waste of time, because you’ve found the ideal placement for all the furniture in a room. I know the feeling, but I’ve been surprised when we suddenly gained more space by adding another piece of furniture, which forced us to rearrange the pieces that were already there! Since then, I have tried to keep an open mind about different ideas, and embraced the opportunity to occasionally change furniture arrangements!
4. Ask yourself if there is anything that particularly bothers you about each room
Are the curtains hung wrong? Maybe it’s time to set them straight. Do some colors or patterns clash? See if moving the offending object across the room or to a different room helps.
Is there some piece of furniture or artwork that you just don’t like? Aside from getting rid of the object entirely, you could try covering a piece of furniture with a pretty cloth or slipcover.
If you have a fabric stash in your house, you can work magic without heading to the store. New curtains, or even new trimmings on old curtains, can add interest to your windows. Fresh pillow covers can hide stained or worn ones. A pretty blanket thrown over an ugly chair can completely cover that pattern you don’t like.
In the case of smaller objects or artwork, it might not bother you as much if it was moved to a different location, or grouped with a set of other objects so it is not the sole focus of attention. Or consider putting it away in a closet for a month or two. If you forget about it, you probably don’t really need or want it. Feel free to send it on to a new home!
Finding Time to Organize
If all this sounds great to you, but you can’t just drop all of your other responsibilities to tidy and rearrange your house for a few days, try these tips for making time to organize:
Set aside an hour or two each day
It’s okay to take a little bit at a time, and work through your house slowly. Unless you can come up with a totally free weekend, you will probably need at least a week of smaller increments to finish the job.
Find a time when you’re in a positive mood and not too tired
After supper is probably not the best time, unless you’re a night owl! And if you get to the scheduled time but you’re feeling frazzled or worn out, don’t even start organizing. You will only get more frustrated with yourself. It’s much better to skip a day or two if you’re really too busy, than to try and force yourself to accomplish too much. We want this to be a pleasant task, remember?
Start with an area that’s not too big, but really bothers you
The satisfaction from tidying and organizing a perpetual eyesore will help to motivate you to keep going. However, trying to tackle a big area first can be overwhelming, so don’t pick the biggest mess in the house to start with!
I like to start with something I know I can finish in an afternoon, like one dresser. Maybe even just the top of the dresser, if it’s really messy. If I start with something that I’ve been meaning to organize, that gives me energy to plow through the rest of the house!
Other tips for organizing
Deciding what to keep
Keep things because you like them, not because you think they might come in handy some day or because you think you ought to. Sure, you just might find a use for that metal fitting some day. But 37 plastic containers? A broken bicycle? That vase (or sweater, or picture) which you don’t even like, but it’s from a relative?
Some things are precious because they are family heirlooms, and hold special memories. Some things are objectively useful (like storage containers), but having too many of them makes them just one more thing to store.
The more stuff you have in your house, the more time and energy you must spend in cleaning and organizing it. You must decide yourself which things to keep, but I know for myself, I would rather live with less stuff in a space that is neat and uncluttered, than with a lot of stuff I might need someday.
A Note on Paper
Papers can be some of the most time-consuming things to sort through and organize. One piece of paper takes up barely any space, but when you’re going through them, you have to look at each one individually. This takes both time and energy–and you don’t always see a huge improvement when you’re done, even if you throw out a lot of paper!
For this reason, I always save papers for last, or close to last. If I come across a file or binder of papers while I’m organizing, I move it to my desk until I have leisure to sit down and decide which ones I really need to keep.
Methods of Organization
Some people like to organize room by room, while others advise organizing by each type of item: clothes, kitchen utensils, books, etc. I have done both, and found both to be helpful.
I did read Marie Kondo’s book, “The Life-Changing Magic of Tidying Up,” and tidied my house using her method about a year ago. It was very thorough, and I think everyone could benefit from tidying that way… once. It’s not a process that needs to be repeated every month, or year. (Hopefully!)
However, her method of tidying doesn’t keep your house perfect forever. You still have to put things away where they belong, of course. And if anything new comes into your house, you will need to find a home for it. That is why I still do an organizing or tidying spree once a year: because during the past year, things came into my house, so now I need to rethink the storage spaces that worked earlier.
This time around, tidying went much faster, and I barely had to touch some areas. (I didn’t gain any new kitchen utensils, so they’re still organized from last year.) But in the end, I still gained the same sense of satisfaction in surveying a clean, tidy home.
Tidying and organizing makes me happy to live in my home. I hope it has the same effects for you!
This is the time of year where you start seeing “gift guides” pop up everywhere, claiming to tell you the perfect presents to buy for just about anyone. There’s nothing wrong with the idea per se; thinking of gifts for everyone in your family can be quite a task!
However, the best gifts can’t be found on Amazon. Some of the most meaningful gifts I’ve been given are handmade, and some of them aren’t tangible things at all!
This gift guide for homemakers is designed to stretch your imagination and help you think creatively about your gift-giving. It is geared toward homemakers or any women who appreciate homey things, whether that’s your mother, daughter, next-door neighbor, or an elderly lady from your church.
Handmade vs. Purchased Gifts
I love making gifts for friends and family members… and I’m always terribly disappointed when I run out of time (or steam) for all of the projects I planned! Also, I know that not everyone has the time or patience for projects like this.
Therefore, I have included links to several small homemaker-run shops in this article. I am happy to support these ladies and their families, and delighted to share their goods with you!
1. Homemade Soaps, Lotions, and other toiletries
Soaps, lotions, and other handmade toiletries make lovely gifts.
These common household items don’t have to be the plain drugstore variety. Brighten someone’s toilette or vanity with a pretty bar of handmade soap or a jar of hand cream. If you wish to avoid fragrances altogether (or just can’t decide which scent to choose), opt for unscented varieties.
Katie has some easy beginner tutorials for soap making and lotion making, if you’re just getting started. She also has many other recipes for pretty, scented soaps on her website, Heart’s Content Farmhouse.
Soap making is a useful skill, and mixing your own scents with essential oils can be fun, but not everyone enjoys this type of messy or lengthy project. If you would rather buy a finished product than make your own, check out these shops:
What’s more homey than a flickering candle on the windowsill or in the corner of your kitchen? Pretty and practical, candles not only provide light on dim evenings (or during power outages); every room looks more cheerful, bathed in their warm, soft glow.
Making beeswax tapers or jar candles is on my list of projects to try, but I haven’t gotten there yet! Browse through a gift shop for locally-made candles, or visit Laura at CandlesandCoffeeHouse.com for candles, cute mugs, and more! Old Light Candle Co. is another great resource!
3. Baking or Cooking Mixes
These mixes can be anything from the soup or muffin “gifts in a jar”, to spice blends, to hot drink mixes… you get the idea. These gifts show that you took the time to make something special, but they can be saved for later instead of added to the already-overwhelming stash of Christmas goodies!
Even better, these mixes help homemakers by speeding up the cooking or baking process. We all know that anything that can make dinner prep less stressful is a winner!
Here are some of my favorite mixes to get your creative juices flowing:
Hot Cocoa Mix
Herbal Teas
Taco Seasoning Mix
Steak Seasoning Mix
Italian Herb Seasoning
Ranch Dressing/Dip Mix
Bean Soup Mix
Muffin mix (with mix-ins like chocolate, dried fruits, and/or nuts)
If you need a recipe for any of these, I find Pinterest very helpful — for pretty packaging ideas as well as actual recipes! You can visit my Pinterest board DIY Pantry for more inspiration!
Do you know someone who sends thoughtful cards or writes letters by hand? I think it is a wonderful practice, and I really enjoy both writing and receiving penned greetings from friends and family alike.
Pretty papers and cards make these friendly missives so much nicer! Why not give your favorite correspondent a pack of pretty stationery or greeting cards?
You can make your own with colored cardstock and rubber stamps, or choose a design from a friendly little stationery company. *This is a shameless plug for my Etsy shop!* I have greeting cards, letter paper, and recipe cards in several kitchen and floral designs in my shop right now!
5. Kitchen accessories
Homemakers spend a good deal of time in their kitchens, so kitchen-themed gifts are often very welcome. Anything pretty and new (to the recipient, at least) for the eye to rest on in the course of daily tasks brightens the eye and prompts a smile.
If you are worried about not matching the style of the recipient, choose something with neutral colors that will not be displayed prominently. Here are some useful kitchen accessories that make nice gifts for homemakers:
Wooden spoons – new or thrifted, you can never have too many!
Tea towels – look for seasonal prints or more neutral hues
Recipe cards – you can find many lovely designs on Etsy, such as these!
Potholders or trivets – they do wear out or get scorched, and fresh ones are nice
Cutting boards – vintage or new, engraved or painted
I love to look at the pretty gift baskets at silent auctions and fundraisers! They are usually themed: family game night, spa day, cookie baking, wine and cheese… the options are endless.
For me, it’s a fun excuse to pick out some pretty things I wouldn’t buy for myself, and arrange them in a thrifted basket with a festive cloth and ribbon!
Here are some more basket themes perfect for a homemaker:
The best gifts aren’t always things. Sometimes it’s hard to think of presents for certain people because they already have everything they need, yet they don’t appreciate frivolous trinkets.
In this situation, sometimes the gift of your time or attention can be the perfect gift. Here are some intangible offerings that many homemakers would appreciate:
Babysitting for an evening, an afternoon, or an entire day!
Help with yard work (especially for older folks)
Organize friends to provide meals for a family with a new baby, during a move, or going through tough times for whatever reason
Visit, call, or write to the recipient at least once a week for the next several months. These simple acts show how much you care.
Spiritual Bouquet: offer prayers for this person (your family can participate!) for a set period, and send the recipient a card telling her how much she is loved & prayed for.
***
I hope you have enjoyed this list of gift ideas for homemakers! Of course there are many more options for homemade and purchased gifts, but this should help you to start thinking creatively for your gift giving!
Last but not least, if you know a homemaker who could use some homemaking inspiration, send her my way!
Creating a flexible but effective daily schedule for homemakers is easier than you think!
What does a homemaker do all day, anyway?
Have you ever been asked this question, and not known what to reply? Or maybe you’re not even sure what you’re supposed to be doing all day as a homemaker!
Homemaking doesn’t come with a job description, so it’s up to you and me to create one. As homemakers, we run our households. We make up the rules about how our days will flow. We make priorities for our time, and work toward goals. We are responsible for keeping our families fed and clothed, our houses ship-shape, and our homes peaceful, life-giving havens.
This is beginning to sound like a tall order, isn’t it? How does one woman do all of these things?
Let me tell you a secret: it will never be “done,” and never “perfect.”
That’s the nature of keeping a home. But that’s also part of its beauty: we get to start fresh every day, even if the previous day was a miserable failure.
How can I be a productive homemaker?
This is a question we all ask ourselves at some time or another. Some days, it feels like I don’t get anything done besides cooking supper.
While we can’t completely avoid the disappointments, there are some practical things we can do to ensure that most days are not failures.
In general, this means setting up some kind of framework. It’s the job description and responsibilities of your position, if you like to think of it that way.
If you prefer to see homemaking as a vocation instead of an occupation, you might think of this framework as a quilting frame or embroidery hoop which holds the fabric in place while you work at different parts.
The frame is important because it allows you to see the whole piece, but focus on one small area at a time.
So what is this framework for homemaking? What kind of structure helps us to make the best use of our time every day?
I like lists, but sometimes these aren’t very effective. I find myself writing tasks on the list that I’ve already accomplished, just so I can check them off! Or the list gets too long, and I feel behind before the day is fairly started!
Enter the daily schedule. It’s flexible enough to meet each day’s individual needs, yet structured enough to help you accomplish the things you need to do on a daily or weekly basis.
Benefits of a daily schedule
What makes a daily schedule so helpful for homemakers?
Hint: it’s not just about getting the maximum amount done each day, though schedules do help you to be more productive!
Writing tasks down gets them out of your head.
This means you won’t be constantly trying to remember everything you need to do!
If you forget, you can just look at the schedule. Oftentimes, though, I don’t even have to look at the schedule once I’ve written it out. Somehow, putting things on paper helps me remember them better.
It also makes me less stressed. I hate the feeling that I’m forgetting something, and I definitely don’t want to go through that every day. Creating a schedule gives me more peace of mind.
It helps you to maximize productivity during specific parts of the day.
Perhaps you’re a morning person, and you can push through lots of tasks before lunchtime — if you don’t get distracted by a magazine or your phone. Or you’re a night owl, and move slowly in the morning no matter how long your to-do list is.
Maybe you have young children, and can’t seem to focus on tasks that require lots of brain power unless the kids are sleeping. Naptime is a precious sliver of quiet in your day.
Having a schedule helps you to see which times of day are your best times for getting housework done, or focusing on something that requires maximum attention.
Making a schedule allows you to choose how your day will flow.
Do you find yourself always rushing to get the house clean and supper ready at a certain time? What if you could plan your day better, so that supper preparations and tidying up wouldn’t be so hurried all the time?
Making a schedule allows you to divide up your day into manageable chunks of time, so ideally you never have to rush about frantically. (I do say “ideally,” because we all know that those days happen!)
More than just spreading out the tasks, a schedule helps you to set a flow for the day. Some activities make sense at certain times, like working on a project during naptime, or cooking supper at 5:00 pm.
But if you don’t sit down and plan out how you want your day to go, it probably won’t be very organized. I have found that my most peaceful days are those when I know what I need to accomplish and how much time each task should take.
I know this sounds like you’re working steadily all day long, but that’s not the case. Making a schedule allows you to schedule in leisure time, too. You can pencil in an hour for a walk in the middle of the day, if you like, or teatime with a friend.
Writing it down actually allows me to enjoy my leisure time more, because I don’t feel guilty about not working constantly. If my house is a mess and I have a bunch of chores to do, I’m not going to really relax and enjoy a long walk.
Types of schedules
This brings us to a discussion about different types of schedules. You may be familiar with day planners and hourly schedules, where you detail which activities should happen every hour.
Those worked well for me when I had several places to go during the day, and set appointments and deadlines. You may like that amount of structure, and thrive on an hourly schedule like this.
If you would like to see an example of an hourly schedule for a homemaker, Jayden’s daily schedule is great!
Since I became a full-time homemaker, my schedules are rarely this detailed or time-specific. For better or worse, I don’t get up at the same time every day, and my mornings can vary widely. I need a schedule that is more flexible than an hourly model.
Priority-based Schedules
The type of schedule I use is based on my priorities for the day. I pick a handful of things I need to do, such as housework and making meals.
Then I add in a few things that are good for my physical and spiritual wellbeing: walking, running, and pilates are physical activities I enjoy, while journaling, prayer, and Scripture reading are good for my spirit.
Finally, I make room for some activities I enjoy for their own sake: baking, reading, having tea, writing to a friend, or writing about homemaking…
Next, I make my schedule. My days are mostly pretty flexible, but there are some set times (meals and naptime/bedtime) that do not change. So I build my schedule around these times.
Note: The main difference between this type of schedule and an hourly schedule is that a priority-based schedule does not focus on specific time slots for each task. I find this freeing, but you may prefer to schedule your days more strictly.
My Schedule
Morning: Housework
I am a morning person, and can usually accomplish a fair amount before lunchtime. Therefore, I dedicate the time between breakfast and lunch to housework. (One day per week, this time is used for grocery shopping and running errands in town.)
Lunch
Early Afternoon: Outside time
Between lunch and naptime, I do something outside with my kids. We take a walk, shovel snow, or work in the garden. Any additional time is spent reading stories.
Naptime: Quiet projects
Naptime is for working on my own projects. This is the time I can do whatever I like, my quiet time for reading or writing. I try not to waste it on the internet, but sometimes that happens, and it’s okay because that time wasn’t supposed to be spent on something really important.
Late Afternoon: Supper prep
After naps, I focus on making supper and tidying the house. My goal is to have everything fairly neat, quiet, and orderly when my husband comes home from work. If the meal won’t take long to prepare, I might have time to finish up housework left over from the morning. However, I try not to start any projects at this time of day.
Dinnertime
Evening: Family time
After dinner is family time. I do not try to get any more housework or writing done during this time, because I know it will end in frustration. Instead, I focus on my husband and kids. We read stories, play music, and tidy up one last time before bed.
Late Evening: Wind down
After the kids are asleep is my time to tie up any loose ends from the day and prepare for the next morning.
I can’t do anything that makes noise or requires much light after the kids go to sleep, due to our close living quarters, so I don’t try to get any more housework done at night.
That’s my schedule, in fairly brief form! Please understand that this is an ideal schedule, and it certainly doesn’t happen every day! But when I do stick to it, my days are peaceful as well as productive.
Creating your own schedule
Whether you choose to make an hourly schedule or one that is priority-based, there are a few things you should take into account.
When I make up a schedule, I try to think through a typical week in my head to determine which activities need to be written down (so they actually get done), and which ones don’t need to happen every week.
If you don’t have a ‘typical week’, just think through last week. It’s something to start with, anyway.
What to include
Whichever style of schedule you choose, start by writing down mealtimes. If you’re using an hourly format, you will set an actual time for each meal: i.e., 7:00 – Breakfast time, 12:00 – Lunch time, etc.
If you are making a priority-based schedule, you don’t need to write down a specific time for meals. Just put Breakfast somewhere near the top of your paper, Lunch somewhere in the middle, and Supper near the bottom. You can always rewrite the page later if it needs to be adjusted.
After mealtimes are accounted for, make sure the housework has its place. Cooking, cleaning, laundry, and all the rest of it needs to get done some time!
You may prefer to do a little bit of each task every day: fold one load of laundry, clean one room, etc. I prefer to tackle one big task or category of tasks each day. I use a weekly housekeeping schedule to keep it straight.
After housework, build in time for some activities that are good for you, physically, mentally, and emotionally. Homemaking isn’t all work, and there is room for creativity and having fun!
Morning & evening routines
You may wish to create a morning and/or evening routine in your daily schedule. Morning routines can be really helpful in starting your day out on the right foot and helping you to feel ready for the day.
I have to admit, right now my morning routine is pretty minimal. I would probably benefit from setting an alarm and getting up earlier, so my mornings can be more consistent!
Know your weaknesses and target those areas
One of the best things your daily schedule can help you do is to improve your weaknesses. However, you have to do it intentionally.
If you know you tend to dawdle in the mornings, having a structured morning routine can help you overcome procrastination and headaches later on in the day.
If you get distracted by your phone or computer, set specific limits on how much time you are allowed to spend on them each day.
If you can spend hours perusing cookbooks or Pinterest while you plan meals, set a time limit for that as well. (Guilty!)
If your evenings are always stressful and rushed as you try to get supper on the table, plan your afternoons well so that supper prep starts earlier.
These simple considerations can make a huge difference in your schedule and your life!
Thoughts about Schedules
I hope you find some of these ideas helpful in creating your own daily schedule. Remember, schedules aren’t for making you work every second of the day. They are for ensuring you have a balance of work and leisure, so that you can get everything done without getting burned out!
One last point: Some days are so hectic, schedules go out the window. When that happens, don’t beat yourself up about not sticking to your daily schedule! The last thing you need at that point is more stress.
On particularly crazy days, I often pick just one or two things that absolutely need to happen, and focus on those until they are complete. When I’m faced with a jam-packed day, anything more can be overwhelming.
Setting up a daily schedule is part of becoming intentional about homemaking. It helps you to appreciate your days more, whether they are spent at home or not.
Hi, I’m Kimberly! I’m an Alaskan wife and mother who loves simple, old-fashioned living. If you’re looking for country-style recipes from scratch or simple homemaking ideas, pour yourself a cup of tea and join me!


 Hi, I’m Kimberly! I’m an Alaskan wife and mother who loves simple, old-fashioned living. If you’re looking for country-style recipes from scratch or simple homemaking ideas, pour yourself a cup of tea and join me!