I like making my house smell nice, especially in the fall and winter. There’s nothing quite so nice as the scent of freshly baked bread wafting through the house, or spicy cranberry sauce bubbling away on the stove. But for the days when those activities are not happening, or for parties when you desire a special atmosphere, there is a much quicker, easier option!
I stumbled across a recipe for natural gel air fresheners a few weeks ago, and thought it looked interesting. You’ve probably seen the ones in the stores: plug it in and fill your house with toxic chemicals! No, thank you. But you can make your own with natural essential oils instead of synthetic fragrances. It’s cheaper, nontoxic, and almost as fast as buying one from the store. Plus, if you make your own scented products with essential oils, you can make sure the oils you use are high quality, and you won’t be using any weird fillers or additives, which might be just as toxic as synthetic scents!
But why make these instead of candles, or just using a diffuser? I have three reasons: first, both scented candles (even natural ones) and diffusers can be overpowering for small rooms or for people who are sensitive to scents. Secondly, these are so quick and easy to make! No melting wax, and no waiting for candles to harden. These gel air fresheners only take about 10 minutes from start to finish. Thirdly, you can add different scents to each jar if you like, which you can’t do with candles. As a bonus, the jars are small, so you can tuck them on a windowsill or bookshelf instead of wondering how to get your ultrasonic diffuser to complement your country cottage decor! (You can even add natural dried flowers and spices to the jars so they look more like potpourri than random jars of someone’s forgotten punch.)
Have I convinced you yet? All it takes is a few ingredients, a glass jar or two, and about ten minutes of your time. What better project for a chilly afternoon? These make great gifts, by the way!
If you’re new to essential oils, keep reading. Otherwise, you can skip this next section and go straight to the instructions!
What are essential oils?
Essential oils are concentrated plant essences; thus, they don’t contain harmful chemicals. You can get citrus oils by squeezing a strip of lemon or orange rind. The oils has a much stronger scent and flavor than the juice of these fruits. Essential oils are the compounds that give a particular fruit, flower, or leaf its signature smell. Most essential oils must be steam distilled, as it’s not practical to squeeze leaves and bark for their oils.
If you do a quick web search for essential oils, you will find that there is a broad range of prices, even for the exact same oil. Why is that? The essential oil industry is not regulated, so there are impostors out there: some companies take synthetic scents, or synthetic mixed with natural, and market them as pure essential oils.
How do you find good quality essential oils?
Price is your first clue. Synthetic oils often have much lower prices than true essential oils. Check the company’s website for further information. If you can’t find information about where they source their oils or purity testing standards, that is a red flag. The best companies publish third party GC/MS testing for each batch of each essential oil they sell. This transparency is important if you’re looking for pure essential oils. Even if a company uses mostly essential oils, with a little synthetic mixed in to reduce costs, this can spell bad news for you as a consumer: skin reactions, headaches, and nausea are common reactions to synthetic “essential oils.”
Four companies that I know and trust are Rocky Mountain Oils, Eden’s Garden, Mountain Rose Herbs, and NOW Essential Oils.
Are Essential Oils Safe?
Yes, if they are used properly. Essential oils should never be ingested unless under a physician’s supervision, or applied undiluted to the skin. When making your own scented products with essential oils, you should follow a recipe so that the oils are diluted sufficiently. Too much essential oil (too strong of a concentration) can result in side effects like nausea, headache, or skin rashes.
Additionally, certain essential oils should not be used if you are pregnant or nursing, like cinnamon and birch oils. Some should not be used around children under two years old. If you have a baby in the house, you should avoid using diffusers or scented skin products around the baby until he or she is older. Always read the safety precautions for each essential oil, and if you buy blends, make sure you read the list of ingredients!
Method
The first step in making gel air fresheners is to boil water, then add the salt and gelatin.
Bring one cup of water to a boil in a small saucepan. Stir in two tablespoons of unflavored gelatin and one tablespoon of salt until they are completely dissolved. Remove the pan from the heat and let cool for 5 minutes.
Pour the gelatin mixture into your jar or jars. If there are clumps of gelatin in the pot, you may wish to strain the liquid as you pour.
Add your chosen essential oils to each jar (20 drops total for this recipe), as well as a few drops of natural food coloring if desired. Stir gently.
You will need 20 drops of essential oils for this recipe. For example, I used two 6-oz jars, so I needed 10 drops of essential oil per jar. I added 4 drops of Cardamom, 3 drops of Ginger, 2 drops of Allspice, and 1 drop of Nutmeg essential oil to one jar. I added 7 drops of Cozy Cabin blend and 3 drops of Blood Orange essential oil to the other jar. You can use just one essential oil for the whole recipe if you prefer, or mix and match like I did.
Set the jars in the refrigerator to cool until set.
That’s it! You can decorate the jars with dried flowers, spices like cinnamon chips or star anise, or pretty shells. Tie a ribbon around it for a homey touch. Set the jars around your house and enjoy!
Tip: you can add a few more drops of essential oil to the gel air fresheners as the scent fades over time. These air fresheners will last up to three weeks. If you are giving them as gifts or don’t want to use them all right away, put a lid on the jars. This will keep the scent contained for a longer period.
How is your grocery budget doing lately? Straining at the seams? Mine has been growing inexplicably every month–and I don’t think it can all be ascribed to the kids eating more! After staring, dismayed, at last month’s figures, something definitely needed to change.
So, I decided to revisit my old grocery shopping tips and price book. Scratch that: those prices are outdated and just depressing when I compare them to the current tags in the grocery store. It was time to make a new price book. The way I shop for groceries has changed over the years, depending on where we are living, number of mouths to feed, budget, etc. I needed the new price book to reflect that, so I made a spreadsheet with room to compare prices from several different kinds of retailers.
In a typical month, I will buy groceries at a traditional grocery store, a bulk foods store or wholesale supplier, a natural foods co-op, and sometimes an online retailer or specialty shop.
The Secret to Finding the Best Deals on Groceries
Why would anyone want to make grocery shopping so complicated, you ask? I think of it as a kind of game, searching to find the best prices on grocery staples to fit my family and my budget. However, it’s hard to play this game without a good price reference. You may think, “Oh look: peanut butter is on sale. It’s a great deal!”
But is it really? To know the answer to that question, you would have to compare the sale price of peanut butter at store A to the regular and/or sale prices of peanut butter at stores B, C, and D.
To do that, you need a price book.
What is a price book?
A price book is a notebook or spreadsheet in which you log the prices of items you typically buy. Use one row or line for each item, and make sure there is space to write prices from several different stores. Bring it along with you to the grocery store and note down the prices of apples, milk, peanut butter, or whatever you typically buy. Or copy prices off your receipt once you get home. (This is a much easier option if your shopping trip involves young children!)
Next time you head to a different store, take your price book along again. It will give you a reference for prices at the other stores, so you won’t have to stand in front of the peanut butter display wondering whether this sale is actually worth it. And you won’t have to try to keep hundreds of grocery prices stored in your brain! Your price book will absolutely save you money, because you can quickly and easily compare prices across brands and stores.
Of course, comparing prices is even more difficult when comparing containers of different size. You may remember that a good price on natural peanut butter is $6.99 at Safeway. But if you shop at a different store, the brand might be different, and the container size might vary as well.
How do you compare the prices of a quart jar of peanut butter to a gallon pail? The key lies in comparing unit prices.
What are unit prices?
Unit prices are those little numbers on the corners of the price tags in the store, which tell you the item’s price per unit of measurement. Items are typically measured in pounds, ounces, and fluid ounces, though other units of measurement may be used. For example, if a quart jar of peanut butter (32 oz) costs $6.99, then the unit price will be 6.99/32= $0.22 per ounce.
Unit prices are useful when you are comparing across different brands and sizes of containers. They can help you determine whether or not the larger size container is actually a better deal. IT ISN’T ALWAYS! A smaller container of store brand peanut butter may actually be less expensive than a larger container of brand name peanut butter. Check those unit prices!
How do you compare the unit prices for two items if they use different units of measurement?
This is where it gets tricky. Thank goodness for smart phones with calculators! You could also bring a calculator with you to the store, or else make a note of the price and size of container, and add it to your price book at home.
Here’s what to do: if the unit price for a 32-oz. jar of peanut butter is $0.22 per ounce, and the unit price of a 9-lb. pail of peanut butter is $4.75 per pound, don’t panic! Remember, 16 ounces = 1 pound, so just convert the unit price of the pail of peanut butter to ounces: 4.75/16= $0.30 per ounce. Now you can see that the pail of peanut butter, while a larger size, is actually more expensive per ounce of peanut butter than the 32-ounce jar.
Here’s a quick tip for faster shopping excursions when you don’t have a calculator:
A general rule when comparing one particular item across brands, in similar size containers, is that items measured in a larger unit will be less expensive. For example, if one brand of canned tomatoes is $1.19 per pound, and another brand is $0.14 per ounce, the can measured in ounces is probably more expensive than the can measured in pounds.
Remember, this rule only holds when comparing items in similarly sized packages. In the peanut butter example above, the large pail of peanut butter turned out to be more expensive than the smaller jar.
How do price books help you save money?
You already know how price books help you compare unit prices across brands and stores, to help you determine which jar of peanut butter or tomatoes is the best deal. But is there anything else price books can tell you?
Yes! Price books can help you compare items which are not identical, but are used in similar ways. How many different ways can you buy green beans, for instance? Fresh, frozen, canned, and even pickled if you’re lucky. Now, you can use those beans in most of the same recipes (except the pickles, of course!) But do you always think about comparing the price of fresh vs. frozen beans? Your price book can show you right away what the difference is.
Another example is fats and oils used for cooking. Have you ever compared the prices of olive oil and coconut oil, for instance? What about butter? Price books make it easy to see at a glance which one is less expensive per pound or fluid ounce. Maybe you could adapt your recipes to use more of the cooking fat which is least expensive.
Price books can also help you spot a good sale a mile away! Once you get used to checking unit prices and learn which products are the best deal, you won’t be so quick to jump at a sale on the fancy Italian brand of canned tomatoes. However, you will notice right away when the summer produce prices drop below the cost of canned and frozen produce.
Price books can show you where you are spending your money, when it comes to brand names or organic items. Lately, I have been trying to balance buying some organic products when the prices are similar to non-organic, or if it is an item I think is more important to be free from pesticides. If you go the extra step of comparing organic and non-organic items in your price book, it can give you that much more information about your grocery expenditures. In a lean month, you might decide to opt for non-organic products instead of vaguely assuring yourself that it doesn’t make much of a difference to your budget.
Of course I’m not saying you always need to choose the least expensive option for every item you buy! The point of a price book is to give you information, not force your choice. An informed choice is the best one.
Price Books and Sales
Price books are useful for comparing unit prices for the same or similar items across brands and stores, but are they really any use when it comes to sales?
Actually, price books are your best friend when it comes to shopping sales. This is what you need to do to get the most out of sales:
Note down SALE PRICE, SALE DATE, and HOW OFTEN the item goes on sale. You can do this on a separate page of your price book if you want, or on the bottom of the page for each item.
This will allow you to not only buy items when they are on a great sale, but also stock up enough to last you through to the next sale (presuming the item is shelf stable, or you are able to preserve it). For example, condiments like ketchup and mustard typically go on sale before Memorial Day, July 4th, and sometimes Labor Day (in the United States). You won’t likely find them on sale before Thanksgiving, however; so make sure you buy enough during the summer sales to last you until next summer.
Fresh produce goes on sale in the summer, or when the produce is ripe on farms closest to you. Frozen fruits and vegetables often go on sale in the spring or early summer, as stores are trying to clear out last year’s stock to make room for the next batch.
How to Make Your Own Price Book
Enough about the whys, here’s the how to:
There are two different ways to make a price book: you can make a physical book using a notebook and pen, or you can make a spreadsheet on the computer and either print it off or just keep an electronic log of prices.
Making a Physical Price Book
To make a physical price book, you will need some kind of notebook. I like smallish spiral-bound notebooks with a lot of pages! Use a separate page for each item. We will use eggs as an example. On the first line, write the name of the store where you found the item: “Safeway.” Then write the unit price: “$2.60/dozen.” Next to the unit price, write the cost of the package: “$12.99/5 dozen.” Skip a line underneath, so you can write in sale prices. Go to the next line and write the name of another store where you can buy eggs: “Costco.” Continue with the unit prices and package price as above.
Is this starting to sound like a lot of work? Don’t overwhelm yourself by trying to write down prices on every single item you buy all at once. I save my receipts and enter prices over the course of several weeks, whenever I have a few spare minutes. This project does take a while to complete, but it is well worthwhile in reducing grocery expenditures over the long term.
TIP
Does your grocery store have an app or website? Use this to check prices and enter them in your price book before you shop!
The one downside to a physical notebook is that you can’t add pages later. Whether you organize your price book alphabetically or by category (produce, meat & fish, etc.) there is always a chance you might miss an item. I suggest making a list of all the items you want to include in your price book on a separate sheet of paper and looking it over a few times before copying the items into your price book. You can always write in more entries at the end of the notebook, if all else fails.
Making a Digital Price Book
The second option is to make a spreadsheet on your computer. If you would like to go this route, I’ve already done most of the work for you! You can grab a copy of my Grocery Price Book Template, print it off, and simply write in the names of the stores you shop at and the prices of the items.
I tried to make my template thorough, but it does reflect the items I buy, and your list will most likely be different. I included several blank lines in each category for you to write in items not found on my list.
If you prefer to keep your spreadsheet in a digital format, or if my list is widely different than yours, I am happy to share my Grocery Price Book Digital Template with you. You will need to access Google Docs to open the document. Please SAVE A COPY to your own Google Drive before you edit anything! Otherwise you will be editing the master copy for everyone.
Get A Free Grocery Price Book Template
Click the button below the image to download a PDF of my blank Grocery Price Book Template.
How to decrystallize honey the right way: do this, not that!
If you’ve ever bought honey in bulk, you know that it gets very thick and crystallized after a while. Usually this takes several months, but honey can thicken up extra quickly in the wintertime (or if your house is chilly). Honey still tastes just fine in this state, but it can be difficult to measure–and it sure doesn’t drizzle nicely over a hot biscuit!
The question is, how do you get your honey from this thick, crystallized, nearly solid mass into the runny, pourable liquid it once was?
The process is pretty straightforward, but there are one or two things you should know to avoid:
First, do not try to heat honey by any method when it is stored in a plastic container. The plastic will soften and leach chemicals into your honey!
Do not microwave honey, especially raw honey. Microwaves heat food unevenly, and parts of the honey are likely to get too hot and scorch in the microwave, which destroys nutrients and flavor.
Do not boil honey. Again, this destroys nutrients, especially in raw honey. Antioxidants and enzymes in honey are destroyed at temperatures higher than 110 degrees F.
Keeping these in mind, let’s look at the best ways to reliquefy honey.
The Best Way to Decrystallize Honey
According to Asheville Bee Charmer, the correct way to decrystallize raw honey is by low, constant, indirect heat. They suggest heating a pot of water to 95-110 degrees F, setting a glass jar of crystallized honey in a large bowl, and pouring the hot water into the bowl, to a depth higher than the level of the honey but lower than the top of the honey jar. Let the honey jar sit in the warm water for as long as it takes to reliquefy, stirring occasionally. This might take about an hour.
The Quick Way to Decrystallize Honey
Another acceptable way to reliquefy your honey is to bring a small pot of water to a simmer, remove it from the heat, and set your honey jar directly into the pot. The water in the pot will be higher than 110 degrees at first, but the honey itself is unlikely to reach that temperature before the water cools. Stirring occasionally helps the honey to melt evenly, and decreases the risk of any particular part of the honey getting too hot.
The Easiest Way to Decrystallize Honey
If you’re trying to cook supper and don’t have time (or space on your stovetop) to heat a pot of water, there is another way to get your honey runny. Simply set your honey jar (not a plastic jar, remember!) near a hot burner. The burner provides enough indirect heat to reliquefy honey.
If you decide to use this method, BE CAREFUL! Do NOT set a jar of honey directly onto a hot stove! You could shatter the jar and cause a fire. Remember, you want indirect heat to warm your honey. Also, since you are not controlling the temperature of the hot air around the honey jar, it is important to stir your honey frequently–and use a hot pad or oven mitt to pick up the jar. It might get hot quicker than you think it will!
A Few More Tips
You might be wondering if there is a way to prevent honey from crystallizing in the first place. The answer: not really, unless you buy it in small quantities and use it up within a few months. All honey will eventually crystallize, but you will find that some types stay runny for longer periods. This is because honey is composed of glucose, fructose, enzymes, antioxidants, and pollen: and the concentration of each varies based on where the honey comes from and the type of flowers used.
Still, you can keep your honey nice and runny for a longer period if you store it in a warm place. It shouldn’t be kept hot, but if you tend to store honey in a cool cellar, it will crystallize faster. If you buy honey in bulk, try keeping a small jar of honey in a cabinet or shelf near your oven, and the rest in a pantry or cellar.
Finally, you don’t want to heat honey over and over again, as this depletes flavor and possibly nutrients. Rather than trying to reliquefy your twelve-pound bucket of honey all at once, it’s better to scoop some into a pint or quart jar, and heat that instead. Not only will you save time heating a smaller amount of honey, but there is less risk of the honey crystallizing again before you use it all up!
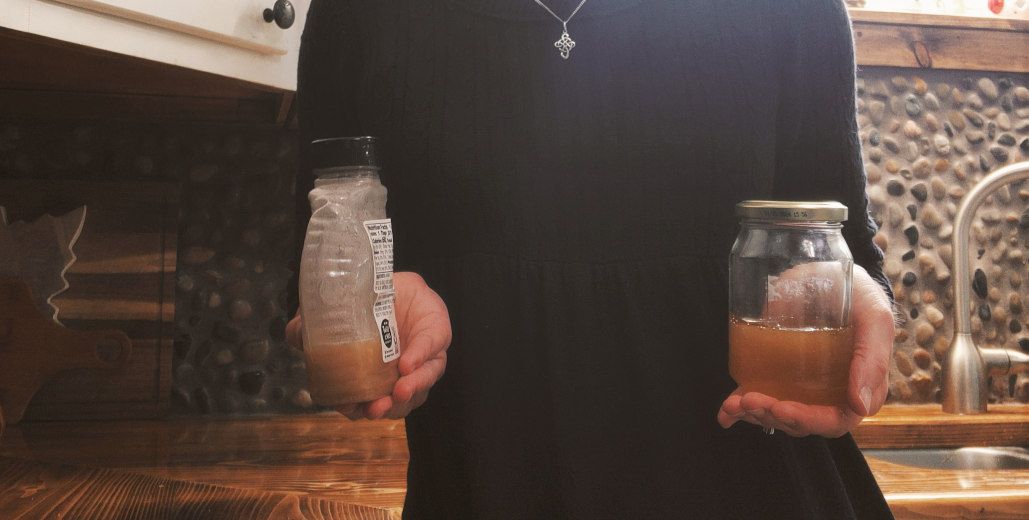
There you have it: three methods to decrystallize your honey. I hope you find them helpful! Remember to never, ever heat honey in plastic! Always transfer it to a glass or heat-proof ceramic jar before heating. Even leaving a plastic jar of honey too close to the stove can result in damaged, melted plastic (as happened to my poor jar of honey in the photo). It might sound like a long process to melt your honey with warm water or indirect heat, but this is the best and safest way to restore honey to its original form without destroying enzymes and antioxidants.
Is your life not exactly what you envisioned when you began this homemaking endeavor? Did you begin with enthusiasm, only to lose your zest after a time? Have you fallen into some bad habits which hinder your efforts rather than helping them?
Maybe it’s time to review your habits of homemaking, and form some new good habits to replace those which really aren’t useful. Think of it as a ‘spring cleaning’ for your homemaking routine!
The perfect time for a reset
This time of year always gets to me. Early spring, when the weather is fickle, can be frustrating. Perhaps it reminds me of my own nature: one moment sunny and smiling, but the next grumpy and overcast because of some small mishap that I allowed to cloud my day. Whatever the cause, I feel restless and unsatisfied with myself this time of year. I can see all too clearly the bad habits that have crept in during the long winter, and I wish I could just jerk myself up and out of them.
But, of course, new habits are not formed in a day, and old ones are hard to break, so I usually just continue in my habitual ruts.
I also find myself comparing my own situation in life to others, and finding my own lot rather less exciting or inspiring or lovely than I would wish.
Now we all know that we shouldn’t compare ourselves to others, but it might be worthwhile to remember the ideals we once had, and compare those to our current lives. Not to make ourselves miserable, but to give us fresh inspiration to begin again and work toward our goals. Of course, we might find that some of our old ideals no longer apply to our current lives; and that’s fine. If you find that is the case for you, it is the perfect time to take stock of where you are in life and where you hope to be. Even if your old goals still apply, perhaps you will decide to add a few new ones based on changes in yourself or your life.
Remembering why you began
Each of us must choose her own goals, but here are two examples:
Perhaps you began homemaking as a starry-eyed newlywed, excited to learn all the domestic arts, all at once! By and by, frustrated by many failed attempts at new skills and the extra demands of a baby or two, you find yourself going the rounds of your daily life with half-hearted efforts and mediocre results. You are no longer on fire with passion for motherhood or homemaking, and you don’t like the life you are leading or the person you are becoming.
Or maybe your life was your career for many years, and transitioning to a homemaker’s role wasn’t all sunbeams and roses. Perhaps you have caught yourself wishing for your old job, where people actually listened to you and took you seriously. You probably had some pretty idea of what a homemaker’s life would be like, but now you feel disillusioned and somewhat cheated.
If you can identify with any of these illustrations, I encourage you to find some quiet time and think seriously about what you want in life, what is best for you and your family, and how to get there.
Discerning what needs to change
When you experience a feeling of restlessness or frustration, it is natural to desire to change something in order to relieve that stress and feel happy again. But what exactly needs to change? The answer will vary for each of us; there is no one-size-fits-all solution here.
How do we discern what we need to change? In order to move from a vague feeling of frustration to a diagnosis of the particular problem and an action plan to improve it, we need to ask ourselves some serious questions.
This should go without saying, but when you do ask these questions, be completely honest in your answers. This isn’t a test, and it isn’t about what looks good to others. It’s about finding which areas in your life need improvement, and honesty is essential, even if it is painful to think about your own failings.
Here are some discernment questions to get you started:
Am I at peace in life? If not, is the unrest in my relationship with God, with myself, or with other people?
Spiritual
The problem might be spiritual if you think you have no time to pray, or if you merely go through the motions of your habitual prayers and devotions, or if you find yourself wondering whether any of this “religious stuff” really matters anyway. If this description fits you, consider blocking out half an hour every day to read Scripture, pray, or just dwell in the present moment with a spirit of gratitude. Quality time is the key to developing any relationship, and this is no exception.
Personal
Are you at peace with yourself? You might not be if you are frustrated by bad habits cropping up such as sleeping in, wasting time on media (social or not), leaving the house messy, feeling sorry for yourself, or half-hearted efforts at doing your duty. These types of faults are what may be called character flaws: laziness, lack of attention, and selfishness or self-centeredness can crop up under many different guises. Fixing them usually requires cultivating the opposite virtue: diligence, attention, and charity or love would be the opposite virtues for the examples above.
Relational
Finally, the problem might lie in your relationships with others if you find yourself gossiping, arguing or yelling at family members frequently, or comparing yourself to others and wishing for what someone else has. All of these habits may be mended by making a firm effort to see every person we meet as an amazing and unrepeatable creation, worthy of our respect and love. C.S. Lewis wrote in one of his most famous essays:
There are no ordinary people. You have never talked to a mere mortal. Nations, cultures, arts, civilizations–these are mortal, and their life is to ours as the life of a gnat. But it is immortals we joke with, marry, snub, and exploit–immortal horrors or everlasting splendors. This does not mean we are to be perpetually solemn. We must play. But our merriment must be of that kind (and it is, in fact, the merriest kind) which exists between people who have, from the outset, taken each other seriously–no flippancy, no superiority, no presumption. And our charity must be a real and costly love, with deep feeling for the sins in spite of which we love the sinner–no mere tolerance, or indulgence which parodies love as flippancy parodies merriment.
The Weight of Glory, C.S. Lewis
This passage is worth thinking over slowly, as it exposes as fallacies several ideas that our society takes for granted. These days, tolerance is touted as the greatest virtue, while human dignity is trampled underfoot. Lewis turns the picture right side up and shows us the relation between persons and civilizations from an eternal perspective. Have we also slipped into habits of thinking and acting as if they were true?
The will and habit
The remedy for any of these faults lies in your will. However, it is not enough to decide that you will never act this way again. Once a habit is formed, whether it is a bad one or good, it leaves a track in the brain. Just as it is easier to follow a path through a field or wood than to cut cross-country, so it is easier for your brain to run in the tracks laid down by habit.
Don’t be surprised if very soon after you make a decision to stop a bad habit, you slip into it again without thinking. This is the nature of habit, of course. It is like an “autopilot” setting on your brain which lets you carry out many actions, and even thoughts and feelings, without thinking.
Obviously this can be very helpful in the case of good habits, but it makes bad habits that much harder to break. For in order to break a bad habit, you will have to be very watchful. You will have to think about what you are doing more than you normally do, so that you can stop yourself from slipping into the bad habit unintentionally.
How can this be done? One way is to think of a good habit to replace the contrary bad habit you are trying to erase. Next, think of the situations where you are likely to slip into the bad habit. Then make a plan for what to do in those situations instead of the thing you normally do, which you are now trying to avoid.
An Illustration
Consider the example of a mother who is trying to stop wasting so much time on her phone. She knows that after a stressful day, when the kids are finally asleep, she often pulls out her phone to relax, and before she knows it, an hour or two has slipped by.
To prevent this from happening in the future, she needs to make a plan for when this situation presents itself. She sets out a book and some bath salts next to the chair where she usually relaxes with her phone so that when she collapses into the chair, tired out at the end of the day, she will see these items and remember to go take a bath and read instead of mindlessly scrolling her feed.
Formation of Habits
Numerous studies have established that habits take about two weeks of constant repetition to form, and months to solidify. Habits which are practiced for years without interruption become very hard to break indeed.
After the first few weeks, you will notice that much less effort of mind is required to follow the habit, although you do still have to be vigilant that you do not slip back into the previous habit, which will not be fully erased yet. This is one of the most dangerous points in the formation of a new habit, according to Charlotte Mason. She writes that the critical moment comes when a newly-formed habit has been practiced successfully perhaps twenty times in succession. She uses the example of a boy learning to shut the door after himself:
Some day Johnny is so taken up with some new delight that the habit, not yet fully formed, loses its hold, and he is half-way downstairs before he thinks of the door. Then he does think of it, with a little prick of conscience, strong enough, not to send him back, but to make him pause a moment to see if his mother will call him back. She has noticed the omission, and is saying to herself, ‘Oh, poor little fellow, he has been very good about it this long time; I’ll let him off this once.’ He, outside, fails to hear his mother’s call, says to himself–fatal sentence!–‘Oh, it doesn’t matter,’ and trots off.
Next time he leaves the door open, but it is not a ‘forget.’ His mother calls him back, in a rather feeble way. His quick ear catches the weakness of her tone, and, without coming back, he cries, ‘Oh, mother, I’m in such a hurry,’ and she says no more, but lets him off. Again he rushes in, leaving the door wide open. ‘Johnny!’–in a warning voice. ‘I’m going out again in just a minute, mother,’ and after ten minutes’ rummaging he does go out, and forgets to shut the door. The mother’s mis-timed easiness has lost for her every foot of the ground she has gained.
Home Education, Charlotte Mason
In this example, the mother was acting as the little boy’s conscience, in order to help his weak child’s will form a good habit. The same kind of dialogue takes place inside our own minds when we are tempted to abandon a young habit. “Oh, just this once won’t hurt.” “I’ve been so good lately, I deserve a break.” “I’m in too much of a hurry today.”
Will it really be a big deal to break your habit once? Perhaps not if it is fully formed; but in the first stages, such a lapse can render all your previous effort bootless.
Steps to form a habit
Whether you need to change something in your relationship with God, yourself, or other people, habits can help you turn your thoughts and change your actions. Here is how to start:
Examine your life and determine which actions or thought patterns you would like to change.
Write them down on one side of a piece of paper.
Opposite each bad habit, write down a good habit which will replace it. If you have a long list, choose just one or two habits to work on at first.
Make a plan by thinking of the situations which trigger the bad habits. Plan how you can intervene in those situations to prevent the bad habit from taking over.
Give yourself a time frame. Pick a date about two weeks away and make a note on your calendar to review your progress in forming a new habit.
Consider asking a friend to be your accountability partner, and check up on your progress. This is especially helpful if you are trying to correct a fault like gossiping, which is more of a problem in a group setting.
Try to be perfectly consistent in practicing your new habit. Do not consciously allow yourself to return to the bad habit, even in times of stress. If it should happen accidentally, though, don’t berate yourself unduly. Just resolve firmly to begin again. It may help to keep a record for the first few weeks of how many times you have succeeded in keeping the new habit, and how many times you reverted to the old habit.
I will end with Charlotte Mason’s encouragement to mothers who are overwhelmed by the number of habits they think they need to cultivate in their children. She reminds them to focus on one habit at a time, and remember that “the formation of habit itself becomes habit;” that is, once you have trained yourself or your child in a new habit, the process of forming a habit gets easier. It is easier to form the second habit than the first, simply because you have more practice in forming habits. Even if we find a long list of areas we need to improve, let’s flex our habit-forming muscles and dive in!
Hi, I’m Kimberly! I’m an Alaskan wife and mother who loves simple, old-fashioned living. If you’re looking for country-style recipes from scratch or simple homemaking ideas, pour yourself a cup of tea and join me!


 Hi, I’m Kimberly! I’m an Alaskan wife and mother who loves simple, old-fashioned living. If you’re looking for country-style recipes from scratch or simple homemaking ideas, pour yourself a cup of tea and join me!