Natural cleaning products are easy to make, safe to use, and inexpensive. If you’ve never made your own natural cleaner, this recipe for citrus and sage cleaner is a great place to start! This vinegar-based cleaner is gentle, yet effective. I like it best for wiping down kitchen surfaces and cleaning windows.
White vinegar is a natural disinfectant, so it can be used for cleaning everything from windows to kitchens to bathrooms. Vinegar cuts through grease and grime very effectively. It’s also much more economical than name-brand cleaners from the store. Plus, ingesting vinegar doesn’t usually make you very sick, so it’s safer than those harsh cleaners to keep around your house when you have small children!
Why make your own citrus and herb-infused cleaner when you can just use vinegar? Well, citrus-scented vinegar smells a whole lot better than plain, in my opinion! Also, the citrus peels contain limonene, an antibacterial and antiviral compound. Many different herbs contain other microorganism-fighting compounds, which help make your cleaning solution more effective.
Some great choices for antibacterial and antiviral herbs to use are: sage, oregano, cloves, lavender, eucalyptus, and rosemary. You can use fresh or dried herbs for this cleaner recipe. However, do try to use whole herb leaves (or sprigs, if the leaves are very small). Crushed dried herbs are difficult to strain out of the cleaner when it’s done infusing. Whole leaves are much easier to pick out!
I like sage because it has antibacterial, antifungal, and antiviral properties. Plus, it’s a pretty plant and easy to grow in my herb garden! Even the scent of sage can have positive effects in your home: it is said to be mentally stimulating and reduce anxiety. The oils found in citrus peels (ex: limonene) have similar properties, so they work well together as cleaning agents and creating a positive atmosphere!
You will need:
glass pint jar with lid
about 1-1/2 cups of citrus peels, loosely packed
1/2 cup fresh or dried sage leaves, if desired
2 cups white or apple cider vinegar
Method
Citrus peels and dried sage leaves. I used two large lemons to make one pint of cleaner.
First, wash your fruits and rinse thoroughly. Peel the fruits and save the juice for another use. You may use only one kind of citrus peel, or a variety if you like. I have used grapefruit, lemon, and clementine peels to make this cleaner. They all smell wonderful!
If you are using large citrus fruits like grapefruit, you will probably only need one grapefruit to make a pint of cleaner. However, if you choose to use lemons or limes, you will need several of them to fill your pint jar with peels.
If you don’t have enough citrus peels at one time, you may store them in a zip-top bag or small air-tight container in the refrigerator for a day or two, until you have enough to mostly fill a pint jar.
You can layer the citrus peels and sage leaves for a prettier appearance. This also helps keep the leaves submerged in the vinegar.
Place the citrus peels in the pint jar. The jar should be more than half full, but not overflowing. Add the sage leaves, or other herbs if desired. Again, the jar should not be full to the brim. Pour vinegar over the peels and herbs until they are completely covered. Screw a lid on the jar tightly.
Set the jar in a cool, dark place for about two weeks. Shake the jar every few days (if you remember!). You may let the peels and herbs infuse for 10 days to 3 weeks.
When the cleaner is ready, strain the solid peels and herb leaves out and discard. Measure the liquid and add a roughly equal amount of water. You can use the cleaner in a spray bottle, or merely keep it in the jar and dampen a clean rag with the mixture when you need it.
Store the cleaning solution tightly covered, away from direct sunlight and out of reach of small hands.
Enjoy using this natural, homemade citrus cleaner in your home! The fresh citrus and herb scent is surely much nicer than harsh chemicals!
For more cleaning solutions and household hints, check out these vintage cleaning tips!
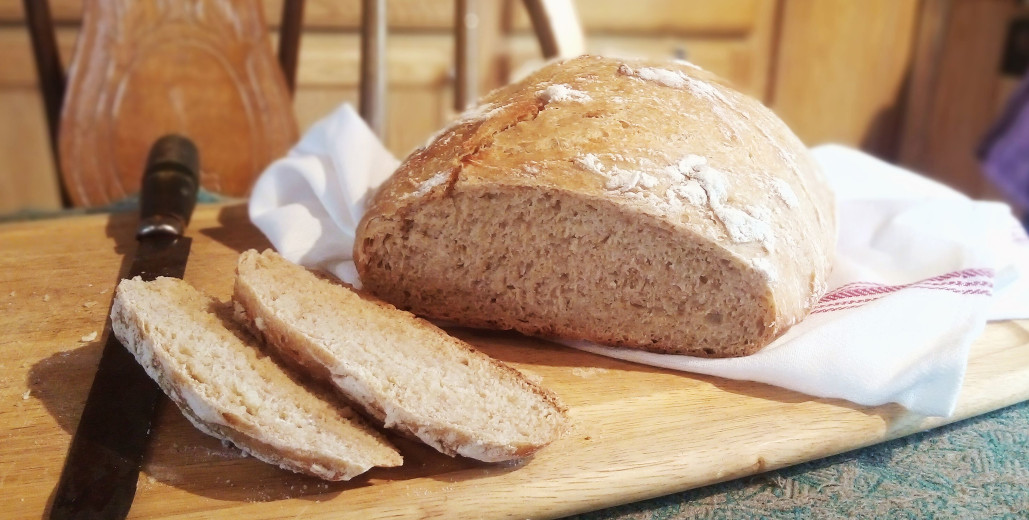
Sourdough bread baking doesn’t have to be finicky! Just seven minutes of hands-on time in the evening is all you need to make the dough, then let it do all the work of rising while you sleep. Shape and bake in the morning, and you have a delicious, fuss-free loaf of bread with minimal effort!
Working with sourdough can be intimidating, especially when you’re new to it. First, you have to worry about how much to feed your starter and how often. Then how do you know when it’s ready to bake with? How many bubbles signify the active state? And those rising times. If you don’t plan your day right, you might just wind up baking bread in the middle of the night, because it wasn’t ready earlier!
This sourdough bread recipe is a fuss-free alternative to traditional recipes that require lots of kneading and checking on the dough. With just 7 minutes of hands-on time to mix up the dough in the evening, the bread does all the work of rising while you sleep. Then all you need to do in the morning is shape the loaf and let it rise again while your oven heats! Nothing beats that for a simple bread recipe.
Starting out with Sourdough
There’s definitely a learning curve when it comes to sourdough baking. That’s why most cookbooks recommend you start out with something simple, like pancakes. I would agree that that’s a good place to start, and I highly recommend Sourdough A to Z from the Traditional Cooking School if you’re new to sourdough baking. It comes in either an e-course or e-book format, along with a printed manual of techniques and recipes.
Unlike other sourdough cookbooks, which often tell you there is only one right way to make sourdough work, this manual looks at several different “sourdough routines” of different home bakers. Some of them use their sourdough nearly every day, while others only use it once a week or so. I tend to use my sourdough starter once per week on average, but sometimes it’s nice to keep it out on the counter and use it every other day.
Another good resource is the blog, An Oregon Cottage. Jami has a thorough beginner’s guide to working with sourdough.
Types of Sourdough Bread Recipes
Knowing how to “read” your sourdough starter is the key to flexibility in sourdough baking. Again, this comes with practice. It’s wise to expect a failed attempt or two when you’re learning. My first loaf of sourdough bread looked like a brick, and was nearly as dense! I had followed the recipe exactly. I gave that loaf hours and hours of rising time. But my kitchen must not have been warm enough, or humid enough, or something else went wrong.
When you end up with a failure, it’s tempting to just give up. Take a break if you’re frustrated, but don’t assume you’ll never succeed!
If you’re having trouble with classic sourdough bread recipes which call for lots of kneading, rising, shaping, and rising again, try this recipe instead. It’s an artisan-style recipe, which calls for very little kneading and one long period of rising while you sleep, with an additional shorter period of rising while the oven is heating.
Artisan Bread vs. Traditional Bread Recipes
What are the benefits to making artisan-style breads?
First, you don’t have to know how much about kneading. As long as you mix all the ingredients thoroughly, your bread should turn out just fine. Kneading for a minute or two can help, but it’s not essential.
Secondly, times are approximate. You can let the bread rise for 8 hours or 12 hours, or even longer if you accidentally forget about it!
Thirdly, forget about a perfectly smooth, evenly shaped loaf. This bread is dusted with flour before baking, which naturally gives it a rustic, somewhat uneven appearance. That’s all part of the charm of artisan breads!
Finally, the ingredients are flexible. This recipe is very forgiving. You can leave out the honey entirely, or double it if your family likes a sweeter bread. You can use whole wheat flour, white whole wheat, or regular all-purpose or bread flour. I generally use a combination of whole wheat and all-purpose, so that’s what I listed in the recipe.
The most important thing to remember about baking with sourdough is that you need to wait until your starter is nice and bubbly before making anything that needs to rise a lot (like bread). As a general rule of thumb, allow about 4 hours between feeding the starter and making your dough. If your kitchen is warm and the starter was sitting out already, it might not need this much time. But if your starter was stored in the refrigerator, or if you haven’t used it in a while, or your kitchen is not very warm, it may take a full 4 hours or more to reach the active state.
NOTE:
If your starter takes longer than 4 hours to double and become bubbly, it might be too new to use for bread baking. Keep feeding it and using it for other “flat” recipes like pancakes or crackers. Once your starter can reach the active state in about 4 hours, it is strong enough to raise bread dough.
Recipe Notes
This recipe is a combination of my favorite artisan bread recipe using regular yeast, and a sourdough artisan bread recipe that was a little too finicky for my taste. The result is a chewy loaf with a crispy crust that’s not too tough.
It smells amazing fresh from the oven, but try to let it cool completely before cutting, as warm bread is more crumbly and delicate. (However, I know from experience that it is possible to slice this bread 5 minutes after it came out of the oven!)
How sour is it? The sourness varies loaf by loaf depending on your starter and rising conditions, but in general, it’s a pretty mild flavor.
This recipe uses a very simple method, but I did include detailed instructions in case you have never attempted sourdough bread. If the following instructions look too complicated, remember that really all you need to do is: mix, rise, shape, and bake!
Method
If you plan to let your sourdough rise overnight, feed your starter by mid-afternoon, so it has time to reach the active state before bedtime! Make sure you will have enough starter for this recipe, plus some extra to save and feed again.
You will need a medium sized glass or ceramic mixing bowl. Stir your active, bubbly sourdough starter gently. It will fall a bit, so don’t measure before you stir!
Measure the starter and pour it into the mixing bowl. Add the lukewarm water, honey, salt, and flour. Stir all the ingredients together with a wooden spoon until it is too stiff to stir.
At this point, flour your hands and fold the dough over itself a few times to make sure everything is well mixed. You can do this right in the bowl; you don’t have to actually knead the dough. It should feel a bit moist and sticky. Sourdough bread will “soak up” more of the water as it sits.
Cover the mixing bowl with a tea towel and place it in a warm, draft-free area. Let the dough sit for 8-12 hours. Overnight works great!
In the morning, cut a square of parchment paper larger than the bottom of your Dutch oven. Flour your hands generously, and dust the top of the dough with flour as well. Carefully pull the dough away from the edges of the bowl. Do not punch the dough down, like you would a regular yeast bread. Shape it gently into a ball by folding the edges underneath.
Dust the ball of dough with flour and place it on the parchment paper. You may slash the top of the loaf with a sharp knife a few times if you like. Let the loaf rise for 45 minutes in a warm, draft-free spot. If you’re in a hurry, you can shorten this second rise to 30 minutes, but the texture might suffer and the loaf might be flatter.
Adjust your oven racks to make room for the Dutch oven. (This is easier to do before your oven is hot!) Place the Dutch oven (without the lid) in the oven while you preheat it to 450 degrees F.
When the loaf is done rising and the oven is hot, carefully remove the Dutch oven and set it in a safe place. Transfer the sourdough loaf to the Dutch oven by holding the corners of the parchment paper and setting the loaf in carefully. Replace the lid on the Dutch oven, and return it to the hot oven.
Bake for 15 minutes, then remove the lid and continue to bake for another 15 minutes, until the crust is lightly browned and the bread smells done. Cool the bread on a wire rack before slicing.
Sourdough bread doesn't have to be finicky! Mix up the dough and let it rise overnight, then shape and bake the bread in the morning. No kneading or constant checking on the dough required!
Prep Time7 minutesmins
Cook Time30 minutesmins
Rising8 hourshrs
Total Time8 hourshrs37 minutesmins
Course: Breads
Keyword: Bread, Sourdough
Servings: 1loaf
Author: kimberly
Ingredients
3/4cupactive sourdough starter
1-1/4cupslukewarm water
1-1/2tbsphoney
1-1/2tspsalt
1cupwhole wheat flour
2cupsall-purpose or bread flour
Instructions
In a medium glass or ceramic mixing bowl, combine the sourdough starter, water, honey, salt, and flour. Mix well with a wooden spoon.
When the dough is too stiff to stir, flour your hands and fold the dough over on top of itself a few times, to ensure that all the ingredients are mixed.
Cover the bowl of dough with a tea towel and set it in a warm, draft-free location for 8-12 hours or overnight.
In the morning, cut a square of parchment paper larger than the bottom of your Dutch oven. Generously flour your hands and the top of the dough. Carefully remove the dough from the bowl and shape it into a ball. Dust the ball of dough with flour and place it on the parchment paper. Let rise for 45 minutes.
Set your Dutch oven on the bottom rack of your oven and preheat the oven to 450 degrees F. Transfer the risen loaf to the hot Dutch oven and replace the lid. Bake for 15 minutes, then remove the lid and continue to bake for another 15 minutes, until the crust is lightly browned and the bread smells done.
Carefully remove the bread from the Dutch oven and cool completely on a wire rack before slicing.
Is homemaking a privation or a privilege? Explore the dignity, authority, and creativity of the homemaker’s vocation.
It’s no secret that homemaking gets a bad rap these days. Even among women who have consciously chosen homemaking and embraced it as a vocation and way of life, there are still plenty of days when it’s hard to remember why exactly we wanted this!
Sure, homemaking has its challenges and frustrations. Everything that’s really worth doing is challenging. That’s how we grow as human persons: by meeting new challenges and finding ways to overcome them. But instead of always focusing on the negatives, did you ever stop to think about homemaking as a privilege?
Homemaking: privation or privilege?
At first glance, it seems silly to refer to homemaking as a privilege. After all, you don’t need to achieve a certain level of wealth or education to become one. You don’t need a high social status–in fact, becoming a homemaker usually lowers your social status! You don’t need to be particularly smart, or strong, or beautiful to qualify for this position. All you need is a husband who supports you.
Why then should we consider homemaking a privilege?
It’s not because, as some might insinuate, homemakers get to sit around and eat bonbons all day while their husbands do all the work. That idea is entirely unfounded. Most homemakers throughout history have not had the luxury of hired cooks and housekeepers, unless they were quite wealthy.
No, most homemakers do their share of work; laziness is not more common among these women than the rest of the population.
Homemaking is a privilege because it makes the woman the queen of her household. It gives her authority over countless decisions that must be made on a daily basis. Further, it provides opportunities for creativity as well as nurturing and caring for others. It allows her to use her womanly gifts and talents directly for the good of her family. In other words, homemaking allows women to express their femininity through their vocations.
The Dignity of the Homemaker’s Role
A century ago, women’s rights advocates saw professional jobs and salaries as desirable privileges, and they fought long and hard to make these available to women as well as men. Perhaps the right question to ask is: why did they see secretaries as more privileged than homemakers?
One common argument was that working outside the home gave women more dignity. If the job in question was a professional one, such as a physician or a college professor, I can understand that there is an inherent dignity in those positions. But I hardly think that working in a factory or as a secretary carries the same dignity.
Indeed, it seems that in abdicating their role in the home for many if not most jobs, women lost dignity. They went from being in charge of the daily life of their households to jobs that barely required them to think for themselves, let alone make decisions and be responsible for other people.
The role of the homemaker carries with it a special womanly dignity. It makes the wife the queen of her little kingdom, her home. It gives her responsibility to care for her family: feeding them, clothing them, keeping the house neat and clean, and making their home a haven. Homemaking allows the husband to exercise chivalry by working to provide for his wife and family. It shows the children how mothers and fathers can maintain a strong and healthy relationship by their mutually supportive roles.
When traditional roles are abandoned
When husband and wife both work outside the home, their roles lose definition and become interchangeable. Man and woman are both performing the role of breadwinner, which can lead to competition in their relationship rather than teamwork.
Meanwhile, who is left to take care of the home and the children? Sometimes the duties are split evenly, but more often, the wife must try to juggle most of the cooking, housekeeping, and raising children along with her career.
This situation is not ideal, for anyone involved. The husband suffers, because home is chaotic instead of restful. The wife suffers, because she is too busy and overextended to do her job well. Most of all, the children suffer. They are passed along from daycare to the school system and after-school activities, summer camps and sports leagues. They are raised by everyone except their parents, who are just not home.
Even loving parents who truly want the best for their kids often don’t see the value of homemaking. They think that, in order to give their children the best life possible, they should both work so that they have more money, and can buy their kids more toys and clothes and college educations.
The Authority of a Homemaker
Another argument of women’s rights advocates was that women had no authority in the home. No doubt, there are some husbands who micromanage their wives and homes, but these are surely the exception rather than the norm. Most husbands would be glad to leave much of the household affairs in the competent hands of their wives. All of the homemakers whom I have had the privilege of knowing appear quite satisfied with the authority they exercise.
How does a homemaker exercise authority, you may ask. In what does it consist?
Part of the homemaker’s role as “queen of the household” involves her authority over all the daily events of her family, both planned and unplanned. As mistress of the house, she is the highest authority while her husband is not present. She oversees projects and repairs within and without the house. She is in charge of household management, and delegates tasks to appropriate helpers. She answers questions and solves problems when they arise. She keeps home life running smoothly.
Authority of a working woman
Compare this to the role of a woman who works outside the home. When she is hired by a company, she becomes a part of its hierarchy. She may be responsible for others, or not. She is certainly held accountable to her supervisor, or manager, or the owner of the company. Even if she rises to the top of the corporate ladder, there are boards of trustees or professional bodies that function as checks and balances to her power.
A married woman in charge of her household enjoys, ideally, equally shared authority with her husband. They work together as co-founders of their household and family. But practically speaking, homemakers make more decisions about the home and family life, simply because they are always present. They are, in a sense, the life or the heart of the home.
Creativity as an Expression of Homemaking
Homemakers are the heart of the home. Their very mission is to breathe life and love into a physical dwelling, to turn an empty house or apartment into a home.
We have all been in houses that don’t really feel lived in. They feel stuffy and forced, almost as if they aren’t real. And they’re not: not real homes, that is. They are houses that are still waiting to be transformed into homes.
When you enter a true home, it feels like an extension of the family who lives there. I’m not talking merely about the expense of the furnishings or the style of the decor. Homes are an expression of a family’s values, their ideals, and their interests.
Women are nearly always responsible for creating this feeling of home. They are naturally equipped for nurturing others, and creating cozy, welcoming spaces for their families and guests. Of course working women can use their creative talents in their homes, and many do, but homemakers have a definite advantage: they spend most of their time at home, so they have more time and opportunities for domestic creativity.
Again, you don’t have to be wealthy to exercise this creativity. Even families living in trailers or rustic cabins lacking modern amenities can find ways to make their homes prettier and more comfortable. How? That’s the beauty of creative expression. Love and creativity always find ways to improve a situation, especially when it’s less than ideal.
Receptive Creativity
Gertrud von le Fort said that creativity is linked to receptivity. True creativity is always receptive to Divine inspiration. When people forget this quality and use creativity only to express what they find inside themselves, it breaks down into unintelligible chaos. (Think modern art.)
On the other hand, when the artist is receptive as well as expressive, his or her creations reflect truth and beauty. They are unique, as each human person is unique; and yet, they follow the Divine imprint that is present in the world. Masterpieces are beautiful because they conform to certain principles, and attempt to capture the truth and beauty of the subject.
Indeed, artists, perhaps more than anyone else, are attuned to the patterns and laws of nature and humanity. Their special gifts help them to uncover these Divine fingerprints and bring others to see them through art and music.
Women, who are naturally more receptive than men, have an easier time with this aspect of creativity. Women are more ready to sit with others and try to understand them before deciding how to solve their problems. This is why so many women have a knack for artistic pursuits such as interior decorating, flower arranging, and so much more. It comes naturally to them to try to understand the room or the flowers they are working with, so that they can see how to arrange each item to its greatest advantage.
This vision through understanding is sometimes called intuition. Intuition is grasping something as a whole instead of breaking it down into parts. Again, it is universally agreed that women as a group are more intuitive than men. Intuition greatly aids creativity by this very receptivity to the essence of things.
The Value of Homemaking
Some people think that homemakers don’t contribute anything to society. After all, they’re not “producing” anything. Or are they? Homemakers contribute very materially to society by nurturing their families. Families are the building blocks of society, and strong families are what keeps each society flourishing and functioning smoothly. So it is more correct to say that homemakers are invaluable to any and every society. There can be no more important role in forming good citizens than that of a homemaker.
How do you reckon the value of a homemaker? Well, what is the value of a home? Look at those who grow up in broken homes, or no real homes at all. They are often angry, anxious, depressed, and confused. As young adults, they lack direction in life and social skills necessary for getting along well with others. They often make poor choices, and involve others in their dysfunction.
There are exceptions, thankfully. With grace and perseverance, anyone can break out of a dysfunctional routine. But isn’t it better to start out with a home and family that is loving, nurturing, and provides the best possible basis for the success of each person? Isn’t it better to build a society on a solid structure of normal, functioning families, rather than dysfunctional families and every-man-for-himself individualism?
The family is the building block of society. As more and more families start to crumble, the society they live in weakens. Homemakers are the defenders of the family, and therefore society. They build up their homes and neighborhoods through the bonds of love and solidarity.
Today, this work is too often passed over as unnecessary, uninteresting, and unfulfilling. It is no less important because it is unpopular, however. In fact, the more unpopular homemaking becomes, the more important it is to the fate of families and societies alike.
Authentic Femininity and Homemaking
Women who seek authentic femininity embrace being women. They are not trying to be more like men. They accept the differences between men and women with equanimity, instead of constantly trying to erase all differences, good and bad.
These women see that they have different gifts and talents than men, and this is a good thing. It allows men and women to cooperate and work together in marriage, as well as in other relationships. Recognizing that women have different strengths and weaknesses than men allows them to maximize their potential to help each other.
The opposite view holds that women are unfairly subjugated to men in most if not all spheres of life, and that every effort should be made to eradicate these inequalities. In this view, oddly enough, only masculine strengths and virtues are esteemed.
The fact that men tend to possess more of these masculine virtues is said to be caused by the suppression of women’s rights, while feminine virtues and strengths are not even mentioned. This is a philosophy of inequality, and the goal of its proponents is to remove all differences or inequalities: to “level the playing field.”
Authentic femininity does not denigrate true feminine virtues and strengths. Rather, it embraces all of the feminine characteristics which are good, and seeks to help women attain happiness in their womanhood.
Homemaking is a deeply feminine calling. The art of making a home and nurturing a family resonates with the feminine heart. The homemaker who has embraced authentic femininity sees the four walls of her home, not as a confining prison, but as the boundaries of her own little kingdom, and a blank canvas for her creativity.
Further Reading
If you enjoyed this article, you may also enjoy:
The Eternal Woman, by Gertrud von le Fort (affiliate link; read my full disclosure here)
These peach-studded muffins are perfect for breakfast or tea. Not too sweet, they’re full of delicate fruit flavor – and they always disappear in a flash!
Who wouldn’t want to wake up to the smell of fresh peach muffins for breakfast? Peaches are the star of these bright, fruit-studded morsels. There’s just enough sugar to complement their sweetness, not overpower it. Sliced almonds add just the right amount of crunch and delicate flavor. This recipe relies on handy canned peaches, so you can enjoy these muffins even when the peaches are not in season!
Nothing speaks of summery sunshine and warmth like fresh, ripe fruit. While the growing season is a wonderful, busy time, it doesn’t last forever–especially here in Alaska! Canned fruit allows me to enjoy the flavors of summer even when the weather is rather less than warm.
I enjoy preserving the berries and fruits that grow here, but I’m also thankful for grocery stores that supply me with canned peaches and other fruits which shun this cold climate! Canned fruit is certainly not the same as fresh, and it can’t always be substituted with the same results. For example, canned peaches can’t match fresh ones for their heavenly aroma!
But canned fruit definitely has its place in the world of cookery. It works particularly well when baked into breads or desserts. These almond peach muffins are one of my favorite ways to use canned peaches. I hope you enjoy them, too!
Method
Preheat your oven to 400 degrees F. Butter a 12-cup muffin tin and set aside.
In a medium mixing bowl, whisk together the sour cream, vegetable oil, eggs, and almond extract. You may use any lightly-flavored oil: avocado, sunflower, canola, or regular vegetable oil. Even extra virgin olive oil will work.
In another bowl, sift together the flour, sugar, baking powder, and salt. Once the dry ingredients are well mixed, add them to the egg mixture and stir gently until just combined. Fold in the chopped peaches and sliced almonds.
Spoon the batter into the buttered muffin tin. Fill each muffin cup 3/4 full. Now, the size of muffin tins varies somewhat, so you may need a second tin. This recipe should make between 12-16 muffins, depending on the size of your tins and how full you fill them.
Bake for 18-20 minutes, or until the centers are set and the edges are golden. These muffins should dome nicely, if you don’t stir the batter too much or open the oven door while they are baking.
Cool the muffins in the tin for a few minutes before removing them to a wire rack. You may cool them completely on the rack, or serve warm.
Notes and Variations
I use canned peach halves or sliced peaches in this recipe for their availability and convenience. It doesn’t matter whether they are canned in juice or syrup, but do make sure you drain them first! I live in a place far from peach orchards, and it’s difficult to find good peaches even during the summer. However, if you do have access to good fresh peaches, and you are making these muffins when peaches are in season, by all means use fresh fruit! Frozen peaches will also work. If you decide to use fresh or frozen fruit, you will need one cup of chopped peaches.
If you do not want crunchy muffins, but still want the almond flavor, you may substitute 1/4 cup of ground or finely chopped almonds for the sliced almonds. Or leave them out altogether, if you prefer.
These muffins are slightly sweet, but nowhere near cupcake sweetness. If you prefer a sweeter muffin, sprinkle some additional sugar over the muffins just before baking. I like to use raw sugar, which is sometimes called turbinado sugar or evaporated cane juice. It has larger crystals, which look pretty on the muffins!
Even better, mix equal parts finely chopped almonds with raw sugar and sprinkle the mixture over the unbaked muffins. (You will need about one tablespoon of each.) This adds the perfect touch for tea parties!
These peach-studded muffins are perfect for breakfast or tea. Not too sweet, they're full of delicate fruit flavor – and they always disappear in a flash!
Prep Time15 minutesmins
Cook Time20 minutesmins
Total Time35 minutesmins
Course: Breads, Breakfast, Brunch, Teatime
Cuisine: American
Keyword: Bread, Brunch, Muffins, Peach, Tea Party
Servings: 12muffins
Author: kimberly
Ingredients
1/2cupsour cream
1/4cupvegetable oil
2eggs
1/2tspalmond extract
1-3/4cupall-purpose flourunbleached
1/2cupsugar
2tspbaking powder
1/2tspsalt
15oz.canned peachesdrained and chopped
1/3cupsliced almonds
Instructions
Preheat oven to 400 degrees F. Butter a 12-cup muffin tin and set aside.
In a medium mixing bowl, combine the sour cream, oil, eggs, and almond extract.
Sift together the flour, sugar, baking powder, and salt in another bowl. Add the flour mixture to the egg mixture and stir until just combined.
Fold in chopped peaches and almonds. Spoon batter into prepared muffin tin.
Bake muffins at 400 degrees F for 18-20 minutes, or until centers are set and edges are golden.
Cool muffins in tin for 5 minutes before removing to a wire rack to cool completely, or serve warm.
Notes
You may substitute 1 cup of fresh or frozen peaches for the canned peaches.
Hi, I’m Kimberly! I’m an Alaskan wife and mother who loves simple, old-fashioned living. If you’re looking for country-style recipes from scratch or simple homemaking ideas, pour yourself a cup of tea and join me!


 Hi, I’m Kimberly! I’m an Alaskan wife and mother who loves simple, old-fashioned living. If you’re looking for country-style recipes from scratch or simple homemaking ideas, pour yourself a cup of tea and join me!