Posted on Leave a comment

Pumpkin Chocolate Chip Muffins

There's a secret ingredient in these pumpkin chocolate chip muffins which makes them especially moist, and healthier too!
There’s a secret ingredient in these pumpkin chocolate chip muffins which makes them especially moist, and healthier too!

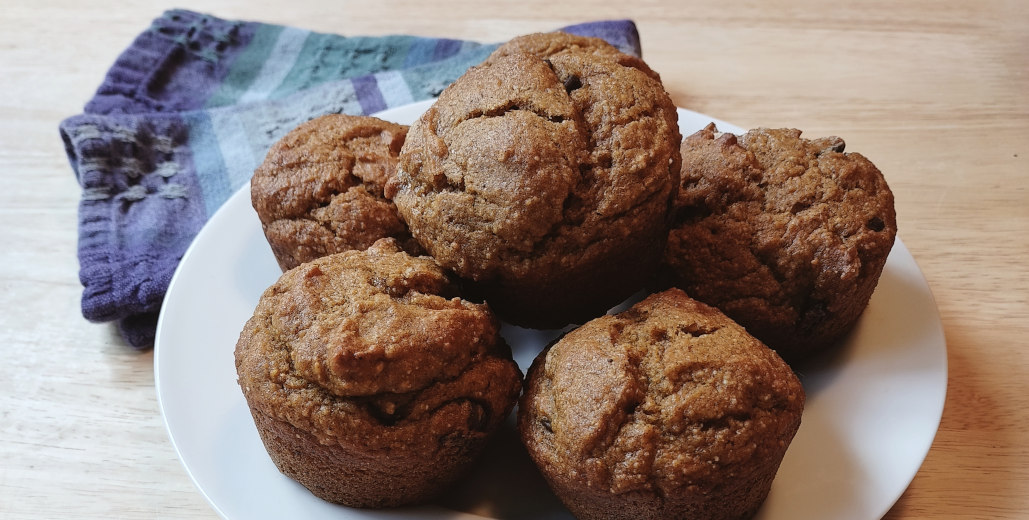
As soon as the weather turns cool and rainy, I start thinking about fall baking. I crave warm, comforting breads and baked goodies with plenty of spices and flavors of apples and pumpkin. These pumpkin chocolate chip muffins have been one of my go-to recipes for quite a few years. I can whip up a batch in about 5 minutes now, so you know I have made this recipe pretty often!

There are a couple of things which set this recipe apart from other pumpkin muffins. First, many pumpkin bread or muffin recipes call for quite a lot of vegetable oil. I don’t like to use heavily processed oils like that, so I usually substitute olive oil in recipes which call for vegetable oil. But nobody wants their pumpkin muffins to taste like olive oil! I solved that problem by using applesauce in place of the oil!

You do need some type of fat or oil, or the muffins won’t have the right texture. But I’ve found that a little bit of melted butter in addition to the applesauce works well. Thus, I get both apples and pumpkins in these muffins, though the apple flavor isn’t strong enough to taste.

Making a better muffin

Applesauce makes these muffins especially moist, without the residual greasiness you sometimes get with muffins that have lots of oil in them. So these pumpkin chocolate chip muffins are healthier and have a better texture! That’s a double win!

To increase the nutritional value of these muffins even further, use whole wheat flour for all or part of the flour this recipe calls for. I’ve written the recipe for using 1 cup of whole wheat flour and 2 cups of unbleached all-purpose flour, but you are welcome to use all whole wheat flour if you like. I recommend using a whole wheat pastry flour or white whole wheat flour in this recipe.

Method

Making pumpkin chocolate chip muffins

Preheat your oven to 400 degrees F. Butter your muffin tins, or line them with paper cupcake liners. Set aside.

In a large mixing bowl, combine the applesauce, pumpkin puree, eggs, melted butter, and sugar. Stir well to combine. In another bowl, sift the flour with the salt, baking powder, cinnamon, ginger, nutmeg, and cloves. Stir the flour mixture gently into the pumpkin mixture. When it is almost combined, stir in the chocolate chips until no streaks of flour remain.

Fill the muffin cups 3/4 full with batter. (If you are using large bakery-size muffin tins, fill them about 2/3 full.) Bake for 18-20 minutes, until the top of a muffin springs back when touched lightly. Cool in pans for 2 minutes, then remove to a wire rack to cool completely.

When the muffins are cool, store tightly covered at room temperature for up to 3 days.

Enjoy!

Note: This recipe makes more or fewer muffins, depending on what size of muffin tins you use. For example, the last time I baked these, I made 18 standard-size muffins and 6 large bakery-size muffins, for a total of 24 muffins. If you use all standard-size muffin tins, expect to make 30 muffins. If you use all large-size muffin tins, expect to make about 15.

There's a secret ingredient in these pumpkin chocolate chip muffins which makes them especially moist, and healthier too!

Pumpkin Chocolate Chip Muffins

Applesauce makes these muffins especially moist, without any residual greasiness from oil. That makes these muffins both healthier and the perfect texture!
Prep Time10 minutes
Cook Time20 minutes
Total Time30 minutes
Course: Breads, Breakfast
Cuisine: American
Keyword: Apple, Chocolate, Muffins, Pumpkin
Servings: 30 muffins
Author: kimberly

Ingredients

  • 15 ounces pumpkin puree
  • 1 cup applesauce unsweetened
  • 4 eggs
  • 1-1/4 cups sugar
  • 1/2 cup butter melted
  • 2 cups all-purpose flour unbleached
  • 1 cup whole wheat flour
  • 2 tsp baking soda
  • 2 tsp baking powder
  • 1 tsp salt
  • 1 tsp ground cinnamon
  • 1/2 tsp grated nutmeg
  • 1/2 tsp ground cloves
  • 1/2 tsp ground ginger
  • 1 cup chocolate chips

Instructions

  • Preheat your oven to 400 degrees F. Prepare your muffin tins with butter or paper cupcake liners.
  • In a large mixing bowl, beat the pumpkin, applesauce, eggs, sugar, and melted butter until smooth.
  • In another bowl, sift the flour with the baking soda, baking powder, salt, and spices. Add to the pumpkin mixture and stir until nearly combined. Stir in chocolate chips until no streaks of flour remain.
  • Spoon the batter into the prepared muffin tins. Bake for 18-20 minutes, or until the top of a muffin springs back when touched lightly. Cool in pan for 2 minutes before removing to a wire rack to cool completely.
There's a secret ingredient in these pumpkin chocolate chip muffins which makes them especially moist, and healthier too!

If you like these muffins, try some of these other fall recipes: Pumpkin Snickerdoodles or Apple Cinnamon Baked Oatmeal!

Posted on Leave a comment

Cranberry + White Chocolate Oatmeal Cookies

Tart cranberries and luscious white chocolate pair perfectly in these quick and easy cookies! They're sure to become your family's favorites.

Fresh cranberries in a cookie? Yes indeed! There’s something about these cookies that makes them an instant family favorite. In fact, they have become legendary in my family, thanks to my sister Bethany who loves to bake them.

While they are quite simple to make, the white chocolate and tangy cranberries make an unforgettable combination that will have you baking them again and again. And don’t expect these cookies to sit around in your cookie tin–once your family gets a sniff, they will be gone as soon as they’re cool enough to touch! (My husband admitted to consuming five cookies in one sitting the last time I made them!)

Method

Preheat your oven to 350 degrees F. You will need to bake these cookies in several batches, so it is helpful to have at least two baking sheets. Lightly butter the sheets and set them aside. While these are buttery drop cookies, the fresh berries tend to stick to the pans, so that’s why I recommend buttering them. Alternatively, you may line the baking sheets with parchment paper.

In a large mixing bowl, cream together the butter and brown sugar. Brown sugar makes these cookies soft, and lends a subtle depth of flavor. You may find it easier to use an electric mixer to make the dough, but if your butter is soft enough, a wooden spoon works just fine.

Add the eggs and vanilla extract, and stir well to combine.

In a medium-size mixing bowl, sift together the flour, oats, baking soda, and salt. Add them to the creamed mixture, and mix thoroughly. Fold in the white chocolate chips and cranberries.

Using Fresh Berries in Cookie Dough

For this recipe, I use lingonberries, or lowbush cranberries, as they are commonly called in Alaska. This is a smaller cousin of the cranberry, which tastes very similar. (They are more intensely tart, if you ask me.) These berries grow wild in Alaska, Canada, the Pacific Northwest, and parts of Northern Europe.

Lingonberries are ideal to use in this recipe because they are small and firm. If you cannot get lingonberries where you live, you may substitute regular (fresh) cranberries. Since those are bigger and tend to be less juicy, you may wish to chop them coarsely before adding them to the cookie dough.

When folding berries into cookie dough, you must work quickly and gently, or the berries will burst. Then you will have pink-streaked cookies and flat, chewy berries instead of whole, juicy ones. I like to use frozen berries, so they don’t burst or squish as easily. If you have trouble incorporating the berries into the cookie dough, err on the side of less mixing. You can always press stray berries into the top and sides of each cookie after you form them on your baking sheet.

Tart cranberries and luscious white chocolate pair perfectly in these quick and easy cookies! They're sure to become your family's favorites.

Baking the Cookies

Drop the dough by tablespoonfuls onto the buttered baking sheets, spacing them 2″ apart. Press any stray berries and white chocolate chips into the cookie dough. Bake for 8-10 minutes, until the edges of the cookies are lightly browned.

Let the baked cookies rest on the pans for 2 minutes, then remove them to a wire rack to cool completely. The cookies will be fragile at first, so letting them rest on the pans for a few minutes gives them a chance to firm up.

These cookies will keep in an airtight container at room temperature for up to a week. They also freeze well, and may be stored in the freezer for up to 3 months.

Enjoy!

Tart cranberries and luscious white chocolate pair perfectly in these quick and easy cookies! They're sure to become your family's favorites.

Cranberry + White Chocolate Oatmeal Cookies

Tart cranberries and luscious white chocolate pair perfectly in these easy drop cookies. They make a pretty addition to holiday cookie trays, but they are delicious all year long!
Prep Time15 minutes
Cook Time20 minutes
Total Time35 minutes
Course: Dessert
Cuisine: American
Keyword: Christmas, Cookies, Cranberry, Oatmeal, White Chocolate
Servings: 50 cookies
Author: kimberly

Ingredients

  • 3/4 cup butter softened
  • 1-1/2 cups brown sugar
  • 2 eggs
  • 1 tsp vanilla extract
  • 1-3/4 cups flour unbleached
  • 1-1/2 cups quick oats
  • 1 tsp baking soda
  • 1/4 tsp salt
  • 1 cup white chocolate chips
  • 1 cup lingonberries or cranberries fresh or frozen

Instructions

  • Preheat oven to 350 degrees F. Lightly butter two baking sheets and set aside.
  • In a large mixing bowl, cream together the butter and brown sugar. Add the eggs and vanilla, and mix well.
  • In another bowl, sift together the flour, oats, baking soda, and salt. Stir into creamed mixture until thoroughly combined. Dough will be stiff.
  • Fold in white chocolate and cranberries. Do not overmix, or the berries will burst and turn the dough pink.
  • Drop cookies by tablespoon onto buttered sheets. Bake for 8-10 minutes, or until the edges are lightly browned. Cool on sheets for 2 minutes, then remove to a wire rack to cool completely.
Posted on Leave a comment

Chocolate + Coconut Granola

This chocolate coconut granola combines heavenly flavors with just the right amount of sweetness for a breakfast treat that's sure to satisfy!
This chocolate coconut granola combines heavenly flavors with just the right amount of sweetness for a breakfast treat that’s sure to satisfy!

Chocolate for breakfast? Usually I’d be skeptical, but this granola packs a lot of protein, not too much sugar, and incredibly luscious flavor. Pair it with whole milk yogurt and some fresh cherries for a decadent yet healthy treat!

If your yogurt-and-granola routine is getting a little boring, try this twist on traditional granola recipes! Dark cocoa powder and ground cinnamon provide a welcome change of pace for this morning staple. Paired with oats, almonds, and coconut, the flavors really shine.

This isn’t one of those granola recipes that calls for 26 different ingredients and whatever fruit and nut combinations you happen to have on hand. Instead, the carefully matched flavors provide a nice balance of deep and rich cocoa with the classic almond + coconut combination.

Even better, you control the amount of sugar that goes into the mixture. If you’re like me and don’t prefer overly sweet breakfast foods, just decrease the honey or brown sugar a bit to get the level of sweetness you want.

This chocolate coconut granola combines heavenly flavors with just the right amount of sweetness for a breakfast treat that's sure to satisfy!
This delightfully different granola makes a great gift, too!

Method

Preheat your oven to 325 degrees F. Set aside one or two large, rimmed baking sheets. (If you only have one, you will need to stir the granola very carefully as it cooks! Two pans just makes it easier.)

In a large mixing bowl, combine the oats, almonds, coconut, and brown sugar. The recipe calls for rolled oats, but you can use quick oats in a pinch. It won’t affect the flavor or consistency of the finished granola.

Making your own brown sugar

For the brown sugar, I like to make my own. I only make as much as I will use in a few weeks. That way, you never have to worry about it getting hard or lumpy.

  • To make your own brown sugar, pour a cup or two of white sugar, turbinado sugar, or dehydrated cane sugar into a medium size bowl. Drizzle a tablespoon or so of molasses over the sugar, then work it into the sugar with your hands. I’ve tried using a spoon, but that never seems to really mix it thoroughly.
  • When all the sugar is the same color (with no white patches in the bottom of the bowl), you’re done! Add a little more molasses if you like a darker brown sugar. I have used both blackstrap molasses and table syrup (also known as light molasses or treacle) to make brown sugar. I prefer a dark brown sugar, so blackstrap molasses is usually my first choice.

After you’ve made your brown sugar and combined it with the dry ingredients, get another medium-size bowl or large liquid measuring cup to mix the wet ingredients. Melt the coconut oil, either in the microwave or on the stovetop, over low heat. Add the cocoa powder, honey, cinnamon, and salt. It might seem odd to add these to the liquid rather than the dry ingredients, but this step does seem to help spread the flavors out evenly through the granola.

Once everything is combined thoroughly, spread the granola mixture out on your baking sheets. Try to spread it as evenly as possible, without a mound in the middle. Bake the chocolate granola for 45 minutes to an hour, checking it every 15 minutes.

chocolate coconut granola on pan

When you check the granola, remove the pan from the oven and place it carefully on top of the stove or a heatproof surface. Stir through the mixture with a large wooden spoon, being careful not to spill any granola out of the pan. This is where splitting the mixture between two pans makes things easier! You want to stir from the outside of the pan in towards the center, because the edges will bake faster than the middle. Then spread granola from the center outwards, toward the edges.

This granola doesn’t get much darker in the oven, due to the already-dark color from the cocoa, so it can be hard to determine exactly when the granola is done. It’s best to watch the almonds and coconut carefully for a change in color. They start out white or nearly white, and they should turn light brown when the granola is finished. Smell is also a good indicator. When you start smelling toasted coconut and almonds, your granola is likely done!

Remember that the granola will continue to harden as it cools, so don’t worry if it seems a little soft when you take it out of the oven. The enticing aroma will likely draw everyone in the house, so good luck cooling it completely before everyone wants a taste!

This chocolate coconut granola may be stored in an airtight container at room temperature for several weeks, so don’t be afraid to double the recipe!

This chocolate coconut granola combines heavenly flavors with just the right amount of sweetness for a breakfast treat that's sure to satisfy!

Chocolate + Coconut Granola

Chocolate for breakfast? This granola combines lots of protein and flavor with just the right amount of sweetness for a healthy yet decadent treat!
Prep Time10 minutes
Cook Time1 hour
Total Time1 hour 10 minutes
Course: Breakfast
Cuisine: American
Keyword: Chocolate, Coconut, Granola
Servings: 6 cups
Author: kimberly

Ingredients

  • 3 cups rolled oats
  • 1 cup sliced almonds
  • 3/4 cup shredded coconut unsweetened
  • 1/3 cup dark brown sugar
  • 1/2 cup unsweetened cocoa powder
  • 1/3 cup honey
  • 1/3 cup coconut oil melted
  • 1-1/4 tsp cinnamon
  • 1/2 tsp salt

Instructions

  • Preheat your oven to 325 degrees Fahrenheit. In a large mixing bowl, combine the oats, almonds, coconut, and sugar.
  • In a separate bowl, mix the cocoa powder, honey, melted coconut oil, cinnamon, and salt. Combine the two mixtures and stir until the dry ingredients are thoroughly moistened.
  • Spread the granola mixture out on one or two large, flat baking sheets with raised edges. Bake the granola for 45-60 minutes, stirring every 15 minutes. The granola is done when it is dry and the almonds and coconut pieces are lightly browned.
  • Cool completely in the pan before transferring to a storage container. This granola will keep in an airtight container at room temperature for several weeks.

For more breakfast recipes, try Apple Streusel Cream Cheese Bread Pudding or Overnight Apple Cinnamon Baked Oatmeal!

Posted on 1 Comment

Sunny Apricot Iced Tea

This sweet and fruity apricot iced tea will put you in a summery state of mind at first sip!
This sweet and fruity, slightly fizzy apricot iced tea will put you in a summery state of mind at first sip!

What captures the sun-drenched essence of summer better than ripe apricots? This sunny apricot iced tea will transport you to lazy afternoons on the front porch swing with the first sip! Sweet and fruity, with a bit of fizz just for fun, this is one recipe you will find yourself making again and again this summer.

Iced tea is perfect for hot days when you need a cool, refreshing drink. Make it with strong black tea for a garden tea party, or use decaf or herbal tea for a drink the kids will love.

Method

This sweet and fruity apricot iced tea will put you in a summery state of mind at first sip! Just a few simple ingredients combine to make this one refreshing hot-weather beverage.
Just a few simple ingredients combine to make this one refreshing hot-weather beverage.

Make one quart of strong apricot-flavored black tea. I used 5 tea bags to one quart of boiling water. The tea I used was a Decaf Apricot Black Tea from The Republic of Tea. You can use regular black tea, but the flavor will not be as strong. If you desire a lighter, fruitier flavor, try an herbal blend instead of black tea: the Cinnamon Apricot Tisane from Monterey Bay Spice Company would work very well here.

Do make sure you brew your tea double-strength if using an herbal blend, or even with black tea if you want a strong tea flavor. The juice and seltzer water will dilute the tea to about half-strength. I was making this recipe with kids in mind, so I was happy with the less intense tea flavor.

Chill the tea for at least one hour in the refrigerator. You may add some sugar while the tea is still warm if you prefer.

Prepare the apricots: drain one 15-ounce can of apricot halves and reserve the juice. Mash the apricots with a fork or a potato masher, or in a food processor. Canned apricots are pretty soft, so if you don’t have a food processor, don’t worry!

mashed apricots for iced tea
Mash the canned apricots with a fork or a potato masher. Alternatively, puree in a food processor.

When the tea is chilled, pour it into a 2-quart (or larger) pitcher or jar. Add the mashed apricots, reserved apricot juice or syrup, and two 12-ounce cans of peach or apricot-flavored seltzer water. Apricot-flavored seltzer water can be hard to find depending on where you live, but peach works just fine.

Stir well and taste for sweetness. Depending on whether your apricots were canned in juice, light syrup, or heavy syrup, you will need to add more or less sugar. I used apricots that were canned in extra light syrup, and I added 6 tablespoons of sugar to the final mixture. If you aren’t sure how much sugar you will need, try adding just one or two tablespoons at a time; stir; and taste again for sweetness. That way, you won’t end up accidentally adding too much!

Add 2-3 cups of ice cubes and serve immediately. Be sure to stir or shake before pouring the tea, or the apricot bits will all fall to the bottom of the pitcher.

If you are making this tea ahead, don’t add the seltzer water or ice until just before serving. You can mix the tea, mashed apricots, and apricot juice in a pitcher (with some sugar if desired) and store in the refrigerator for a day or two before serving.

After adding the seltzer water and ice, the tea is best drunk the same day. You can store any leftovers in the refrigerator, but you will lose the bubbles!

Sunny Apricot Iced Tea

Sun-drenched summery goodness in an icy glass… this iced tea will transport you to afternoons on the porch swing at the first sip!
Prep Time5 minutes
Chilling1 hour
Total Time1 hour 5 minutes
Course: Drinks
Cuisine: American
Keyword: Apricot, Iced Tea
Servings: 2 quarts
Author: kimberly

Ingredients

  • 1 quart strong brewed apricot-flavored black tea
  • 15 ounces canned apricots in juice or syrup undrained
  • 2 12-oz. cans apricot or peach-flavored seltzer water
  • sugar to taste
  • 2-3 cups ice cubes

Instructions

  • Brew the apricot-flavored black tea double-strength and chill in the refrigerator at least one hour.
  • Drain the canned apricots and reserve juice. Mash the apricots in a small bowl with a fork or potato masher, or puree in a food processor.
  • In a 2-quart pitcher, combine the chilled tea, mashed apricots, apricot juice, and seltzer water. Stir well and taste for sweetness. Add sugar to taste, 1-2 tablespoons at a time.
  • Stir in 2-3 cups of ice cubes and serve immediately.
This sweet and fruity apricot iced tea will put you in a summery state of mind at first sip! Just a few simple ingredients combine to make this one refreshing hot-weather beverage.

If you enjoyed this recipe, you might also like my Butterscotch Creme Iced Tea!