Posted on Leave a comment

Chocolate + Coconut Granola

This chocolate coconut granola combines heavenly flavors with just the right amount of sweetness for a breakfast treat that's sure to satisfy!
This chocolate coconut granola combines heavenly flavors with just the right amount of sweetness for a breakfast treat that’s sure to satisfy!

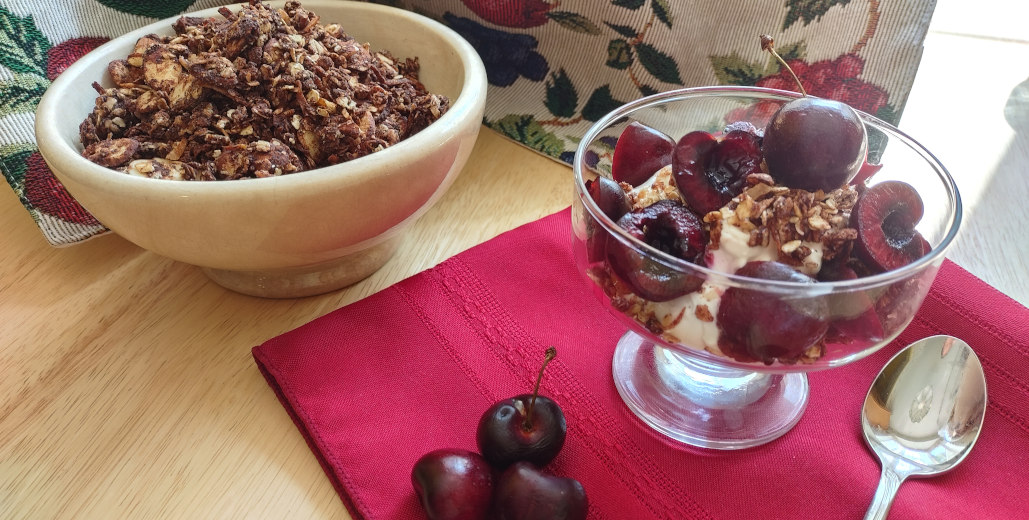
Chocolate for breakfast? Usually I’d be skeptical, but this granola packs a lot of protein, not too much sugar, and incredibly luscious flavor. Pair it with whole milk yogurt and some fresh cherries for a decadent yet healthy treat!

If your yogurt-and-granola routine is getting a little boring, try this twist on traditional granola recipes! Dark cocoa powder and ground cinnamon provide a welcome change of pace for this morning staple. Paired with oats, almonds, and coconut, the flavors really shine.

This isn’t one of those granola recipes that calls for 26 different ingredients and whatever fruit and nut combinations you happen to have on hand. Instead, the carefully matched flavors provide a nice balance of deep and rich cocoa with the classic almond + coconut combination.

Even better, you control the amount of sugar that goes into the mixture. If you’re like me and don’t prefer overly sweet breakfast foods, just decrease the honey or brown sugar a bit to get the level of sweetness you want.

This chocolate coconut granola combines heavenly flavors with just the right amount of sweetness for a breakfast treat that's sure to satisfy!
This delightfully different granola makes a great gift, too!

Method

Preheat your oven to 325 degrees F. Set aside one or two large, rimmed baking sheets. (If you only have one, you will need to stir the granola very carefully as it cooks! Two pans just makes it easier.)

In a large mixing bowl, combine the oats, almonds, coconut, and brown sugar. The recipe calls for rolled oats, but you can use quick oats in a pinch. It won’t affect the flavor or consistency of the finished granola.

Making your own brown sugar

For the brown sugar, I like to make my own. I only make as much as I will use in a few weeks. That way, you never have to worry about it getting hard or lumpy.

  • To make your own brown sugar, pour a cup or two of white sugar, turbinado sugar, or dehydrated cane sugar into a medium size bowl. Drizzle a tablespoon or so of molasses over the sugar, then work it into the sugar with your hands. I’ve tried using a spoon, but that never seems to really mix it thoroughly.
  • When all the sugar is the same color (with no white patches in the bottom of the bowl), you’re done! Add a little more molasses if you like a darker brown sugar. I have used both blackstrap molasses and table syrup (also known as light molasses or treacle) to make brown sugar. I prefer a dark brown sugar, so blackstrap molasses is usually my first choice.

After you’ve made your brown sugar and combined it with the dry ingredients, get another medium-size bowl or large liquid measuring cup to mix the wet ingredients. Melt the coconut oil, either in the microwave or on the stovetop, over low heat. Add the cocoa powder, honey, cinnamon, and salt. It might seem odd to add these to the liquid rather than the dry ingredients, but this step does seem to help spread the flavors out evenly through the granola.

Once everything is combined thoroughly, spread the granola mixture out on your baking sheets. Try to spread it as evenly as possible, without a mound in the middle. Bake the chocolate granola for 45 minutes to an hour, checking it every 15 minutes.

chocolate coconut granola on pan

When you check the granola, remove the pan from the oven and place it carefully on top of the stove or a heatproof surface. Stir through the mixture with a large wooden spoon, being careful not to spill any granola out of the pan. This is where splitting the mixture between two pans makes things easier! You want to stir from the outside of the pan in towards the center, because the edges will bake faster than the middle. Then spread granola from the center outwards, toward the edges.

This granola doesn’t get much darker in the oven, due to the already-dark color from the cocoa, so it can be hard to determine exactly when the granola is done. It’s best to watch the almonds and coconut carefully for a change in color. They start out white or nearly white, and they should turn light brown when the granola is finished. Smell is also a good indicator. When you start smelling toasted coconut and almonds, your granola is likely done!

Remember that the granola will continue to harden as it cools, so don’t worry if it seems a little soft when you take it out of the oven. The enticing aroma will likely draw everyone in the house, so good luck cooling it completely before everyone wants a taste!

This chocolate coconut granola may be stored in an airtight container at room temperature for several weeks, so don’t be afraid to double the recipe!

This chocolate coconut granola combines heavenly flavors with just the right amount of sweetness for a breakfast treat that's sure to satisfy!

Chocolate + Coconut Granola

Chocolate for breakfast? This granola combines lots of protein and flavor with just the right amount of sweetness for a healthy yet decadent treat!
Prep Time10 minutes
Cook Time1 hour
Total Time1 hour 10 minutes
Course: Breakfast
Cuisine: American
Keyword: Chocolate, Coconut, Granola
Servings: 6 cups
Author: kimberly

Ingredients

  • 3 cups rolled oats
  • 1 cup sliced almonds
  • 3/4 cup shredded coconut unsweetened
  • 1/3 cup dark brown sugar
  • 1/2 cup unsweetened cocoa powder
  • 1/3 cup honey
  • 1/3 cup coconut oil melted
  • 1-1/4 tsp cinnamon
  • 1/2 tsp salt

Instructions

  • Preheat your oven to 325 degrees Fahrenheit. In a large mixing bowl, combine the oats, almonds, coconut, and sugar.
  • In a separate bowl, mix the cocoa powder, honey, melted coconut oil, cinnamon, and salt. Combine the two mixtures and stir until the dry ingredients are thoroughly moistened.
  • Spread the granola mixture out on one or two large, flat baking sheets with raised edges. Bake the granola for 45-60 minutes, stirring every 15 minutes. The granola is done when it is dry and the almonds and coconut pieces are lightly browned.
  • Cool completely in the pan before transferring to a storage container. This granola will keep in an airtight container at room temperature for several weeks.

For more breakfast recipes, try Apple Streusel Cream Cheese Bread Pudding or Overnight Apple Cinnamon Baked Oatmeal!

Posted on Leave a comment

Sunny Apricot Iced Tea

This sweet and fruity apricot iced tea will put you in a summery state of mind at first sip!
This sweet and fruity, slightly fizzy apricot iced tea will put you in a summery state of mind at first sip!

What captures the sun-drenched essence of summer better than ripe apricots? This sunny apricot iced tea will transport you to lazy afternoons on the front porch swing with the first sip! Sweet and fruity, with a bit of fizz just for fun, this is one recipe you will find yourself making again and again this summer.

Iced tea is perfect for hot days when you need a cool, refreshing drink. Make it with strong black tea for a garden tea party, or use decaf or herbal tea for a drink the kids will love.

Method

This sweet and fruity apricot iced tea will put you in a summery state of mind at first sip! Just a few simple ingredients combine to make this one refreshing hot-weather beverage.
Just a few simple ingredients combine to make this one refreshing hot-weather beverage.

Make one quart of strong apricot-flavored black tea. I used 5 tea bags to one quart of boiling water. The tea I used was a Decaf Apricot Black Tea from The Republic of Tea. You can use regular black tea, but the flavor will not be as strong. If you desire a lighter, fruitier flavor, try an herbal blend instead of black tea: the Cinnamon Apricot Tisane from Monterey Bay Spice Company would work very well here.

Do make sure you brew your tea double-strength if using an herbal blend, or even with black tea if you want a strong tea flavor. The juice and seltzer water will dilute the tea to about half-strength. I was making this recipe with kids in mind, so I was happy with the less intense tea flavor.

Chill the tea for at least one hour in the refrigerator. You may add some sugar while the tea is still warm if you prefer.

Prepare the apricots: drain one 15-ounce can of apricot halves and reserve the juice. Mash the apricots with a fork or a potato masher, or in a food processor. Canned apricots are pretty soft, so if you don’t have a food processor, don’t worry!

mashed apricots for iced tea
Mash the canned apricots with a fork or a potato masher. Alternatively, puree in a food processor.

When the tea is chilled, pour it into a 2-quart (or larger) pitcher or jar. Add the mashed apricots, reserved apricot juice or syrup, and two 12-ounce cans of peach or apricot-flavored seltzer water. Apricot-flavored seltzer water can be hard to find depending on where you live, but peach works just fine.

Stir well and taste for sweetness. Depending on whether your apricots were canned in juice, light syrup, or heavy syrup, you will need to add more or less sugar. I used apricots that were canned in extra light syrup, and I added 6 tablespoons of sugar to the final mixture. If you aren’t sure how much sugar you will need, try adding just one or two tablespoons at a time; stir; and taste again for sweetness. That way, you won’t end up accidentally adding too much!

Add 2-3 cups of ice cubes and serve immediately. Be sure to stir or shake before pouring the tea, or the apricot bits will all fall to the bottom of the pitcher.

If you are making this tea ahead, don’t add the seltzer water or ice until just before serving. You can mix the tea, mashed apricots, and apricot juice in a pitcher (with some sugar if desired) and store in the refrigerator for a day or two before serving.

After adding the seltzer water and ice, the tea is best drunk the same day. You can store any leftovers in the refrigerator, but you will lose the bubbles!

Sunny Apricot Iced Tea

Sun-drenched summery goodness in an icy glass… this iced tea will transport you to afternoons on the porch swing at the first sip!
Prep Time5 minutes
Chilling1 hour
Total Time1 hour 5 minutes
Course: Drinks
Cuisine: American
Keyword: Apricot, Iced Tea
Servings: 2 quarts
Author: kimberly

Ingredients

  • 1 quart strong brewed apricot-flavored black tea
  • 15 ounces canned apricots in juice or syrup undrained
  • 2 12-oz. cans apricot or peach-flavored seltzer water
  • sugar to taste
  • 2-3 cups ice cubes

Instructions

  • Brew the apricot-flavored black tea double-strength and chill in the refrigerator at least one hour.
  • Drain the canned apricots and reserve juice. Mash the apricots in a small bowl with a fork or potato masher, or puree in a food processor.
  • In a 2-quart pitcher, combine the chilled tea, mashed apricots, apricot juice, and seltzer water. Stir well and taste for sweetness. Add sugar to taste, 1-2 tablespoons at a time.
  • Stir in 2-3 cups of ice cubes and serve immediately.
This sweet and fruity apricot iced tea will put you in a summery state of mind at first sip! Just a few simple ingredients combine to make this one refreshing hot-weather beverage.

If you enjoyed this recipe, you might also like my Butterscotch Creme Iced Tea!

Posted on 4 Comments

Apple Streusel & Cream Cheese French Toast Bake

The flavors of apple and cream cheese Danishes combined in an easy French toast bake give you delicious flavor with much less effort than pastry-making!

Fresh pastries are delightful, aren’t they? But they do take a fair amount of time and effort, so I don’t find myself making them often! However, the enticing flavors of apple and cream cheese Danishes can still be yours on busy mornings with this heavenly apple streusel French toast bake studded with nuggets of cream cheese!

The idea behind this recipe was twofold: first, I wanted a special dish that took thirty minutes or less in the morning, so I could bring it along to my mother’s house for brunch after church on Sunday mornings, without making hungry kids and husbands wait too long for their food. Second, I wanted something sweet but nutritious, tasty but not too decadent for breakfast.

The answer? A bread pudding (or French toast bake, if that’s what you like to call them) that bakes until not quite set in the evening, then gets popped back in the oven in the morning to add the finishing touches and crisp up the topping!

It relies on cinnamon and apples for natural sweetness, with a streusel topping for just the right amount of sugar on top. Cream cheese adds extra protein, while feeling decadent and making the dish look extra pretty.

Speaking of protein, bread puddings are definitely health foods, in my opinion! Start with homemade whole wheat bread, add eggs and milk to hold everything together, throw in some flavorful additions like cream cheese, fruit, and spices, and you have yourself a protein-packed breakfast!

Of course, the more sugar you add, the more it starts to taste like dessert… and you certainly could serve this as dessert, with a scoop of ice cream or a whisky cream sauce, perhaps. And for even more decadent Danish-inspired flavor, use day-old croissants instead of regular bread! That combination is pretty magical.

Whether you serve this bread pudding for breakfast or dessert, it will make a pretty addition to any special meal!

I modeled this apple French toast bake recipe loosely after my all-time favorite pumpkin cream cheese French toast bake from Dinner then Dessert. That one is definitely sweeter, but oh so delicious! It makes several appearances in my kitchen throughout September and October each year!

Method

First, preheat your oven to 350 degrees F. Butter the bottom and sides of a 13×9″ baking pan and set aside.

Prepare the apple filling: Peel and chop the apples. Melt butter in a skillet, then add the chopped apples and saute over medium-low heat for about ten minutes, until the apples are soft. Stir in the sugar and cinnamon.

Bread cubes for French toast bake

For the bread pudding: Cube a loaf of bread (you will need about 10 cups) and set aside. Cubes that are 1-inch to 1-1/2 inch in diameter work well. In a large mixing bowl, combine the eggs, milk, cream, vanilla extract, sugar, and cinnamon. Beat lightly to combine. Add the bread cubes and stir well, making sure all the cubes are moistened. Set aside while you make the streusel topping.

Aim for a crumbly texture when making the streusel topping. Don't mix too much!
Aim for a crumbly texture when making the streusel topping. Don’t mix too much!

For the streusel: Combine the flour, brown sugar, cinnamon, and nutmeg in a small bowl or food processor. Cut in the cold butter with a pastry blender, or pulse in food processor until the mixture is crumbly. Don’t process too long, or you will end up with a sticky paste!

Layer the apples and cream cheese chunks on top of the bread cubes in the pan.

To assemble the French toast bake: Layer half of the bread mixture, half of the apples, and half of the cream cheese chunks in the prepared pan. Repeat layers. Sprinkle the streusel topping over the apples and cream cheese.

Baking: Option 1

Bake the French toast bake for 40 minutes, until almost set. Remove from the oven and cool on a wire rack. Cover and chill overnight in the refrigerator.

In the morning, remove the pan from the refrigerator while you preheat the oven to 350 degrees F. Bake for 25 minutes, until the center is set and the topping is crisp.

Baking: Option 2

If you don’t need to chill the French toast bake overnight, go ahead and just bake it for a full 50-60 minutes, until the center is set and the topping is crisp.

Mmm, warm apples and cinnamon, paired with sweet streusel and cream cheese make one decadent brunch bake!

Enjoy!

Apple Streusel & Cream Cheese French Toast Bake

The flavors of apple and cream cheese Danishes in an easy breakfast casserole is simple to make, yet so satisfying! It's perfect for brunch or dessert.
Prep Time35 minutes
Cook Time40 minutes
Reheating25 minutes
Total Time1 hour 40 minutes
Course: Breakfast, Brunch, Dessert
Cuisine: American
Keyword: Apple, Bread Pudding, Brunch, Cinnamon, Cream Cheese
Servings: 16
Author: kimberly

Ingredients

  • 3 large, tart apples peeled and chopped
  • 1 tbsp butter
  • 3/4 tsp cinnamon
  • 2 tbsp sugar
  • 10 cups cubed day-old bread
  • 8 eggs
  • 2 cups milk
  • 2/3 cup heavy cream
  • 1 tbsp vanilla extract
  • 1/3 cup sugar
  • 1/2 tsp cinnamon
  • 8 ounces cream cheese cut into small pieces
  • 1/2 cup flour
  • 1/2 cup brown sugar
  • 3/4 tsp cinnamon
  • 1/4 tsp nutmeg
  • 1/2 cup cold butter cut into small pieces

Instructions

  • Preheat the oven to 350 degrees F. Butter a 13×9" pan and set aside.
  • Saute the apples in 1 tablespoon of butter for about 10 minutes, until they are soft. Stir in 3/4 teaspoon cinnamon and 2 tablespoons sugar.
  • In a large mixing bowl, combine the eggs, milk, cream, vanilla, sugar, and 1/2 teaspoon cinnamon. Add the bread cubes and stir well to combine.
  • In a small bowl or food processor, combine the flour, brown sugar, cinnamon, and nutmeg. Cut in butter with a pastry blender or pulse in food processor until crumbly.
  • To assemble the French toast bake: layer 1/2 of the bread mixture in the buttered pan, followed by 1/2 of the apple filling and 1/2 of the cream cheese chunks. Repeat layers. Top with streusel.
  • Bake for 45 minutes. Remove from oven and let cool on a wire rack. Chill in refrigerator overnight. In the morning, remove the pan from the refrigerator while preheating the oven to 350 degrees. Bake for another 25 minutes, until heated through.

Notes

Alternatively, if you do not need to chill the French toast bake overnight, you can just bake it for 50-60 minutes, until the topping is crisp and the center is set.
The flavors of apple and cream cheese Danishes combined in an easy French toast bake give you delicious flavor with much less effort than pastry-making!
Posted on Leave a comment

Seven Minute Sourdough Bread

Sourdough bread baking doesn't have to be finicky! Just seven minutes of hands-on time in the evening is all you need to make the dough, then let it do all the work of rising while you sleep. Shape and bake in the morning, and you have a delicious, fuss-free loaf of bread with minimal effort!
Sourdough bread baking doesn’t have to be finicky! Just seven minutes of hands-on time in the evening is all you need to make the dough, then let it do all the work of rising while you sleep. Shape and bake in the morning, and you have a delicious, fuss-free loaf of bread with minimal effort!

Working with sourdough can be intimidating, especially when you’re new to it. First, you have to worry about how much to feed your starter and how often. Then how do you know when it’s ready to bake with? How many bubbles signify the active state? And those rising times. If you don’t plan your day right, you might just wind up baking bread in the middle of the night, because it wasn’t ready earlier!

This sourdough bread recipe is a fuss-free alternative to traditional recipes that require lots of kneading and checking on the dough. With just 7 minutes of hands-on time to mix up the dough in the evening, the bread does all the work of rising while you sleep. Then all you need to do in the morning is shape the loaf and let it rise again while your oven heats! Nothing beats that for a simple bread recipe.

Starting out with Sourdough

There’s definitely a learning curve when it comes to sourdough baking. That’s why most cookbooks recommend you start out with something simple, like pancakes. I would agree that that’s a good place to start, and I highly recommend Sourdough A to Z from the Traditional Cooking School if you’re new to sourdough baking. It comes in either an e-course or e-book format, along with a printed manual of techniques and recipes.

Unlike other sourdough cookbooks, which often tell you there is only one right way to make sourdough work, this manual looks at several different “sourdough routines” of different home bakers. Some of them use their sourdough nearly every day, while others only use it once a week or so. I tend to use my sourdough starter once per week on average, but sometimes it’s nice to keep it out on the counter and use it every other day.

Another good resource is the blog, An Oregon Cottage. Jami has a thorough beginner’s guide to working with sourdough.

Types of Sourdough Bread Recipes

Knowing how to “read” your sourdough starter is the key to flexibility in sourdough baking. Again, this comes with practice. It’s wise to expect a failed attempt or two when you’re learning. My first loaf of sourdough bread looked like a brick, and was nearly as dense! I had followed the recipe exactly. I gave that loaf hours and hours of rising time. But my kitchen must not have been warm enough, or humid enough, or something else went wrong.

When you end up with a failure, it’s tempting to just give up. Take a break if you’re frustrated, but don’t assume you’ll never succeed!

If you’re having trouble with classic sourdough bread recipes which call for lots of kneading, rising, shaping, and rising again, try this recipe instead. It’s an artisan-style recipe, which calls for very little kneading and one long period of rising while you sleep, with an additional shorter period of rising while the oven is heating.

Artisan Bread vs. Traditional Bread Recipes

What are the benefits to making artisan-style breads?

  • First, you don’t have to know how much about kneading. As long as you mix all the ingredients thoroughly, your bread should turn out just fine. Kneading for a minute or two can help, but it’s not essential.
  • Secondly, times are approximate. You can let the bread rise for 8 hours or 12 hours, or even longer if you accidentally forget about it!
  • Thirdly, forget about a perfectly smooth, evenly shaped loaf. This bread is dusted with flour before baking, which naturally gives it a rustic, somewhat uneven appearance. That’s all part of the charm of artisan breads!
  • Finally, the ingredients are flexible. This recipe is very forgiving. You can leave out the honey entirely, or double it if your family likes a sweeter bread. You can use whole wheat flour, white whole wheat, or regular all-purpose or bread flour. I generally use a combination of whole wheat and all-purpose, so that’s what I listed in the recipe.

The most important thing to remember about baking with sourdough is that you need to wait until your starter is nice and bubbly before making anything that needs to rise a lot (like bread). As a general rule of thumb, allow about 4 hours between feeding the starter and making your dough. If your kitchen is warm and the starter was sitting out already, it might not need this much time. But if your starter was stored in the refrigerator, or if you haven’t used it in a while, or your kitchen is not very warm, it may take a full 4 hours or more to reach the active state.

NOTE:

If your starter takes longer than 4 hours to double and become bubbly, it might be too new to use for bread baking. Keep feeding it and using it for other “flat” recipes like pancakes or crackers. Once your starter can reach the active state in about 4 hours, it is strong enough to raise bread dough.

Sourdough bread baking doesn't have to be finicky! Just seven minutes of hands-on time in the evening is all you need to make the dough, then let it do all the work of rising while you sleep. Shape and bake in the morning, and you have a delicious, fuss-free loaf of bread with minimal effort!

Recipe Notes

This recipe is a combination of my favorite artisan bread recipe using regular yeast, and a sourdough artisan bread recipe that was a little too finicky for my taste. The result is a chewy loaf with a crispy crust that’s not too tough.

It smells amazing fresh from the oven, but try to let it cool completely before cutting, as warm bread is more crumbly and delicate. (However, I know from experience that it is possible to slice this bread 5 minutes after it came out of the oven!)

How sour is it? The sourness varies loaf by loaf depending on your starter and rising conditions, but in general, it’s a pretty mild flavor.

This recipe uses a very simple method, but I did include detailed instructions in case you have never attempted sourdough bread. If the following instructions look too complicated, remember that really all you need to do is: mix, rise, shape, and bake!

Method

If you plan to let your sourdough rise overnight, feed your starter by mid-afternoon, so it has time to reach the active state before bedtime! Make sure you will have enough starter for this recipe, plus some extra to save and feed again.

You will need a medium sized glass or ceramic mixing bowl. Stir your active, bubbly sourdough starter gently. It will fall a bit, so don’t measure before you stir!

Measure the starter and pour it into the mixing bowl. Add the lukewarm water, honey, salt, and flour. Stir all the ingredients together with a wooden spoon until it is too stiff to stir.

At this point, flour your hands and fold the dough over itself a few times to make sure everything is well mixed. You can do this right in the bowl; you don’t have to actually knead the dough. It should feel a bit moist and sticky. Sourdough bread will “soak up” more of the water as it sits.

Cover the mixing bowl with a tea towel and place it in a warm, draft-free area. Let the dough sit for 8-12 hours. Overnight works great!

In the morning, cut a square of parchment paper larger than the bottom of your Dutch oven. Flour your hands generously, and dust the top of the dough with flour as well. Carefully pull the dough away from the edges of the bowl. Do not punch the dough down, like you would a regular yeast bread. Shape it gently into a ball by folding the edges underneath.

Dust the ball of dough with flour and place it on the parchment paper. You may slash the top of the loaf with a sharp knife a few times if you like. Let the loaf rise for 45 minutes in a warm, draft-free spot. If you’re in a hurry, you can shorten this second rise to 30 minutes, but the texture might suffer and the loaf might be flatter.

Adjust your oven racks to make room for the Dutch oven. (This is easier to do before your oven is hot!) Place the Dutch oven (without the lid) in the oven while you preheat it to 450 degrees F.

When the loaf is done rising and the oven is hot, carefully remove the Dutch oven and set it in a safe place. Transfer the sourdough loaf to the Dutch oven by holding the corners of the parchment paper and setting the loaf in carefully. Replace the lid on the Dutch oven, and return it to the hot oven.

Bake for 15 minutes, then remove the lid and continue to bake for another 15 minutes, until the crust is lightly browned and the bread smells done. Cool the bread on a wire rack before slicing.

Enjoy!

~Kimberly

Seven Minute Sourdough Bread

Sourdough bread doesn't have to be finicky! Mix up the dough and let it rise overnight, then shape and bake the bread in the morning. No kneading or constant checking on the dough required!
Prep Time7 minutes
Cook Time30 minutes
Rising8 hours
Total Time8 hours 37 minutes
Course: Breads
Keyword: Bread, Sourdough
Servings: 1 loaf
Author: kimberly

Ingredients

  • 3/4 cup active sourdough starter
  • 1-1/4 cups lukewarm water
  • 1-1/2 tbsp honey
  • 1-1/2 tsp salt
  • 1 cup whole wheat flour
  • 2 cups all-purpose or bread flour

Instructions

  • In a medium glass or ceramic mixing bowl, combine the sourdough starter, water, honey, salt, and flour. Mix well with a wooden spoon.
  • When the dough is too stiff to stir, flour your hands and fold the dough over on top of itself a few times, to ensure that all the ingredients are mixed.
  • Cover the bowl of dough with a tea towel and set it in a warm, draft-free location for 8-12 hours or overnight.
  • In the morning, cut a square of parchment paper larger than the bottom of your Dutch oven. Generously flour your hands and the top of the dough. Carefully remove the dough from the bowl and shape it into a ball. Dust the ball of dough with flour and place it on the parchment paper. Let rise for 45 minutes.
  • Set your Dutch oven on the bottom rack of your oven and preheat the oven to 450 degrees F. Transfer the risen loaf to the hot Dutch oven and replace the lid. Bake for 15 minutes, then remove the lid and continue to bake for another 15 minutes, until the crust is lightly browned and the bread smells done.
  • Carefully remove the bread from the Dutch oven and cool completely on a wire rack before slicing.
Sourdough bread baking doesn't have to be finicky! Just seven minutes of hands-on time in the evening is all you need to make the dough, then let it do all the work of rising while you sleep. Shape and bake in the morning, and you have a delicious, fuss-free loaf of bread with minimal effort!

Like this recipe? You may also enjoy Secrets to the Best Banana Bread and Lemon Ginger Scones.