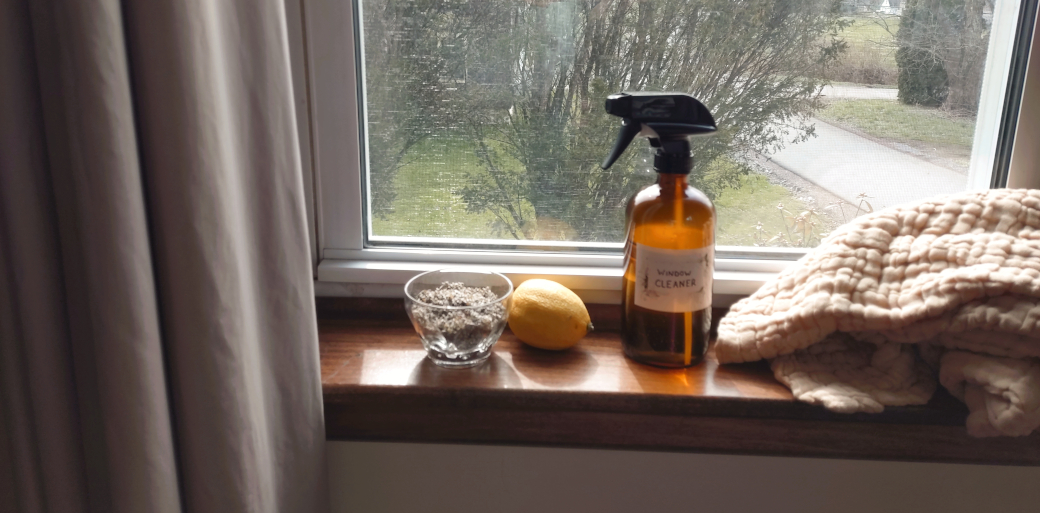
Make your own nontoxic window cleaner with just a few household ingredients! Your windows will sparkle, and your house will smell fresh and clean!
Spring cleaning is just around the corner, and I’m preparing by gathering cleaning supplies and making lists. And refilling all of my homemade cleaners. If you have never made your own cleaners, you’re in for a treat! Homemade cleaning products are simple to make, naturally free of toxic chemicals, easy on the pocketbook, and best of all, they smell amazing! (No more turning on the bathroom fan or opening all the windows after a cleaning day!)
What Do You Need to Make Your Own Homemade Nontoxic Cleaner?
The building blocks of a homemade cleaner are vinegar or alcohol, and water. In this basic recipe, I use white vinegar and water.
Many herbs and plants have antibacterial, antiviral, antifungal, and antiseptic properties which are great for cleaning! You can incorporate these plants into your homemade cleaners in two different ways:
You can steep fresh or dried herbs in vinegar or alcohol, then strain out the solids and add the liquid to your cleaner.
You can add a few drops of essential oils to your homemade natural cleaner.
This homemade window cleaner recipe uses essential oils, but if you would like to use fresh herbs instead, try my Citrus + Sage Homemade Cleaner recipe!
Which Essential Oils Are Good For Cleaning?
There are many, many essential oils that can be used for cleaning due to their germ-fighting properties. That’s a good thing, but it can be overwhelming! Here’s a list of my favorites to get you started:
Lemon (or any other citrus oil)
Eucalyptus
Rosemary
Lavender
Pine
Tea Tree
I like the combination of lemon, rosemary, tea tree, and lavender essential oils in this homemade window cleaner recipe. It makes my bathroom smell nice and fresh when I polish the mirror and wipe the windows!
If you don’t have all of these essential oils, you can substitute a different oil from the list above, or just leave out one or two of the oils. For example, you could substitute lemongrass or grapefruit essential oil for the lemon, or leave out citrus altogether. If you do omit an oil, make sure you increase the amounts of other essential oils accordingly, so that the total number of drops will equal about 48. This is a 0.5% dilution.
Does that dilution rate sound pretty weak? You’re right; but a window cleaner doesn’t have to be as strong as a bathroom cleaner, does it? We’re trying to wipe dirt and grime off of our windows and mirrors, and prevent mold or bacteria from colonizing there. And freshen the air at the same time!
How Do You Make Homemade Window Cleaner?
It’s very simple to make this recipe. Just pour the vinegar and water into a glass spray bottle, and add the essential oils. A funnel is helpful for pouring the liquids into a narrow-mouth bottle. Screw the lid on tightly, shake well, and you’re all set to clean those windows!
If you do make this recipe and enjoy it, please leave a review and let me know!
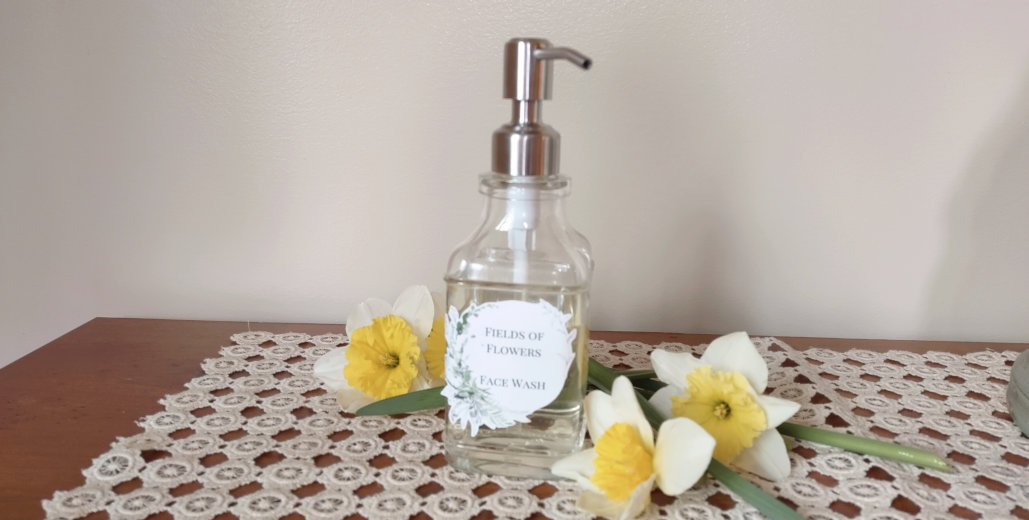
Bathe your face in sweetly scented petals with this castile soap and rose water-based facial cleanser.
With what do you wash your face? Soap? Buttermilk? Roses? Avocado? There are so many different recommendations from various times and cultures, each promising to perform some feat of beauty for your complexion.
Any or all of them may work, of course, but here’s one I can recommend wholeheartedly. This solution of castile soap, rose water, and essential oils is a gentle, natural alternative to expensive facial cleansers. It does not contain any harsh chemicals, preservatives, or stabilizers, so it’s wonderful for sensitive skin. There are no synthetic ingredients you can’t pronounce, only a few natural ingredients. If you prefer to use organic products, it’s easy to find organic versions of each of the ingredients.
But the best part? This homemade facial cleanser works well, and it smells like walking through a field of wildflowers on a midsummer’s morn. Now wouldn’t you like to wake up to the scent of dewy blossoms every morning? It always brings a smile to my face, and I don’t think any cleanser in the world could brighten my complexion more effectively than that!
Can you use castile soap on your face?
You may have heard that castile soap is very strong, and may not be the best for washing sensitive skin like your face. It is true that castile soap is concentrated, and should be diluted before putting it on your face. When it is properly diluted, though, castile soap makes a great addition to facial cleansers. It is made of natural ingredients, so you don’t have to worry about putting lots of chemicals on your skin. Pure castile soap is made of only vegetable-based ingredients, so it is not as harsh or drying as some other soaps.
Is castile soap good for oily or dry skin?
When you make your own castile soap facial cleanser, you control the amount of soap, so if your skin is especially sensitive, just add a smaller amount of soap to the bottle. On the other hand, if your skin is extra oily and this recipe doesn’t seem strong enough, go ahead and add a small amount of extra castile soap to the bottle. Don’t add more than a tablespoon at a time. Remember to shake the bottle well after any adjustments to the recipe.
If you are adding more soap, it’s best to patch test on a small area of skin, such as the inside of your upper arm, to make sure the solution doesn’t irritate your skin.
Can you use rose water in a facial cleanser?
Does the thought of using rose water to cleanse your face bring to mind ancient beauties in classical attire? Rose water has, indeed, been used for centuries in beauty rituals. And with good reason: research shows that roses have some incredible benefits for skin.
They soothe inflammation and redness, while inhibiting bacterial growth that may contribute to acne. Rose water helps your skin to retain moisture, which not only combats dry skin, but also makes it look plumper and softer, reducing the appearance of lines and wrinkles.
Rose water is a natural toner, which means it reduces the appearance and size of pores in your skin. (Here’s a recipe for a natural rose water toner, too!)
It’s also a gentle natural cleanser, and helps to clean clogged skin pores and remove makeup residue. No wonder rose water has been a long-beloved cosmetic of women young and old! If you still need more reasons to use rose water on your face, read this article from Fleur & Bee.
Which essential oils should you use in a facial cleanser?
The range of essential oils is wide, but that doesn’t mean they can all be used interchangeably. Each essential oil contains different compounds that are bioactive: these are the “active ingredients” listed on your skincare products. But unlike most skincare products, these are entirely natural and plant-derived!
Some examples of these bioactive compounds are limonene (found in citrus oils), pinene (found in pine and fir oils), and citronellol (found in rose and geranium oils). Each essential oil contains several of these compounds, and the combination of bioactive compounds in a specific essential oil determines its uses. Some oils are nourishing and soothing for skin, others are good for toning or cleansing, and still others have antibacterial or antiviral properties.
Geranium Essential Oil Constituents and Uses
The three main bioactive compounds, also called molecular constituents, of geranium essential oil, are citronellol, geraniol, and linalool. Geranium essential oil has been used in skin care products for many years. It is said to promote bright, youthful-looking skin. It is beneficial for soothing minor skin irritations and decreasing redness.
Citronellol
Citronellol has several effects in the body. When it is used in skin products, it promotes clear and glowing skin. Rose and geranium essential oils are both good sources of this constituent. Citronellol is also a natural insect deterrent.
Geraniol
Geraniol has antimicrobial, antioxidant, anti-inflammatory, anti-cancer, and neuroprotective properties. It has a rose-like scent, and is used in perfumes, skincare products, natural flavors for food products, and as an insect deterrent. Geraniol is a known allergen, but when it is used topically, there is a fairly low risk of sensitivity, since it does not penetrate the skin readily.
The main benefits of geraniol for skin are: anti-inflammatory (soothing), antimicrobial (fights acne-causing bacteria), and antioxidant (fights free radicals which contribute to aging skin).
Linalool
Linalool has anti-inflammatory and insect-repelling properties as well as relaxing and stress-relieving effects. It is most commonly used in skincare products for its flowery fragrance. This compound is also a potential allergen to very sensitive skin, so we use it in very small concentrations. If you have sensitive skin, you may want to do a patch test before trying it on your face.
One pump of this foaming floral cleanser is enough to refresh your skin and clear away any dirt or residue.
Ylang-ylang Essential Oil Constituents and Uses
Ylang-ylang essential oil’s main active components are linalool, geranyl acetate, and beta-caryophyllene. It is antimicrobial, anti-inflammatory, anxiolytic (anti-anxiety), and used to help wounds heal faster. It is also effective in treating acne-prone skin. Ylang-ylang oil combats excess oil on skin and scalp, so it is also beneficial for hair care. This essential oil’s most prominent feature, however, is its sweet scent reminiscent of jasmine. Ylang-ylang oil is used for its scent in many perfumes and skincare products.
Geranyl acetate
Geranyl acetate has strong analgesic and anti-inflammatory properties. It is great for reducing skin irritation and redness, as well as treating minor burns, eczema, and dermatitis. This compound is very soothing for skin.
B-Caryophyllene
Beta-Caryophyllene is analgesic, anti-inflammatory, antimicrobial, and antioxidant. It helps to soothe skin and fight free radicals which cause skin cells to age.
Lavender Essential Oil Constituents and Uses
Lavender essential oil contains both cis- and trans-beta-ocimene, linalool, and linalyl acetate. It is regarded as a very calming, soothing oil that promotes sleep and relaxation. It is also used widely in skin and hair care products, as well as perfumes.
Beta-Ocimene
Beta-ocimene is a terpene which is most noted for its antiseptic, antiviral, antifungal, anti-inflammatory, and analgesic properties. This compound is found in many plants, and is considered soothing and healing for skin.
Linalyl Acetate
Linalyl acetate is particularly good for healing rashes and soothing sensitive skin. This compound, when combined with linalool, has an especially effective soothing effect. The anti-inflammatory effect is so strong that it has been researched for use in treating high blood pressure. This is one of the main reasons lavender is used in so many products that promote sleep or relaxation.
How to make castile soap facial cleanser
Making your own facial cleanser is very simple. All you need is a glass bottle with a soap pump.
Mix the castile soap, rose water, and essential oils in the bottle.
Screw the lid on tightly and shake well.
To use your homemade castile facial cleanser, pump a small amount of cleanser onto a dampened face cloth. Apply gently all over your face, avoiding the area around your eyes. Rinse with water.
That’s it! So simple, so refreshing, and only natural ingredients! You’ll never need to buy another fancy cleanser again. Let me know if you like this recipe!
Bathe your face in the fresh scent of petals with this simple castile soap-based facial cleanser. It is gentle yet effective for everyday skin cleansing.
Prep Time5 minutesmins
Total Time5 minutesmins
Keyword: Castile Soap, Cleanser, Essential Oils, Rose water, Skincare
Servings: 8ounces
Author: kimberly
Equipment
1 glass bottle with soap pump
Ingredients
2/3cupCastile soapliquid
1/3cupRose water
15dropslavender essential oil
20dropsgeranium essential oil
7dropsylang ylang essential oil
Instructions
Measure castile soap and rose water in the glass bottle. Add essential oils. Screw the lid on tightly and shake well.
Store in a cool, dry place away from direct sunlight.
Is there really such a thing as a healthy, homemade breakfast cereal that actually tastes good? Try this real food recipe, and see for yourself!
Do you like breakfast cereals? I don’t. They never really fill me up in the morning, and I disdain the frosted cardboard taste and texture. But everyone else in my family likes cold cereal, so I usually keep some around for dire circumstances like postpartum and days that my husband leaves for work before 6:30. He doesn’t feel like frying eggs or pancakes at 6 AM, and I don’t blame him. But I also don’t get up that early these days, with a baby keeping me up all hours.
At any rate, when I found a recipe for homemade breakfast cereal, I was only too happy to try it and ditch the honey-flavored rings defying my nutrition goals from the corner cupboard. The first attempt turned out pretty well, I thought. Except for the fact that my kids refused to eat it.
So I played with the recipe a bit until we came up with this version. The original recipe, printed in The Simple Bites Kitchen, does not call for sugar, but I added some for the sake of peace. Two teaspoons of sugar spread out through 12 cups of cereal doesn’t seem too bad. It makes more of a difference in sweetness than you would think, though. The original recipe was supposed to be an “apple crisp” flavor, but… my kids don’t like dried apples for some reason. So I switched up the dried fruits and nuts for a combination that suits my family better. You can adjust them freely to match your own taste.
The cereal we ended up with is a sort of compromise between muesli, granola, and conventional cold cereal. It takes grains and seeds (like muesli), and toasts them (like granola), then mixes them with dried fruit and puffed grains–which could easily be used as a cereal without the extras. The combination certainly adds variety to the breakfast table, while providing ample amounts of protein, carbs, and fiber to hungry kids and grownups alike. Serve it with whole milk or yogurt, and maybe some fresh or frozen fruit for added flavor.
Variations on the Basic Muesli Recipe
You can find many ways to vary this recipe:
In place of the oats, try a rolled 7-grain mix
Add more spices like cloves or nutmeg, or stir in a teaspoon of vanilla extract
Try orange juice instead of apple cider
Drizzle in a bit of honey or maple syrup instead of the sugar
Switch up the dried fruits and nuts
Use different puffed grains
Measure and mix the dried fruits and puffed grains with the cooled oat mixture, and your cereal is ready!
I made a valiant effort to make puffed quinoa for this recipe. It tasted fine, but no matter what method I used, the grains never seemed to get any bigger. To me, it just wasn’t worth to toast half a cup of grains and end up with half a cup of “puffed” grains that got lost in the mix.
If you want to make your own puffed grains, it is pretty easy, and you might well have more success than me! They did taste good, even if they didn’t puff up much.
If you try any variations and find one you like, please let me know! I love to try different flavor and texture combinations.
Method
Preheat your oven to 325 degrees F. Set out two large, rimmed baking sheets and line them with parchment paper. (I don’t know if this step is completely necessary, but I always do it out of habit.)
In a medium-size mixing bowl, combine the oats, coconut, almonds, and pepitas. You may substitute these for different nuts and seeds, but keep the amounts equal.
In a small bowl or measuring cup, combine the apple cider, sugar, and spices. Stir thoroughly, then pour over the oat mixture and toss to combine. So far, this sounds like a granola recipe, but this mixture won’t clump together like granola does.
First, mix all the granola ingredients together and coat with apple cider and spices. Just a touch of raw sugar goes a long way, and brings this cereal from good to great!
Spread it out over the two prepared baking sheets. Pop them in the oven and bake for about 30 minutes. Stir every 10-15 minutes, and rotate the pans. Try not to let the oats get too dark. We’re not making granola, just bringing out the flavor of the grains and nuts by toasting them.
Cool the oat mixture on the pans for 5 minutes or so, then carefully pour everything into a large bowl to cool completely.
Mix in the dried fruits and puffed grains, and you’re all set! Transfer the cereal to an airtight container, and relax in the knowledge that breakfast is ready. The cereal will stay fresh at room temperature for 2-3 weeks… if it lasts that long!
If an almost-sugar-free breakfast cereal that tastes great sounds too good to be true, try this easy recipe! It makes a nice big batch, enough for many mornings.
Prep Time8 minutesmins
Cook Time30 minutesmins
Cooling Time30 minutesmins
Total Time1 hourhr8 minutesmins
Course: Breakfast
Keyword: Breakfast, Cereal, Granola, Muesli
Servings: 12cups
Author: kimberly
Ingredients
2 1/2cupsoatsrolled or quick
1cupdried coconut flakes
1cupsliced almondsraw
1cuppepitasraw
1/2cupunfiltered apple cider
1 1/2tspground cinnamon
1/2tspground ginger
2tspDemerara or raw sugar
1cupdried apple ringschopped
1cupraisins
3cupspuffed wheat
3cupspuffed rice
Instructions
Preheat the oven to 325 degrees F. Line two large, rimmed baking sheets with parchment paper.
Stir together the oats, coconut flakes, almonds, and pepitas in a mixing bowl.
In a small bowl or glass measuring cup, mix the apple cider, cinnamon, ginger, and sugar. Stir well to combine. Pour over the oat mixture and toss to coat evenly.
Spread the mixture out over both baking sheets in a thin, even layer. Bake for about 30 minutes, stirring every 10-15 minutes and rotating pans. Do not let the mixture get too dark!
Cool on pans for 5 minutes, then transfer to a large bowl to cool completely.
Finally, mix in the dried apples, raisins, puffed wheat, and puffed rice. Store in an airtight container. This cereal will stay fresh at room temperature for 2-3 weeks.
Notes
If you would like a sugar-free cereal, omit the sugar.Feel free to substitute different puffed grains if wheat is a problem for your family.
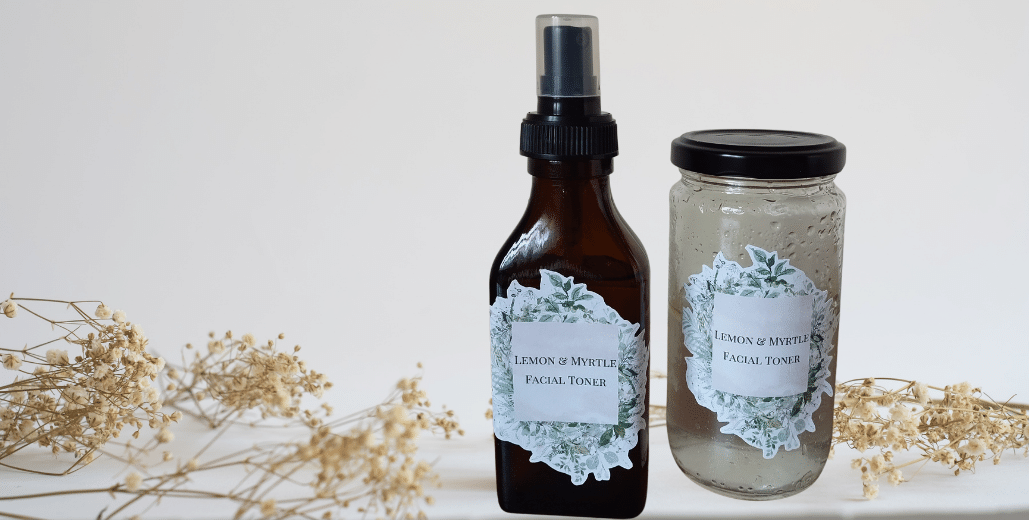
organic and all-natural ingredients make this refreshing skin toner a bottle full of goodness!
Does your beauty routine need a refresh? Dry winter skin, changing seasons with different humidity levels, and stress can all contribute to uneven skin tone. Toners can help with retaining moisture and making your skin soft and even-toned. But commercial toners, even the expensive ones, are often full of chemicals. If you can’t pronounce them and don’t know what they do, there’s a pretty good chance you don’t need them on your skin, which readily absorbs harmful ingredients as well as beneficial ones.
I have been gradually going through all of our household consumables–cleaning products as well as hair, skin, and beauty items–and replacing the chemical-laden varieties with natural, homemade alternatives. Some recipes for homemade products are intimidating, but this one is quite simple! Just mix everything together, give it a good stir, bottle, label, and you’re all set!
Why Should You Use an All Natural Facial Toner?
Skin toners contain astringents, which reduce excess oil, as well as tone and clarify the skin. They can help shrink pores in the surface of the skin, which makes your skin look softer and more even. Commercial varieties often contain a high concentration of alcohol, which can dry your skin out too much, and leaves an unwelcome sting and scent.
The solution? Make your own! When you make your own skin toner, you control the ingredients, so nothing irritating or harmful goes on your skin.
This recipe uses a gentle, organic witch hazel extract, combined with rose water and essential oils, to make a natural preparation which is gentle enough for sensitive skin. If you want an all natural facial toner that clarifies and tones your face without harsh chemicals that strip you of necessary moisture, try this simple recipe! You will love how fresh and radiant it makes your face feel!
Should You Use Witch Hazel in Facial Toners?
No, and yes. It depends on your skin and which one you buy.
Not all witch hazel preparations are made the same way. Many varieties contain a high proportion of alcohol to witch hazel extract, which, as we said before, can dry out your skin unduly and might cause irritation. Other preparations marked “alcohol-free” are technically hydrosols instead of extracts. These are fine to use if your skin is extra dry and sensitive, but the concentration of witch hazel is rather low. I prefer to use a double-distilled witch hazel extract from Mountain Rose Herbs, which contains 85% witch hazel and 15% alcohol.
Witch hazel has been used for its astringent properties for centuries. The bark is boiled, and the resulting liquid is steam distilled to obtain a concentrated, therapeutic witch hazel extract. Witch hazel is classified as a mild astringent. It can reduce inflammation in skin cells, even out skin tone and texture, and help your skin absorb other nutrients.
Witch Hazel Toners vs. Astringents
Witch hazel is used on its own or with alcohol and other ingredients in astringents, for the purpose of removing excess oil, unclogging pores, soothing irritated skin, and decreasing the appearance of acne eruptions. If you have oily, acne-prone skin, witch hazel makes a great single-ingredient astringent, which is completely natural and not as harsh as astringents which also contain high concentrations of isopropyl alcohol and salicylic acid.
This wonderful botanical extract can also be used in facial toners, such as this recipe. Toners are gentler than astringents. Their purpose is to even out skin tone and texture, not necessarily to treat acne or oily skin. Toners are suitable for all skin types, especially dry and sensitive types.
When diluted with other ingredients, witch hazel makes a great addition to facial toners. In this recipe, I use organic witch hazel extract as a base for my toner.
Other ingredients in this natural skin toner recipe are rose water and essential oils.
Why Should You Use Rose Water in a Facial Toner?
Rose water has classically been used in skincare products, especially for the face. It cools and refreshes skin, and confers a light floral aroma. Rose petals are prized for their soothing, rejuvenating, and healing properties.
While rose essential oil is the best source of these therapeutic properties, it is quite expensive. Rose water is a more economical way to obtain some of the benefits and fragrance of rose petals for use in your own skincare preparations.
What are floral waters?
Floral waters, including rose water, are preparations made from water and flower petals. Some preparations also include alcohol. They contain properties of the flower, such as scent, color, and therapeutic benefits unique to the flower used.
This might sound like essential oils, but floral waters are not nearly as concentrated as those. Rose water and other floral waters are suitable for using directly on your skin, unlike essential oils, which must be heavily diluted first.
Even though the scent and therapeutic properties of rose water is much less concentrated than rose essential oil, it is still effective in skincare and beauty regimens. Rose water and other floral waters have reputedly been used since ancient civilizations.
How to Make Floral Waters
There are four different ways to make floral waters:
Steam distillation: Fresh flower petals are distilled with water. The steam releases therapeutic properties of the flower petals. Once the steam is cooled and condensed again into water, the water now contains those beneficial and fragrant properties. This method of distillation is most often used to produce essential oils, and the floral water (or hydrosol) is a by-product. Hydrosols contain trace amounts of essential oils.
Extraction: To make a floral extract, place fresh or dried flower petals in a glass jar with a tightly-fitting lid. Pour over the petals enough distilled water, vodka, vinegar, or witch hazel extract to cover by an inch or so. Cover tightly and shake. Keep the jar in a dark place away from direct sunlight. Shake every day for 2-4 weeks. Strain the liquid and keep in a glass jar away from direct sunlight.
Infusion/Tisane: Floral infusions are made by simmering flower petals in distilled water. Just like an herbal tea!
Dilution: By diluting essential oils in water with the aid of an emulsifier, you can also make a kind of floral water. These are not technically true floral waters, but they are generally interchangeable.
If you are interested in making your own rose water, the Country Hill Cottage has a simple infusion recipe.
Myrtle Essential Oil Benefits for Skin
Common Myrtle, or Myrtus communis, has many therapeutic properties, including astringent, antiseptic, deodorant, expectorant, anxiolytic, and respiratory aid.
Myrtle has been used since the time of the Ancient Greeks, who associated the plant with Aphrodite, the goddess of love and beauty. The Greeks also used myrtle leaves as medicine. Myrtle essential oil has been shown to be an effective antibiotic, antifungal, and antiviral agent.
Myrtle Essential Oil is a gentle yet hardworking essential oil for skincare. It can help to even out skin tone, reduce inflammation, and cleanse the skin of dead cells and microorganisms that cause acne. Myrtle oil has been studied in Korea for its beneficial effects in treating acne.
Myrtle essential oil has a fresh, green, woody aroma. I included it in this facial toner recipe chiefly for its astringent property, but also for its lovely fresh scent!
Recipe Notes
This recipe also calls for a small amount of lemon essential oil. I used it mostly for the scent. Citrus oils are known to cause sun sensitivity if used on the skin, so avoid exposure to direct sunlight soon after applying this toner. If you are concerned or your skin is very sensitive, just omit the lemon oil from the recipe!
Simple, natural ingredients make the best skincare products you can’t buy in stores!
Making the toner is very simple. All you need is a bowl or jar to mix everything, a funnel for pouring, and a glass spray bottle. I used the bottle that my rose water came in (I ordered it here), but you can use any small glass or plastic bottle with a spritz/spray top.
Keep in mind that the recipe makes 8 ounces of toner, so if your bottle is smaller than that, you will need another jar to store the extra toner in!
Mix up these four simple ingredients, and concoct your own all natural facial toner today! If you do make it, please leave a review! I really appreciate it!
This refreshing all natural facial toner is mild and suitable for all skin types. Enjoy soft, even skin with a lovely fresh scent!
Prep Time5 minutesmins
Total Time5 minutesmins
Keyword: Lemon, Myrtle, Rose water, Skincare, Toner
Yield: 8ounces
Author: kimberly
Equipment
1 10-oz. jar or small bowl
1 small glass spray bottle
1 funnel
Materials
5ounceswitch hazel extract
3ouncesrose water
30dropsmyrtle essential oil
10dropslemon essential oil
Instructions
Combine the witch hazel extract and rose water in a small bowl or 10-ounce jar.
Add the essential oils. Stir or shake to combine.
Position funnel in spray bottle and pour toner into bottle. Cap with lid. If you have extra toner, store it in a glass jar with a tightly-fitting lid.
Notes
Lemon essential oil can make skin sensitive to sunlight. Avoid direct sun exposure immediately after applying toner. If you are concerned about this, omit the lemon oil.
Hi, I’m Kimberly! I’m an Alaskan wife and mother who loves simple, old-fashioned living. If you’re looking for country-style recipes from scratch or simple homemaking ideas, pour yourself a cup of tea and join me!


 Hi, I’m Kimberly! I’m an Alaskan wife and mother who loves simple, old-fashioned living. If you’re looking for country-style recipes from scratch or simple homemaking ideas, pour yourself a cup of tea and join me!