Posted on 2 Comments

Adventure-Ready Granola Bars

adventure ready granola bars
homemade granola bars
adventure-ready granola bars

When most of the food you eat is made from scratch, sometimes it’s hard to come up with snacks to pack along on hikes, road trips, or other outdoor activities. These homemade granola bars are kid-friendly and adapt to big or small adventures!

Do you ever find yourself trying to head out on some last-minute trip and searching through your cabinets and refrigerator thinking, “The world is so full of a number of snacks, I’m sure we should have some here somewhere…”

Maybe I’m the only one who finds herself in this predicament rather frequently. I’ve packed along some interesting comestibles for day hikes and car trips simply because we didn’t have any “snack food.”

I do realize that you can buy packs of trail mix, nuts, and all kinds of bars in just about any store that sells food. And I do buy dried fruits and nuts for trail mix. But I like to make my own food for several reasons, so I don’t usually stock packaged snacks.

So began my search for healthy snack foods that are simple and easy to make at home, don’t cost much, and are full of real ingredients. Ideally, they would also be portable and not very messy.

adventure-ready granola bars

Versatile Granola Bars

Granola bars rank high for portability and are a compact energy source, which is great for activities where you don’t have a ton of extra space for food.

Homemade granola bars are great for families with allergies or food intolerances, because you can adjust recipes to fit your needs. You can also choose which add-ins like dried fruits, nuts, or chocolate to include based on your family’s preferences.

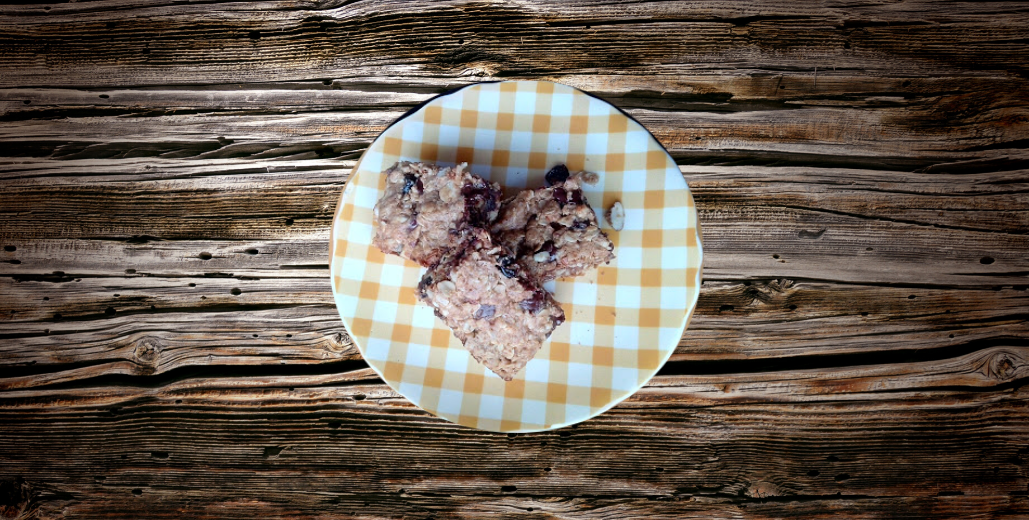
This has been my go-to granola bar recipe for over a year now. They’re simple to mix up and quick to bake, and many of the ingredients can be substituted if you wish. So if you get tired of my favorite flavor combination (dark chocolate, almonds, and cranberries), there are plenty of others to try instead!

I can make these start to finish in less than an hour, even with a toddler helping me! That is definitely an important factor for me when I’m choosing between recipes. Time is the number one reason I get intimidated by recipes for crackers or other snack foods.

Not only are these quick, they’re also just about as easy as it gets. Stir everything together, spread it in a pan, and pop it in the oven to bake. No rolling out fragile dough or cutting into shapes, no constant checking of the oven. They don’t even make a mess of your counter, because they cool in the pan!

The original recipe was a coconut granola bar recipe from Taste of Home, but I’ve played around with the recipe quite a bit. My biggest challenge with granola bar recipes is always making them stick together and not crumble too easily- but still be more of a granola bar than a cookie bar.

Need a good source of energy for your active lifestyle? This quick and easy granola bar recipe is packed with natural ingredients and 7 grams of protein to keep you going all day long!

Maybe my problem is trying to add too many additions to the dough. But who wants to leave out the chocolate? These bars can be a bit crumbly, so I’m still searching for the perfect granola bar recipe. I would not give one to a toddler in a car seat!

Crumbs aside, these bars have great flavor and texture, and a lot of protein: 7 grams per bar! That’s enough to keep my boys happy. These homemade granola bars don’t last very long in our house! Hence the recurring dilemma of absent snack foods…

Method

In a large mixing bowl, stir together the peanut butter, brown sugar, honey, melted coconut oil, and vanilla. Whisk the eggs lightly and add them to the peanut butter mixture.

Combine the oats, flour, salt, and baking powder, and add to the peanut butter mixture. By the way, you can use oat flour or ground oats to make these gluten free.

Mix in the nuts, flaked coconut, dried cranberries, and chocolate chips. The mixture will be stiff. I use almonds, cranberries, and dark chocolate chips in my bars, but you don’t have to stick with these suggestions.

granola bar dough

Try peanuts, cashews, or pecans in place of the almonds. Sub raisins, dried cherries, or dried blueberries for the cranberries. And switch dark chocolate chips to milk or white chocolate pieces or M&Ms. Or leave them out entirely, if you’re trying to limit sugar.

The same thing goes for the coconut. You can leave it out if coconut isn’t your favorite flavor or texture. Add a little wheat germ or flax seeds instead (but decrease the amount, since these are denser than coconut).

You may be thinking that coconut and peanut butter don’t sound like a great combination. I was a little skeptical about using peanut butter myself, at first. However, the peanut butter is not a dominant flavor in these bars. Its role is to help everything stick together.

Pat the mixture into a buttered 13×9″ pan. Bake at 350 degrees F for 25-30 minutes, until the edges start to brown and the center is set.

Cool the granola bars in the pan and slice into bars with a sharp knife. I usually make 18 bars so they’re big enough to satisfy my husband, but if you are making these mostly for smaller appetites, feel free to cut them as small as you wish.

homemade granola bars
Cool the bars completely before removing them from the pan. This helps to prevent crumbling.

When the bars have cooled, remove them from the pan and wrap individually in plastic wrap. They will keep at room temperature for at least 2 weeks, and in the freezer (individually wrapped and placed in a freezer bag) for several months.

Now you’re ready for any adventure! Pack a few of these bars along, and you’ll have a snack that you can feel good about feeding to your family!

Do you have any favorite take-along snacks? I would love to hear about them! Don’t forget to sign up for my email newsletter for more recipes and homely tips!

homemade granola bars

Adventure-Ready Granola Bars

These granola bars are chock-full of real, healthy ingredients that taste great and are good for you, too. With 7 grams of protein per bar, they are a great snack for adventures big or small!
Prep Time15 minutes
Cook Time30 minutes
Total Time45 minutes
Course: Snack
Cuisine: American
Keyword: Granola Bars, Healthy Snacks
Servings: 18 bars

Ingredients

  • 2/3 cup peanut butter
  • 1/2 cup brown sugar packed
  • 1/2 cup coconut oil melted
  • 1/2 cup honey
  • 2 eggs lightly beaten
  • 1/2 tsp vanilla extract
  • 2 cups rolled oats
  • 1 cup whole wheat flour
  • 1 tsp baking powder
  • 1/4 tsp salt
  • 2/3 cup flaked coconut
  • 2/3 cup sliced almonds
  • 2/3 cup dried cranberries
  • 3/4 cup dark chocolate chips

Instructions

  • Preheat oven to 350 degrees F.
  • In a large mixing bowl, combine peanut butter, brown sugar, honey, coconut oil, and vanilla extract. Beat eggs lightly and add to peanut butter mixture.
  • Combine the oats, flour, baking powder, and salt; add to peanut butter mixture.
  • Mix in coconut, almonds, cranberries, and chocolate chips. The mixture will be stiff.
  • Pat into a buttered 13×9" pan. Bake for 25-30 minutes, until edges start to brown and center is set.
  • Cool in pan. Cut into bars. When cooled, remove from pan and wrap bars individually.

Notes

Gluten-free variation: substitute oat flour or ground oats for the whole wheat flour.
You may also substitute any nuts or dried fruit you like in place of the almonds and dried cranberries.
Posted on 8 Comments

Dutch Oven Baked Beans

Dutch oven baked beans
Dutch oven cooking at its country best! Long, slow cooking is the key to the best Dutch oven baked beans.
If you're looking for hearty country-style meals, try this Dutch oven baked beans recipe. Long, slow cooking brings out great flavor!

I love cooking with a Dutch oven. There’s something about meals like Dutch oven baked beans that makes them feel so substantial. Maybe it’s just the heaviness of the cast iron that feels so solid, or the notion of cooking like the pioneers once did.

It might even be the types of meals I tend to cook in my Dutch oven: long-simmering soups, stews, or other hearty main dishes that home cooks have been serving to their families for centuries.

Here is one such recipe. Baked beans have been an American classic since the time of the early New England settlers. They haven’t lost much popularity since then, spreading West with the pioneers and finally finding their current place as an indispensable component of cookouts and tailgate parties.

Slow baked beans

I wonder what those early New England settlers would think of baked beans being classified as picnic food? They couldn’t just open a can of cooked and seasoned beans at a moment’s notice.

No, their baked beans required some forethought, because they took a night and a day to reach completion: a night to soak, and a day to cook.

You may have gathered that I like old-fashioned ways, so it should come as no surprise that I prefer my baked beans homemade instead of from the grocery store.

But since I don’t pretend to have as much forethought and practicality as New England pioneer cooks, I’ve adapted their recipe for a shorter cooking time.

How short? Well, don’t ask me for a 30-minute meal or anything. Baked beans need a long time to cook, so they can absorb the flavors of the sauce and meat. If you won’t be soaking the dried beans overnight, plan for 1 hour of quick soaking, 45 minutes of cooking, then another 5-6 hours to cook the beans in the oven.

You can shorten this even further by using plain canned beans or by cooking your beans ahead and storing them in the refrigerator or freezer. Cooked beans freeze exceptionally well.

I have cooked the beans for as little as 3 1/2 hours in the oven. They’re still okay at that point if you’re short on time, but they definitely get better with longer cooking. In fact, these beans taste best reheated on the second or third day. Some things just get better with time.

Which cooking method is best?

It took me years to find a recipe for baked beans that I liked. I grew up on baked beans out of a can, and I’m still not sure how they get that particular flavor. (I think there must be a lot of sugar in those cans!)

After trying several slow cooker recipes and different types of beans, I was almost ready to give up. The results varied: too soupy, too sweet, too bland. It was always disappointing. Then I stumbled upon a Dutch oven baked beans recipe that was more like what I had in mind.

I burnt the beans the first several times I made the recipe, but the results were still good enough that I was willing to keep trying, slowly adjusting ingredients to find what worked best.

My theory is that the cooking method really makes a difference. When you use a slow cooker, it traps all the liquid and doesn’t let any evaporate. Cooking beans in the oven–in a Dutch oven or bean pot–is more like cooking over a fire. It imparts a depth of flavor that slow cookers just can’t give.

Think of it like toasting marshmallows. If the only goal is to make them gooey, the microwave works just fine. But if you’re looking for that perfectly-toasted marshmallow flavor, you can’t beat hot coals and a long stick.

Dutch oven beans

Adjust to taste

I hope you won’t have to try as many recipes or make as many adjustments as I did, but you still may need to tweak a few things.

For this reason–and because you shouldn’t leave an oven unattended for long periods–plan to make this recipe on a day when you will be around to check on the beans from time to time.

Ovens can be temperamental

This applies to both temperature fluctuations and dryness. Mine seems to suck all the moisture out of these beans after a few hours, so I have to keep putting more water in. Your oven may not do that, which is why I don’t recommend adding all the water at the beginning.

Just stir the beans every hour or so to check on the amount of liquid and prevent burning. Add no more than a cup of water at a time. You want the sauce to be thick.

Beans may behave differently

Results can vary slightly depending on whether you soak them overnight or use the quick-soak method, or if you choose to start with canned beans. (Or if your beans are prepared and packaged for emergency/long-term storage, as I learned the hard way!)

Different bean varieties can also lend their own particular flavors, colors, and characteristics to the meal. This is a good thing! I encourage you to experiment and find what you like best.

For example, I don’t like to use pinto beans for baked beans, but I have tried recipes that called for them. So far, the successful bean varieties in my book are Great Northern, navy, small white or red beans, and dark or light kidney beans. I usually use some combination of these.

Method

Prepare your beans

You have several options: soak dried beans in cold water overnight, use the quick-soak method for dried beans in the morning, or start with pre-cooked or canned beans (plain, not canned baked beans).

To soak beans overnight: place dried beans in a pot or bowl. Fill the pot with cold water to cover beans by at least an inch. If using a small (2-quart) pot, you may want to add more water.

To use the quick-soak method: place dried beans in a pot and cover with at least an inch of water. Cover and bring to a boil. Remove from heat and let sit, covered, for an hour.

If you’re starting with cooked or canned beans, skip the next step.

Cook the beans

Drain the soaked beans. Place them in a pot or Dutch oven and cover with water. Bring the beans to a boil. Turn the heat down and simmer for 40-45 minutes until the beans are soft.

Cooking times may vary slightly depending on what kind of beans you use and how old they are. Beans also take a little longer to cook at higher altitudes.

*If you are using beans that have been prepared and packaged for emergency rations or long-term storage, your cooking times will be much longer. I allow at least 2-3 hours.

Prepare to bake your beans

If you’re using canned beans, start here.

Preheat your oven to 325 degrees F. Adjust oven racks so your Dutch oven will fit comfortably.

Place cooked beans in a large bean pot or Dutch oven.

Chop the bacon or salt pork into 3/4-inch pieces and add them to the pot. When I’m using salt pork, I slice it first–about twice as thick as bacon–and then chop. You can just chop the entire piece of meat into cubes if you prefer.

Frozen bacon? No problem. Chop the entire block crosswise, and the layers will separate as they cook. No danger of undercooking here!

ingredients in Dutch oven
It will look like a lot of onion when you combine everything! Don’t worry: they cook down and add subtle flavor to the beans.

Add the rest of the ingredients, along with 2 cups of boiling water. Stir well. Cover and place in the oven for 5-6 hours.

Baking the Beans

You will want to check on your beans periodically during the cooking time. How often? You should stir the beans after about two hours, and every hour thereafter.

Add more water if they are getting dry. You don’t want them to burn, but you do want to end up with a nice thick sauce, so don’t add more than a cup of water at a time.

baked beans
This is how my beans looked after 1 hour. They are still pretty soupy at this point, so I didn’t add any liquid yet. Just give them a good stir and keep cooking.

If the beans are absorbing a lot of liquid and seem to be getting too dry between checks, you can stir them more frequently or turn your oven down to 300 degrees F.

If the beans and/or sauce around the edges gets dark, don’t worry. Just add some water and stir thoroughly, scraping the sides. You actually want the color to darken, as this improves the flavor.

If it’s actually burnt black, don’t mix that part in. Chances are that the middle will be fine, even if the edges are burnt.

Dutch oven baked beans
Notice the darker color around the edges. That’s what you’re looking for. These beans have cooked for about 5 hours and are full of great flavor!

You can let the beans cook all day if you want to. Anywhere between 3 1/2 and 8 hours is fine. In general, I try to cook mine for about 5 hours, but the longer the better!

baked beans and cornbread

Serve these Dutch oven baked beans with hot cornbread or toasted English muffins for a real country-style treat!

Dutch oven baked beans
Print Recipe
5 from 1 vote

Dutch Oven Baked Beans

This big pot of hearty baked beans makes a comforting meal that will feed a horde of hungry appetites! It's cooked slowly in the oven for classic American flavor.
Prep Time40 minutes
Cook Time5 hours
Soaking1 hour
Total Time6 hours 40 minutes
Course: Main Course
Cuisine: American
Keyword: Beans, Dutch oven
Servings: 8 hearty servings

Equipment

  • Dutch oven

Ingredients

  • 3 cups dried beans
  • 1 1/4 cups packed brown sugar
  • 2 cups boiling water
  • 1/3 cup coarsely-ground mustard
  • 1/2 cup molasses
  • 12 ounces thick-sliced bacon or salt pork cut into 3/4-inch pieces
  • 2 onions chopped

Instructions

  • Place dried beans in a Dutch oven and cover with cold water. Soak overnight or use the quick-soak method.
  • For quick-soak method: Bring beans and water to a boil. Remove from heat and let sit for one hour, covered.
  • After soaking, add more water to cover beans. Bring to a boil over high heat; reduce heat to low and simmer for 40-50 minutes until beans are soft. Preheat the oven to 325 degrees F.
  • Drain beans. Add the rest of the ingredients to the Dutch oven along with 2 cups boiling water. Stir well and cover.
  • Bake for 5-6 hours, stirring every hour. Add more water as necessary to prevent burning. The beans are done when the color has darkened and the sauce is thick.

Notes

Red or white bean varieties work best. Feel free to use a combination of different types of beans, such as Great Northern, navy, kidney, small white or red beans.
Posted on 1 Comment

Sweetheart Cranberry Almond Scones

cranberry almond scones
These sweet, fruity scones are a pretty and delectable way to show a friend or sweetheart you love him!
cranberry almond scones

There’s something about the combination of almonds and cranberries that fascinates me. I experienced it once in a pie, and decided to try again with these cranberry almond scones. To my delight, the same flavor phenomenon took place!

Perhaps it happens because they don’t grow in the same climates. Or because they are both such strong flavors, but very different. I even came up with some verses about it:

I know not if it's real or imagination, 
but the fact stands that the combination
of sweet almond and tart cranberry
has a resulting flavor that's nigh unto cherry!

Okay, so I’m not much of a poet. But these cranberry almond scones do taste surprisingly like cherries, as did the “mock cherry pie” I once tasted, which also used this combination.

I suppose tart cherries are the ones used for pies and most preserves. I’ve never eaten one raw, so I don’t know how close the flavor is to cranberries. But why would almonds make cranberries taste like cherries?

It’s beyond my ken, but in a land where cranberries grow and cherries don’t, I’ll take what I can get!

More and more berries

If you follow my blog, you will note that this is the second cranberry scone recipe I’ve posted in as many months. This recipe is very different, I promise! While I was happy with the first cranberry scone recipe, I wanted something a little different this time.

Keep the bright cranberry flavor, but sweeten it more. And make the scones lighter, if possible. I don’t care for dense scones, and the first recipe- while soft and not actually dense- was still not as light as I wanted.

So instead of complementing the cranberries with orange and spice, I opted for the lighter, sweeter pairing with almond. I sugared the cranberries before adding them, to cut their tartness. And I folded the cranberry mixture into the dough at the very end to preserve as much flaky lightness as possible.

The result: a tender, lightly sweet scone with ripples of cherry-flavored fruit filling. They are a little messy to make, and require a light touch, but the end result is definitely worth it. These cranberry almond scones exceeded my expectations!

My husband says that the almond glaze drizzled on top takes these scones to a whole new level! He gave this recipe his approval by eating most of them.

These cranberry almond scones would be perfect for a Valentine’s Day treat, or make them for any other special occasion to surprise your sweetheart.

sweetheart cranberry almond scones

Method

Preheat your oven. Set the cream cheese out so it can soften a bit. (Set it on the stove while the oven heats for extra warmth.) The butter can stay in the refrigerator, as it should be cold.

Prepare the cranberry filling

If you are using frozen cranberries, make sure they have time to thaw, at least most of the way. Frozen berries won’t take up sugar like fresh ones do, and they will still taste pretty tart in the scones.

Place cranberries and 3 tablespoons sugar in a food processor and whirl for a few seconds until combined. Stir in almond extract.

cranberries
Chopping the cranberries with sugar in a food processor makes the filling more evenly flavored, instead of partly tart and partly sweet.

Make the dough

In a large bowl, combine flour, salt, 2 tablespoons sugar, and baking powder. Mix until thoroughly combined.

Cut the butter into small chunks. Mine are usually about half a tablespoon in size. Cut the cream cheese into smaller pieces as well. These pieces don’t need to be as small, because the cream cheese is (hopefully) softer.

Add the butter and cream cheese to the flour mixture and cut in with a pastry blender or fork until the butter is in roughly pea-sized pieces. You shouldn’t see big chunks of cream cheese at this point.

(If you do, your cream cheese wasn’t soft enough. Next time, try cutting the cream cheese in first, before the butter.)

Stir the egg into the half-n-half, and add to flour mixture. Mix lightly just until combined. Fold in almonds.

Knead & shape the scones

Turn dough out onto a floured board or counter. Knead gently three times. Pat dough out into an oval or rectangle shape about 3/4-inch thick.

scone dough
When spreading the filling over the dough, leave about an inch around the edge. This will make it easier to work with the dough.

Now comes the messy part. Spread the cranberry filling over half of the dough. It will be runny. Fold the other half over top of the filling, pressing down lightly. Fold the dough in half again. Some of the filling will probably fall out. Don’t worry about it.

Pat it out a little and fold one more time. (You can skip this last fold if your dough is falling apart or it looks like it might.)

scone dough
Don’t worry if the dough looks messy when you’re finished. It will look better after you bake the scones. If some of the filling falls out, leave it. You don’t want a lot of juicy filling running onto the baking sheet, or it will burn.

Pat the dough into a circle 9-10 inches in diameter. With a sharp knife, slice the circle into 6 wedges. Place the scones on a buttered baking sheet, slightly separated so the edges aren’t touching.

Sprinkle sliced almonds on top of each scone. You may also sprinkle sugar on top, if you will not be glazing them later.

cranberry almond scones
See, they already look better after being cut into scones and topped with almonds!

Bake the scones for 12-15 minutes, or until the edges are golden. Remove the scones to a wire rack to cool. When they are completely cool, you may glaze them with a thin icing made of powdered sugar, milk or cream, and a few drops of almond extract.

Of course, you don’t have to let them cool all the way, especially if you sprinkled sugar on the tops before baking. Cranberry almond scones are delicious warm from the oven!

cranberry almond scones on plate
My favorite way to eat scones is fresh from the oven! My husband prefers them cooled and glazed.

Have you seen the combination of cranberries and almonds in any other recipes? Leave a comment below!

Cranberry Almond Scones

These cranberry almond scones have a light, flaky texture and sweet filling reminiscent of cherry. An almond glaze makes them extra special!
Prep Time20 minutes
Cook Time15 minutes
Total Time35 minutes
Course: Breads
Keyword: Bread, Cranberry, Scones
Servings: 6

Ingredients

  • 3/4 cup cranberries
  • 5 tbsp sugar divided
  • 1/4 tsp almond extract
  • 1 3/4 cups flour unbleached
  • 1/2 tsp salt
  • 2 1/2 tsp baking powder
  • 2 ounces cream cheese softened slightly
  • 3 tbsp butter cold
  • 1 egg
  • 1/2 cup half and half
  • 1/4 cup sliced almonds + more for topping
  • extra sugar or almond glaze if desired

Instructions

  • Preheat your oven to 425 degrees Fahrenheit.
  • Combine cranberries and 3 tablespoons sugar in a food processor. Pulse for a few seconds until cranberries are chopped. Stir in almond extract.
  • In a large mixing bowl, combine flour, 2 tablespoons sugar, salt, and baking powder.
  • Cut in cream cheese and butter with a pastry blender until mixture resembles coarse crumbs.
  • Whisk the egg into the half and half. Pour into flour mixture and stir just until combined. Fold in sliced almonds.
  • Turn dough out onto a floured board. Knead gently three times. Pat dough out to 3/4-inch thickness.
  • Spread the cranberry filling over half of the dough. Fold the other half over on top of it. Fold the dough in half again. Pat it out a little and fold in half a third time. Pat into a 9 or 10-inch circle. Cut into 6 wedges with a sharp knife.
  • Place scones on a buttered baking sheet, separating them so that the edges are not touching. Top with additional sliced almonds and sugar if desired.
  • Bake for 12-15 minutes, until edges are golden. Cool on a wire rack. Drizzle with almond glaze if desired.

Notes

For almond glaze: Stir a tablespoon of milk and 1/8 teaspoon almond extract into 3/4 cup confectioner’s sugar. Keep adding milk a little at a time until desired consistency is reached.
Posted on Leave a comment

Spiced Light Fruitcake

light fruitcake recipe
classic fruitcake
light fruitcake recipe
Here’s a recipe for a light fruitcake with a texture similar to pound cake, and warm spices to complement the fruit flavors.

If you missed the boat for stirring up your fruitcake on the first Sunday of Advent, don’t let that deter you from giving this light fruitcake recipe a try. Fruitcakes are still tasty even when they don’t have several weeks to sit and age!

This year, the first Sunday of Advent found us traipsing about the White Mountains with a few of my siblings and my husband’s brother, who was visiting over Thanksgiving.

My thoughts were directed more toward mountains and leftover pumpkin pie than getting ready for Advent and Christmas.

It wasn’t until the next day that, surrounded by liturgical resources, cookbooks, and my file of Christmas recipes, I tackled Advent planning. And realized that I’d meant to make fruitcakes the day before. Oops.

Another week passed before I managed to collect all the necessary ingredients and actually bake the cakes.

Disclosure: This post may contain affiliate links. If you click on the links and make a purchase, I may receive a small commission at no extra cost to you. Read my full disclosure here.

Light vs. Dark Fruitcake

I usually make dark fruitcakes: the kind that consist mainly of dried fruits and spices, with a little flour to hold them together. I steep them in either brandy or apple juice, and age them in the refrigerator for a few weeks.

My husband isn’t the biggest fan of those cakes, and since I probably shouldn’t consume an entire fruitcake by myself, I decided to use a light fruitcake recipe this year.

What’s the difference? Well, light fruitcakes have a lot more butter, flour, and sugar than their dark counterparts. They’re more like fruit-studded pound cakes than a dark, sticky brick of spicy fruit (more or less).

Also, dark fruitcakes are meant to be steeped in dark spirits and aged for weeks or months. Light fruitcakes use light spirits, or none at all. Some of them are meant to be eaten fresh, not aged.

They are both fruitcakes in their own right, but light ones are more like fruitCAKE, while dark ones are FRUITcake!

A Brief History of Fruitcake

light fruitcake recipe
Fruitcakes have been around in some form since ancient times!

Which version is older? It’s hard to say. Fruitcakes as we know them were likely first made in England in the Middle Ages, when trade routes to the East introduced exotic spices and dried fruits.

These would have been very expensive, so they were saved for special occasions like Christmas feasts.

According to Saveur, fruitcake was eaten in 18th century Europe around the winter solstice, to mark the annual nut harvest.

There have probably been nearly as many fruitcake recipes are there are fruitcake bakers. The amounts and types of fruits, nuts, and spices varied depending on what was available.

For example, light fruitcakes today often contain vanilla. This is a New World plant, so it would have been unknown to medieval cooks.

By contrast, dark fruitcakes often contain molasses or dark treacle (its British counterpart). Treacle has been around for a long time, but was mostly used for medicinal purposes up until the 17th century or thereabouts.

Irish Dundee cake is a close cousin of the English fruitcake. Other cultures have their own traditional cakes made with fruits and nuts; some are aged with spirits, while others are not.

light fruitcake

The basis for my fruitcake

Anyway, that’s why I didn’t go with my usual dark fruitcake. I have made both fruitcake recipes from A Continual Feast, by Evelyn Birge Vitz. (I highly recommend that wonderful cookbook, by the way! You can read more about it in this post about traditional cooking.) The following recipe is my adaptation of her Classic Light Fruitcake recipe.

Why didn’t I just follow that recipe? Because her light fruitcake recipe didn’t call for many spices. This may be normal in light fruitcakes, but I’m not going to make a fruitcake without spices–and lots of them!

My choice of spices for this cake was nutmeg and allspice, with a hint of green cardamom. I was going for warm flavors, but didn’t particularly want cinnamon. It seems like everything else I’m making for Christmas has cinnamon in it!

So I’ll make my excuse that there’s no one right way to make a fruitcake, and leave it at that.

I adjusted a few other ingredients to fit my tastes, and altered the amounts so that the recipe would yield 4 mini loaves instead of 2 large loaves. That’s a better size for our small family, and still gave me a few extra loaves for gifts.

light fruitcake pin

Method

Leave your butter at room temperature until it is soft. Cream it with the sugar until light and fluffy. You can do this with a stand mixer, hand mixer, or with a good old wooden spoon.

Beat in the eggs one at a time, stirring well after each egg is added. Add spirits or fruit juice. You can use any spirit you prefer.

Light fruitcakes “traditionally” take light spirits like light rum or sherry. But that wasn’t the taste I was going for. I like to use brandy; that’s just how a fruitcake should taste, in my mind. If your grandmother always used Scotch or Irish whisky, go for it!

You can also use fruit juice in place of the spirits. Do use a light-colored juice, so it doesn’t turn your batter a muddy color. White grape juice, apple juice or cider, or apricot nectar are all good choices.

I added a touch of cardamom bitters for extra depth of flavor. This is not traditional as far as I know, but it’s one of my favorite flavors. You are welcome to substitute other bitters, or leave it out altogether.

Combine the dry ingredients in a small bowl before adding them to the creamed mixture. (Go easy on the spices if you aren’t a lover of nutmeg!) Last of all, add the mixed dried fruits and peel.

Choose your fruits

Here again is an opportunity for creativity. Use whatever dried or candied fruits you like. Dark raisins, golden raisins, sultanas, currants, dried cherries, dried pineapple, or various combinations of candied fruits are all options here!

I like to make my own candied orange peel. It’s simple to make and tastes much better than what you can buy at the store. However, it is perfectly fine to substitute candied citron or a mix of candied fruit peel if that’s what you have available.

Just make sure the final quantity is equal to what’s specified in the recipe, or your baking times may be different.

Butter your pans and pour the batter in. Bake at 325 degrees for an hour if you use the mini loaf pans. If you use larger pans, heat the oven to 300 degrees and plan to bake them for at least 45 minutes longer.

The cakes are done when a toothpick inserted in the center comes out clean. I had no trouble with the cakes browning too fast (although I overbaked the ones in the picture), but if you think they are getting too dark, feel free to cover them with aluminum foil.

Cool in pans for 10 minutes, then remove to a wire rack to cool completely. Decorate with a confectioner’s sugar glaze and candied cherries or pecan halves.

Aging Fruitcakes

aging light fruitcake
Pouring cider over the fruitcakes. Pour it over the underside of the cakes, which absorb more moisture.

If you won’t be eating the fruitcakes right away, round up some cheesecloth- or plain light cotton cloth will do in a pinch. Turn each cake upside down and pour a little spirits or cider over the bottom of the loaf.

This helps the cakes to stay moist during the aging process, and spirits additionally will help meld the flavors of the different fruits.

Wrap each cake in cheesecloth, and again in aluminum foil. I used cider on two cakes and brandy on the others, so I made sure to label them accordingly!

fruitcakes in foil

You may store the wrapped loaves in your refrigerator or in a cool cellar for several weeks to months- although I suspect if you use fruit juice, the won’t last as long.

When you are ready to serve the fruitcakes, unwrap them and decorate as described above.

If you’ve never tried to make fruitcake, I hope this spiced light fruitcake recipe inspires you to give it a go! It’s a very forgiving recipe because it’s supposed to be dense, and it will stand up to a lot of substitutions.

If you do try it, or have your own favorite fruitcake recipe, I would love to hear about it! Leave a comment below.

Spiced Light Fruitcake

Here's a light fruitcake recipe which is similar to a pound cake in texture, but with the addition of extra spices to make the flavor closer to dark fruitcake.
Prep Time20 minutes
Cook Time1 hour
Cooling and Wrapping38 minutes
Total Time1 hour 58 minutes
Course: Dessert
Cuisine: British
Keyword: Cake, Christmas, Fruitcake
Servings: 4 small cakes
Author: kimberly

Equipment

  • cheesecloth

Ingredients

  • 1 cup butter softened
  • 1 cup sugar
  • 3 eggs
  • 3 tbsp spirits or fruit juice see note
  • 1/4 tsp citrus or cardamom bitters optional
  • 2 cups flour
  • 1 1/2 tsp baking powder
  • 1 tsp salt
  • 1/2 tsp nutmeg freshly grated
  • 1/2 tsp allspice
  • 2/3 cup candied orange peel chopped
  • 2 1/2 cups mixed dried fruit
  • 4 ounces spirits or apple cider optional
  • 2/3 cup confectioner's sugar
  • milk
  • candied cherries or pecan halves

Instructions

  • Preheat oven to 325 degrees F.
  • Cream the butter and sugar in a large mixing bowl.
  • Beat in eggs one at a time, mixing well between each addition.
  • Add spirits or fruit juice and bitters, if using.
  • In a medium bowl, mix the flour, baking powder, salt, and spices. Add them to creamed mixture until combined.
  • Mix in dried fruits and orange peel.
  • Butter 4 mini loaf pans. Divide the batter evenly between the pans and smooth the tops. Bake at 325 degrees F for about an hour, until a toothpick inserted in the center comes out clean.
  • Cool in pans for 10 minutes, then remove to a wire rack to cool completely.
  • To Age: If you are not planning to serve the cakes right away, turn them upside down and slowly pour an ounce of spirits or apple cider over each cake. Wrap each in cheesecloth, and again in aluminum foil. Label and store in the refrigerator or a cool cellar for several weeks.
  • Before serving, make a thin glaze of confectioner's sugar and milk. Drizzle over the tops of cakes, and decorate with candied cherries or pecan halves if desired.

Notes

You may use whichever spirits you like in the cake and for aging. Lighter spirits such as light rum or sherry are often recommended for light fruitcakes, but I like to use brandy.
If you would rather not use alcohol, feel free to substitute any light-colored fruit juice. I recommend white grape juice, apple juice or cider, or apricot nectar.
Even if you use alcohol in the cakes themselves, you may wish to use fruit juice to age them if you will be serving to children. Apple juice or cider works well for this purpose.