Posted on 1 Comment

Lemon Thyme Tea Cookies

These lovely lemon thyme tea cookies have a bright lemon and herbal flavor that's sure to delight!
These lovely lemon thyme tea cookies have a bright lemon and herbal flavor that’s sure to delight!

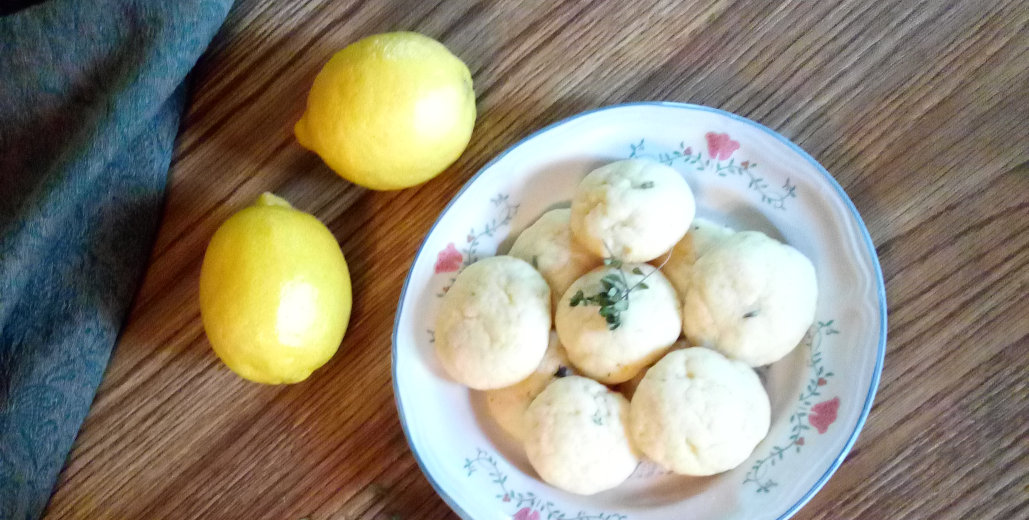
Lemon thyme is one of my favorite herbs to grow, and I’m always looking for new ways to use it. These delicate lemon thyme tea cookies are the perfect backdrop for the bright herbal flavor of lemon thyme. They are an elegant addition to any tea party!

I made these cookies for a bridal shower a few weeks ago, and the bride-to-be liked them so much that she requested them for her wedding as well! I was happy to oblige, because not only are these cookies dainty and delicious, they’re also quite simple to make.

In fact, as far as cookie recipes go, this one definitely belongs in the category of easy, no-fuss recipes.

I based this recipe on a lavender tea cookie, because I thought that recipe provided a nice balance of sweet and floral notes. Instead of dried lavender flowers, I used dried lemon thyme leaves, fresh lemon zest, and a bit of lemon extract.

That sounds like a lot of lemon, but the flavor really isn’t overpowering. These sweet cookies have just enough lemon to complement a nice cup of tea.

If you like herbal flavors, or just want a new cookie recipe to try, I suggest you make a batch of these summery lemon thyme tea cookies. I think you will be pleasantly surprised at their delicate flavoring.

Head over to The Tea Caddy for some of my favorite teas to pair them with!

These lemony tea cookies pair perfectly with your favorite tea for a special occasion or just a quiet afternoon with a friend.

What is Lemon Thyme?

Lemon thyme is not, perhaps, a very common herb – in gardens or in kitchens. I should know, because I have a hard time finding recipes to use it in!

Lemon thyme (Thymus citriodorus) is a variant of common English or German thyme (Thymus vulgaris). It looks just like common thyme, but smells and tastes like lemon. And thyme. It’s pretty wonderful!

Apparently, it is unknown whether this plant is a natural variant of common thyme, or a hybrid of two different plants. In any case, it comes from the Mediterranean region and has been around for at least 200 years. The plant can be found in the South of France, Italy, Spain, and northern Africa. You can read more about lemon thyme here.

Ingredient Notes

Shortening Options

If you don’t like to use hydrogenated shortening, there are other options. You can use all butter, but the cookies won’t be quite as soft, and they are more likely to spread out while baking unless you chill the dough thoroughly first.

Another option is to use palmfruit shortening (or palm oil), which is naturally solid at room temperature. This oil is not hydrogenated, so it does not cause the unwanted effects of regular vegetable shortening. This is what I typically use when a recipe calls for shortening.

Lemon Thyme

For this recipe, I use whole dried leaves of the lemon thyme plant. For some, seeing leaves in their cookie might be off-putting. I understand, and you are welcome to crush your lemon thyme leaves first if this is an issue! My family is used to seeing herbs in their food, so it doesn’t bother them any more. I happen to like seeing the little leaves curling through my cookie!

I have only used dried lemon thyme in this recipe, but fresh leaves should work just as well. Recipes often call for a greater amount of fresh herbs than dried; however, I would recommend starting with the same amount if you are substituting fresh lemon thyme. A cookie chock-full of leaves might not look very appetizing, even if you do like herbs!

These lemony tea cookies pair perfectly with your favorite tea for a special occasion or just a quiet afternoon with a friend.

Method

Before you start, make sure your butter is at room temperature. Cold butter won’t mix well with shortening, resulting in an uneven texture.

Cream the butter, shortening, and sugar together in a large mixing bowl until light and fluffy. Add the eggs, vanilla, and lemon extract, mixing until combined.

In another bowl, combine the flour, baking powder, and salt. Stir in lemon thyme leaves and lemon zest. Gradually add the flour mixture to the butter mixture until combined.

Chill the dough in the refrigerator for 20-30 minutes. I usually just put the entire mixing bowl in the fridge. You can skip this step if you’re not particular about the shape of the cookies. Chilling the dough does help them to stay more compact and rounded, if that is the shape you want.

Heat your oven to 375 degrees Fahrenheit. I do this while the cookies are chilling, because my oven takes a long time to heat up!

Form the cookies into 3/4″ balls and place on ungreased baking sheets. Bake for 8-10 minutes, or until the bottoms are golden brown. Cooling the baking sheets between batches helps to prevent the cookies from spreading out too much.

Remove the cookies from the baking sheets to cool, and enjoy the delicious fragrance of lemon thyme tea cookies wafting through your kitchen!

Happy baking!

~Kimberly

Lemon Thyme Tea Cookies

These lovely little cookies will add a touch of simple elegance to any tea party. With their bright lemon and herbal flavors, these dainty treats are perfect for special occasions.
Prep Time15 minutes
Cook Time30 minutes
Chilling20 minutes
Total Time1 hour 5 minutes
Course: Dessert
Keyword: Cookies, Lemon Thyme, Tea Party
Servings: 5 dozen

Ingredients

  • 1/2 cup butter softened
  • 1/2 cup shortening
  • 1 1/4 cups sugar
  • 2 eggs
  • 1 tsp vanilla extract
  • 1/2 tsp lemon extract
  • 2 1/4 cups all-purpose flour unbleached
  • 1/2 tsp salt
  • 1 tsp baking powder
  • 4 tsp lemon thyme leaves dried
  • 1 tsp lemon zest

Instructions

  • Cream together the butter, shortening, and sugar in a large mixing bowl until light and fluffy.
  • Add eggs, vanilla, and lemon extracts, and mix until combined.
  • In another bowl, combine the flour, salt, and baking powder. Stir in the lemon thyme and lemon zest.
  • Gradually add the flour mixture to the creamed mixture until combined.
  • Chill the dough for 20-30 minutes.
  • Heat the oven to 375 degrees F. Form the dough into 3/4" balls and place on ungreased baking sheets.
  • Bake for 8-10 minutes, until the bottoms of the cookies are golden brown.
Posted on 5 Comments

Simple Strawberry Jam with Dutch Jell

Strawberry jam is simple to make with this quick and easy recipe!
strawberry jam is simple to make with this quick and easy recipe!

There is a short way to make jam, and there is a long way. The long way involves cooking fruit and sugar until the mixture begins to thicken on its own. The short way uses added pectin to speed up the process. 

In general, I like to do things the old-fashioned way, which is typically the longer way. However, there are times when I just need to make jam and don’t have all day to do it! This recipe is simple, fail proof, and takes less than an hour from start to finish! Oh, and the jam is also delicious.

Today was one of those days when my to-do list seemed endless and the children clamored constantly for my attention. It was definitely a day for quick jam-making.

I’ve had strawberries sitting in my refrigerator for nearly a week, begging me to turn them into jam. I kept postponing Canning Day because I was busy preparing goodies for a bridal shower. Now that the shower is over and my kitchen is starting to resume its normal appearance, I had time to focus on jam.

This post contains affiliate links. If you click the links and make a purchase, I may receive a small commission. You can read my full disclosure here.

What equipment do you need to make jam?

  • Water bath canner or pressure canner tall enough to cover your jars with an inch of water. You can substitute a large pot if necessary, if you have a rack to hold the jars up off of the bottom of the pot.
  • Canning jars, lids, and rings. I used 5 pint jars for this recipe.
  • Large stockpot for cooking the jam
  • Potato masher for crushing the berries
  • Wooden spoon
  • Ladle
  • Jar lifter
  • Canning funnel
  • Clean tea towel

The process of making jam using pectin really doesn’t take long once you gather all of your equipment. In fact, what takes the most time is waiting for the water in your water bath canner to boil. I suggest filling that first, before making the jam, so it will be hot by the time you need it.

Sterilizing Jars

There are several different ways to prepare canning jars. The basic concept is that jars and lids need to be sterilized before they are used to store food, or the contents may spoil. Also, the jars should be hot if you are going to fill them with hot jam. Filling cool jars with hot foods may cause the jars to crack.

One way to sterilize jars is to run them through your dishwasher. Another way is to boil them in a pot of water for a few minutes. 

I usually place my empty jars, along with unscrewed rings and lids, in the water bath canner while it is heating. If you don’t want to fish the rings and lids out of a tall pot of boiling water, try boiling them separately in a small pot.

This simple strawberry jam recipe yields 5 pints in under an hour. It is made with Dutch Jell, a natural powdered pectin.

Ingredients

Quick-cook jams can be very simple. For this recipe, you need only strawberries, sugar, and powdered pectin. I use Dutch Jell, but you can substitute a box of another powdered pectin if you wish.

Dutch Jell is a powdered pectin that is sold in bulk packages. I make sure to restock my supply when I visit my in-laws in Pennsylvania, but you can also find it online. The original recipe for strawberry jam from the Dutch Jell company suggests using a rounded 1/3 cup for each batch. This made my jam a bit too gelatinous for my taste, so I just use a level 1/3 cup.

The strawberries should be at their peak of ripeness. If they are underripe, the jam won’t have much flavor. Rinse the berries in cool water and cut off any bad spots with a paring knife.

As for sugar, I have used granulated white sugar and evaporated cane sugar with equally good results. 

Method

Fill your water bath canner with water to about the height of your canning jars. Once you place filled jars in the canner, the water should be deep enough to cover them by about an inch. Place the canner on your stovetop and heat it over the largest burner while you prepare the jam.

If your strawberries are large, cut them into quarters. Small berries may be halved.

Rinse the strawberries under cool water. Hull them and cut off any bad parts with a paring knife. If the berries are large, cut them in quarters; halves are fine for smaller berries. Transfer the berries to a large stockpot. Crush them with a potato masher until they are soupy and no large chunks remain. Unless, of course, you happen to like large chunks in your jam!

Crush the berries in a large stockpot to release the juices. A potato masher works well.

Add the Dutch Jell to the strawberries in the pot and stir well. If you are using a different brand of pectin, read the directions to make sure you add the pectin at the right time.

Measure the sugar into a large bowl. It needs to be added all at once, so don’t wait until the jam is boiling to start measuring it!

Add the sugar to the strawberries all at once.

Bring the berries and Dutch Jell to a boil, stirring frequently. Add the sugar all at once and continue stirring until the mixture begins to foam up. Skim off the light pink foam with a large spoon or a measuring cup. Don’t worry if you don’t get every bit of foam; just stir it back into the jam.

When the jam foams up, skim the light pink foam off the surface. Don't worry about getting every last bit, or you'll remove too much jam along with it.
When the jam foams up, skim the light pink foam off the surface. Don’t worry about getting every last bit, or you’ll remove too much jam along with it.

Once the jam comes to a full rolling boil, continue to cook the jam, stirring constantly, for one minute. Remove from the heat.

Prepare your workspace so that everything is within reach while you’re working with the hot jam. Carefully remove the hot jars, lids, and rings from the boiling water. 

Making strawberry jam: ladling into jars.
Prepare your workspace so that everything is within reach. Place the jar close to the pot of jam to prevent drips.

Set one jar next to the pot of jam. Set the canning funnel in the mouth of the jar. Ladle jam into the jar, leaving ½” of headspace (this should be about level with the bottom of the canning funnel). 

Remove the canning funnel from the jar and set aside. Dip a corner of the clean towel into the pot of hot water. Use it to wipe all around the rim of the jam-filled jar. Sticky residue on the rim can interfere with the seal.

Wipe around the rim of the jar to remove any sticky jam residue.

Place a lid on the jar, then screw a ring on. You may want to hold the hot jar with a towel or pot holder. Screw the ring until it is fingertip-tight. You don’t need to screw it on as hard as you can!

Set the jar into the water bath canner, using the jar lifter. Repeat the process with the remaining jars. If you have some jam remaining which doesn’t quite fill a jar, don’t try to can it. Just refrigerate the partially-full jar after it cools, and consume it first.

Canning strawberry jam: boiling water bath
Use a jar lifter to place jam jars into the canner. Be careful of the hot steam!

Once all the jars have been filled and placed in the water bath canner, check the water to see if it is still boiling. If not, cover with a lid and return to a boil. 

When the water boils, set a timer for ten minutes. The canner does not need to be covered during the boiling water bath. Leave the jars undisturbed in the canner for ten minutes, then remove them one by one with the jar lifter and set aside to cool. 

You will hear a popping sound when each jar seals. This can take a few seconds up to several minutes. 

Mmm, fresh strawberry jam with sourdough bread. What a treat!

After the jars have cooled, don’t forget to label them with the date and contents! Strawberry jam will keep in sealed jars at room temperature for over a year.

strawberry jam is simple to make with this quick and easy recipe!
Print Recipe
2 from 1 vote

Simple Strawberry Jam with Dutch Jell

Looking for a quick and easy strawberry jam recipe? This recipe yields 5 pints of jam in under an hour!
Prep Time10 minutes
Cook Time10 minutes
Boiling Water Bath10 minutes
Total Time30 minutes
Course: Condiments
Keyword: Jam, Strawberries
Servings: 5 pints

Equipment

  • Water bath canner or pressure canner
  • pint jars, lids, and rings
  • stockpot
  • potato masher
  • wooden spoon
  • ladle
  • jar lifter
  • canning funnel
  • clean tea towel

Ingredients

  • 2 lbs. strawberries rinsed, hulled, and quartered
  • 7 cups sugar
  • 1/3 cup Dutch Jell powdered pectin

Instructions

  • Fill a water bath canner or pressure canner with water to cover your jars. Set it over high heat and bring to a boil.
  • Sterilize jars and lids in boiling water or in your dishwasher.
  • Place strawberries in a large stockpot and crush to release juices. Stir in Dutch Jell. Bring to a boil over medium heat, stirring occasionally.
  • While the strawberries are cooking, measure the sugar into a large bowl. When the strawberries begin to boil, add the sugar all at once and stir well until combined.
  • Return the mixture to a boil, stirring frequently. Skim foam off the surface with a large spoon or a measuring cup. Boil and stir the jam for one minute, then remove from the heat.
  • Ladle jam into hot jars, using a canning funnel. Wipe around the rim of each jar before placing a lid on it. Fingertip-tighten the ring around the mouth of the jar.
  • Use a jar lifter to place the jars into the water bath canner. Boil for 10 minutes, then remove jars to cool.
  • When the jars have cooled, check the seals and label the jars with contents and date. Strawberry jam will keep in sealed jars at room temperature for over a year.

Notes

You may substitute other brands of powdered pectin for the Dutch Jell. 1/3 cup Dutch Jell is equal to one box of powdered pectin. Be sure to read the instructions on the box before proceeding with the recipe.
3 ingredients is all it takes to make delicious strawberry jam in under an hour!
Posted on 2 Comments

Adventure-Ready Granola Bars

adventure ready granola bars
homemade granola bars
adventure-ready granola bars

When most of the food you eat is made from scratch, sometimes it’s hard to come up with snacks to pack along on hikes, road trips, or other outdoor activities. These homemade granola bars are kid-friendly and adapt to big or small adventures!

Do you ever find yourself trying to head out on some last-minute trip and searching through your cabinets and refrigerator thinking, “The world is so full of a number of snacks, I’m sure we should have some here somewhere…”

Maybe I’m the only one who finds herself in this predicament rather frequently. I’ve packed along some interesting comestibles for day hikes and car trips simply because we didn’t have any “snack food.”

I do realize that you can buy packs of trail mix, nuts, and all kinds of bars in just about any store that sells food. And I do buy dried fruits and nuts for trail mix. But I like to make my own food for several reasons, so I don’t usually stock packaged snacks.

So began my search for healthy snack foods that are simple and easy to make at home, don’t cost much, and are full of real ingredients. Ideally, they would also be portable and not very messy.

adventure-ready granola bars

Versatile Granola Bars

Granola bars rank high for portability and are a compact energy source, which is great for activities where you don’t have a ton of extra space for food.

Homemade granola bars are great for families with allergies or food intolerances, because you can adjust recipes to fit your needs. You can also choose which add-ins like dried fruits, nuts, or chocolate to include based on your family’s preferences.

This has been my go-to granola bar recipe for over a year now. They’re simple to mix up and quick to bake, and many of the ingredients can be substituted if you wish. So if you get tired of my favorite flavor combination (dark chocolate, almonds, and cranberries), there are plenty of others to try instead!

I can make these start to finish in less than an hour, even with a toddler helping me! That is definitely an important factor for me when I’m choosing between recipes. Time is the number one reason I get intimidated by recipes for crackers or other snack foods.

Not only are these quick, they’re also just about as easy as it gets. Stir everything together, spread it in a pan, and pop it in the oven to bake. No rolling out fragile dough or cutting into shapes, no constant checking of the oven. They don’t even make a mess of your counter, because they cool in the pan!

The original recipe was a coconut granola bar recipe from Taste of Home, but I’ve played around with the recipe quite a bit. My biggest challenge with granola bar recipes is always making them stick together and not crumble too easily- but still be more of a granola bar than a cookie bar.

Need a good source of energy for your active lifestyle? This quick and easy granola bar recipe is packed with natural ingredients and 7 grams of protein to keep you going all day long!

Maybe my problem is trying to add too many additions to the dough. But who wants to leave out the chocolate? These bars can be a bit crumbly, so I’m still searching for the perfect granola bar recipe. I would not give one to a toddler in a car seat!

Crumbs aside, these bars have great flavor and texture, and a lot of protein: 7 grams per bar! That’s enough to keep my boys happy. These homemade granola bars don’t last very long in our house! Hence the recurring dilemma of absent snack foods…

Method

In a large mixing bowl, stir together the peanut butter, brown sugar, honey, melted coconut oil, and vanilla. Whisk the eggs lightly and add them to the peanut butter mixture.

Combine the oats, flour, salt, and baking powder, and add to the peanut butter mixture. By the way, you can use oat flour or ground oats to make these gluten free.

Mix in the nuts, flaked coconut, dried cranberries, and chocolate chips. The mixture will be stiff. I use almonds, cranberries, and dark chocolate chips in my bars, but you don’t have to stick with these suggestions.

granola bar dough

Try peanuts, cashews, or pecans in place of the almonds. Sub raisins, dried cherries, or dried blueberries for the cranberries. And switch dark chocolate chips to milk or white chocolate pieces or M&Ms. Or leave them out entirely, if you’re trying to limit sugar.

The same thing goes for the coconut. You can leave it out if coconut isn’t your favorite flavor or texture. Add a little wheat germ or flax seeds instead (but decrease the amount, since these are denser than coconut).

You may be thinking that coconut and peanut butter don’t sound like a great combination. I was a little skeptical about using peanut butter myself, at first. However, the peanut butter is not a dominant flavor in these bars. Its role is to help everything stick together.

Pat the mixture into a buttered 13×9″ pan. Bake at 350 degrees F for 25-30 minutes, until the edges start to brown and the center is set.

Cool the granola bars in the pan and slice into bars with a sharp knife. I usually make 18 bars so they’re big enough to satisfy my husband, but if you are making these mostly for smaller appetites, feel free to cut them as small as you wish.

homemade granola bars
Cool the bars completely before removing them from the pan. This helps to prevent crumbling.

When the bars have cooled, remove them from the pan and wrap individually in plastic wrap. They will keep at room temperature for at least 2 weeks, and in the freezer (individually wrapped and placed in a freezer bag) for several months.

Now you’re ready for any adventure! Pack a few of these bars along, and you’ll have a snack that you can feel good about feeding to your family!

Do you have any favorite take-along snacks? I would love to hear about them! Don’t forget to sign up for my email newsletter for more recipes and homely tips!

homemade granola bars

Adventure-Ready Granola Bars

These granola bars are chock-full of real, healthy ingredients that taste great and are good for you, too. With 7 grams of protein per bar, they are a great snack for adventures big or small!
Prep Time15 minutes
Cook Time30 minutes
Total Time45 minutes
Course: Snack
Cuisine: American
Keyword: Granola Bars, Healthy Snacks
Servings: 18 bars

Ingredients

  • 2/3 cup peanut butter
  • 1/2 cup brown sugar packed
  • 1/2 cup coconut oil melted
  • 1/2 cup honey
  • 2 eggs lightly beaten
  • 1/2 tsp vanilla extract
  • 2 cups rolled oats
  • 1 cup whole wheat flour
  • 1 tsp baking powder
  • 1/4 tsp salt
  • 2/3 cup flaked coconut
  • 2/3 cup sliced almonds
  • 2/3 cup dried cranberries
  • 3/4 cup dark chocolate chips

Instructions

  • Preheat oven to 350 degrees F.
  • In a large mixing bowl, combine peanut butter, brown sugar, honey, coconut oil, and vanilla extract. Beat eggs lightly and add to peanut butter mixture.
  • Combine the oats, flour, baking powder, and salt; add to peanut butter mixture.
  • Mix in coconut, almonds, cranberries, and chocolate chips. The mixture will be stiff.
  • Pat into a buttered 13×9" pan. Bake for 25-30 minutes, until edges start to brown and center is set.
  • Cool in pan. Cut into bars. When cooled, remove from pan and wrap bars individually.

Notes

Gluten-free variation: substitute oat flour or ground oats for the whole wheat flour.
You may also substitute any nuts or dried fruit you like in place of the almonds and dried cranberries.
Posted on 5 Comments

Dutch Oven Baked Beans

Dutch oven baked beans
Dutch oven cooking at its country best! Long, slow cooking is the key to the best Dutch oven baked beans.
If you're looking for hearty country-style meals, try this Dutch oven baked beans recipe. Long, slow cooking brings out great flavor!

I love cooking with a Dutch oven. There’s something about meals like Dutch oven baked beans that makes them feel so substantial. Maybe it’s just the heaviness of the cast iron that feels so solid, or the notion of cooking like the pioneers once did.

It might even be the types of meals I tend to cook in my Dutch oven: long-simmering soups, stews, or other hearty main dishes that home cooks have been serving to their families for centuries.

Here is one such recipe. Baked beans have been an American classic since the time of the early New England settlers. They haven’t lost much popularity since then, spreading West with the pioneers and finally finding their current place as an indispensable component of cookouts and tailgate parties.

Slow baked beans

I wonder what those early New England settlers would think of baked beans being classified as picnic food? They couldn’t just open a can of cooked and seasoned beans at a moment’s notice.

No, their baked beans required some forethought, because they took a night and a day to reach completion: a night to soak, and a day to cook.

You may have gathered that I like old-fashioned ways, so it should come as no surprise that I prefer my baked beans homemade instead of from the grocery store.

But since I don’t pretend to have as much forethought and practicality as New England pioneer cooks, I’ve adapted their recipe for a shorter cooking time.

How short? Well, don’t ask me for a 30-minute meal or anything. Baked beans need a long time to cook, so they can absorb the flavors of the sauce and meat. If you won’t be soaking the dried beans overnight, plan for 1 hour of quick soaking, 45 minutes of cooking, then another 5-6 hours to cook the beans in the oven.

You can shorten this even further by using plain canned beans or by cooking your beans ahead and storing them in the refrigerator or freezer. Cooked beans freeze exceptionally well.

I have cooked the beans for as little as 3 1/2 hours in the oven. They’re still okay at that point if you’re short on time, but they definitely get better with longer cooking. In fact, these beans taste best reheated on the second or third day. Some things just get better with time.

Which cooking method is best?

It took me years to find a recipe for baked beans that I liked. I grew up on baked beans out of a can, and I’m still not sure how they get that particular flavor. (I think there must be a lot of sugar in those cans!)

After trying several slow cooker recipes and different types of beans, I was almost ready to give up. The results varied: too soupy, too sweet, too bland. It was always disappointing. Then I stumbled upon a Dutch oven baked beans recipe that was more like what I had in mind.

I burnt the beans the first several times I made the recipe, but the results were still good enough that I was willing to keep trying, slowly adjusting ingredients to find what worked best.

My theory is that the cooking method really makes a difference. When you use a slow cooker, it traps all the liquid and doesn’t let any evaporate. Cooking beans in the oven–in a Dutch oven or bean pot–is more like cooking over a fire. It imparts a depth of flavor that slow cookers just can’t give.

Think of it like toasting marshmallows. If the only goal is to make them gooey, the microwave works just fine. But if you’re looking for that perfectly-toasted marshmallow flavor, you can’t beat hot coals and a long stick.

Dutch oven beans

Adjust to taste

I hope you won’t have to try as many recipes or make as many adjustments as I did, but you still may need to tweak a few things.

For this reason–and because you shouldn’t leave an oven unattended for long periods–plan to make this recipe on a day when you will be around to check on the beans from time to time.

Ovens can be temperamental

This applies to both temperature fluctuations and dryness. Mine seems to suck all the moisture out of these beans after a few hours, so I have to keep putting more water in. Your oven may not do that, which is why I don’t recommend adding all the water at the beginning.

Just stir the beans every hour or so to check on the amount of liquid and prevent burning. Add no more than a cup of water at a time. You want the sauce to be thick.

Beans may behave differently

Results can vary slightly depending on whether you soak them overnight or use the quick-soak method, or if you choose to start with canned beans. (Or if your beans are prepared and packaged for emergency/long-term storage, as I learned the hard way!)

Different bean varieties can also lend their own particular flavors, colors, and characteristics to the meal. This is a good thing! I encourage you to experiment and find what you like best.

For example, I don’t like to use pinto beans for baked beans, but I have tried recipes that called for them. So far, the successful bean varieties in my book are Great Northern, navy, small white or red beans, and dark or light kidney beans. I usually use some combination of these.

Method

Prepare your beans

You have several options: soak dried beans in cold water overnight, use the quick-soak method for dried beans in the morning, or start with pre-cooked or canned beans (plain, not canned baked beans).

To soak beans overnight: place dried beans in a pot or bowl. Fill the pot with cold water to cover beans by at least an inch. If using a small (2-quart) pot, you may want to add more water.

To use the quick-soak method: place dried beans in a pot and cover with at least an inch of water. Cover and bring to a boil. Remove from heat and let sit, covered, for an hour.

If you’re starting with cooked or canned beans, skip the next step.

Cook the beans

Drain the soaked beans. Place them in a pot or Dutch oven and cover with water. Bring the beans to a boil. Turn the heat down and simmer for 40-45 minutes until the beans are soft.

Cooking times may vary slightly depending on what kind of beans you use and how old they are. Beans also take a little longer to cook at higher altitudes.

*If you are using beans that have been prepared and packaged for emergency rations or long-term storage, your cooking times will be much longer. I allow at least 2-3 hours.

Prepare to bake your beans

If you’re using canned beans, start here.

Preheat your oven to 325 degrees F. Adjust oven racks so your Dutch oven will fit comfortably.

Place cooked beans in a large bean pot or Dutch oven.

Chop the bacon or salt pork into 3/4-inch pieces and add them to the pot. When I’m using salt pork, I slice it first–about twice as thick as bacon–and then chop. You can just chop the entire piece of meat into cubes if you prefer.

Frozen bacon? No problem. Chop the entire block crosswise, and the layers will separate as they cook. No danger of undercooking here!

ingredients in Dutch oven
It will look like a lot of onion when you combine everything! Don’t worry: they cook down and add subtle flavor to the beans.

Add the rest of the ingredients, along with 2 cups of boiling water. Stir well. Cover and place in the oven for 5-6 hours.

Baking the Beans

You will want to check on your beans periodically during the cooking time. How often? You should stir the beans after about two hours, and every hour thereafter.

Add more water if they are getting dry. You don’t want them to burn, but you do want to end up with a nice thick sauce, so don’t add more than a cup of water at a time.

baked beans
This is how my beans looked after 1 hour. They are still pretty soupy at this point, so I didn’t add any liquid yet. Just give them a good stir and keep cooking.

If the beans are absorbing a lot of liquid and seem to be getting too dry between checks, you can stir them more frequently or turn your oven down to 300 degrees F.

If the beans and/or sauce around the edges gets dark, don’t worry. Just add some water and stir thoroughly, scraping the sides. You actually want the color to darken, as this improves the flavor.

If it’s actually burnt black, don’t mix that part in. Chances are that the middle will be fine, even if the edges are burnt.

Dutch oven baked beans
Notice the darker color around the edges. That’s what you’re looking for. These beans have cooked for about 5 hours and are full of great flavor!

You can let the beans cook all day if you want to. Anywhere between 3 1/2 and 8 hours is fine. In general, I try to cook mine for about 5 hours, but the longer the better!

baked beans and cornbread

Serve these Dutch oven baked beans with hot cornbread or toasted English muffins for a real country-style treat!

Dutch oven baked beans
Print Recipe
5 from 1 vote

Dutch Oven Baked Beans

This big pot of hearty baked beans makes a comforting meal that will feed a horde of hungry appetites! It's cooked slowly in the oven for classic American flavor.
Prep Time40 minutes
Cook Time5 hours
Soaking1 hour
Total Time6 hours 40 minutes
Course: Main Course
Cuisine: American
Keyword: Beans, Dutch oven
Servings: 8 hearty servings

Equipment

  • Dutch oven

Ingredients

  • 3 cups dried beans
  • 1 1/4 cups packed brown sugar
  • 2 cups boiling water
  • 1/3 cup coarsely-ground mustard
  • 1/2 cup molasses
  • 12 ounces thick-sliced bacon or salt pork cut into 3/4-inch pieces
  • 2 onions chopped

Instructions

  • Place dried beans in a Dutch oven and cover with cold water. Soak overnight or use the quick-soak method.
  • For quick-soak method: Bring beans and water to a boil. Remove from heat and let sit for one hour, covered.
  • After soaking, add more water to cover beans. Bring to a boil over high heat; reduce heat to low and simmer for 40-50 minutes until beans are soft. Preheat the oven to 325 degrees F.
  • Drain beans. Add the rest of the ingredients to the Dutch oven along with 2 cups boiling water. Stir well and cover.
  • Bake for 5-6 hours, stirring every hour. Add more water as necessary to prevent burning. The beans are done when the color has darkened and the sauce is thick.

Notes

Red or white bean varieties work best. Feel free to use a combination of different types of beans, such as Great Northern, navy, kidney, small white or red beans.