Posted on Leave a comment

Hearty English Muffins

Hearty English Muffins
English muffins are a simple, versatile bread that can be made into toast, sandwiches, or even mini pizzas.
Jump to Recipe

Toast is a breakfast staple around here, and English muffins are one of my favorite kinds of bread to toast. They come in individual servings, they don’t tend to get crumbs everywhere like a big loaf, and their texture when toasted is just right: not too dry, nor too chewy. Then there’s the added bonus of complementing just about any topping you could come up with. From butter, nut butters, jam, or honey to bacon and eggs or pizza toppings, English muffins are surprisingly versatile.

Recently, most of my English muffins have been made with sourdough, but today I wanted something fluffier and heartier. I know those two words don’t seem to go together, but compared to the sourdough muffins, these have much more of a rise, so there’s just more to them. They are quite delicious fresh from the skillet to the toaster, but don’t burn your mouth!

Making the dough

English muffin dough behaves like any yeast bread dough. Dissolve the yeast in the “wet” ingredients, then stir in the flour and salt. I like to add about 4 cups of flour at first, then the rest 1/2 cup at a time. When the dough gets too stiff to stir, turn it out onto a floured counter or board. Knead it thoroughly, adding flour as needed, until the ball of dough is smooth and elastic. You want a fairly stiff consistency, so the muffins won’t fall and lose their rise when you transfer them to the skillet.

rolling dough
Roll out the dough to about 1/2 inch thick. The muffins should double their height by the time they’re done cooking.

Let the dough rest for 5 minutes, then sprinkle some cornmeal onto the counter and roll it out 1/2 inch thick. Don’t worry about making a perfect rectangle; you will be cutting it up anyway. You can make the muffins whatever size you want. If a biscuit cutter seems too small, try using an upside-down glass or small bowl to cut the dough. While the muffins will double their height, they won’t get much bigger in diameter. Combine any remaining scraps of dough and form them into another muffin or two. They don’t all have to be the same size.

 English muffins on baking sheet
Let the muffins rise on cornmeal-covered sheets for 35-40 minutes.

Once you have the muffins cut out, place them on cornmeal-covered baking sheets to rise. You don’t need to grease the sheets. The muffins only need 35-40 minutes to rise, but a bit longer isn’t a problem.

Skillet Tips

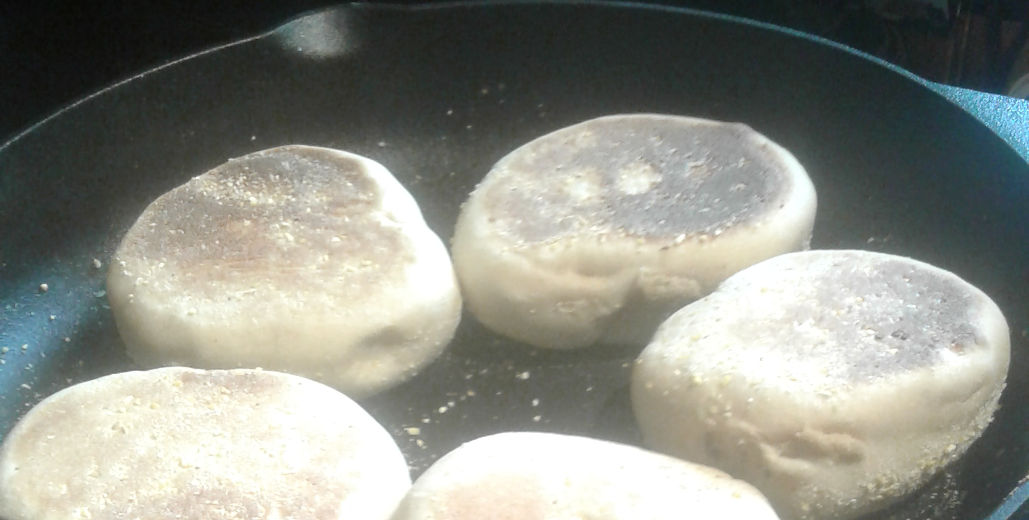
When the muffins have risen, heat a large, heavy skillet over medium-low heat. Cast iron works best. Place muffins in the skillet, making sure both sides are coated with cornmeal. Don’t overcrowd the skillet, but it’s not a problem if the muffins are touching just a little.

Don’t crowd the muffins in the skillet. It’s fine if the edges barely touch.

If you’ve never cooked anything on a dry skillet, you may have to play around with the temperature, so keep checking your muffins while they cook. I cook mine somewhere between low and medium low, depending on how fast they are cooking–and my level of patience!

Flip the muffins over carefully after the first side has cooked. Don’t squish them down in the pan–you don’t want to lose the rise! It’s best to use a heat-proof spatula to avoid burnt fingers.

In an ideal world, every muffin will get cooked to a nice golden brown on each side, without any gooiness in the center. In my world, either the edges cook too fast and the center gets underdone, or one side ends up much darker than the other, or there’s a diaper explosion and I come back to a smoking skillet…

English muffins
English muffins should be cooked until golden brown on both sides and cooked through the middle.

If the center does seem a bit underdone, you have a few options for recovery. First, you can try putting the muffins back in the pan on low heat. This is only a good option if the edges aren’t already pretty dark.

Second, you can bake the muffins in a 350 degree oven for 5-10 minutes. Check on them frequently, especially if they were still hot when you put them in the oven.

Third, if the center is only a little underdone, I usually end up just storing the muffins in the refrigerator and toasting them thoroughly when they come out.

Storing English Muffins

You can store your English muffins in an airtight bag at room temperature for about a week. Cool the muffins completely before putting them in a plastic bag. Alternatively, you may store them in the refrigerator. They also freeze very well, and you can toast them straight from the freezer. Breakfast doesn’t get any more convenient than that!

Hearty English Muffins

Thick and fluffy, these are not your typical grocery store muffins. With superior flavor and hearty texture, these will be a welcome addition to your breakfast table.
Prep Time15 minutes
Cook Time40 minutes
Resting Time45 minutes
Total Time1 hour 40 minutes
Course: Breakfast
Keyword: Bread, Muffins
Servings: 12 muffins

Ingredients

  • 1 cup warm water
  • 2 1/4 tsp active dry yeast
  • 2 tbsp honey
  • 1 cup milk
  • 3 tbsp butter softened
  • 1 1/2 tsp salt
  • 2 1/2 cups whole wheat flour
  • 3-3 1/2 cups unbleached flour
  • cornmeal

Instructions

  • In a large bowl, dissolve yeast in warm water. Add honey, butter, and milk. Stir in salt.
  • Stir in whole wheat flour and 1 1/2 cups unbleached flour. Add more flour 1/2 cup at a time until dough is too stiff to stir.
  • Turn dough out onto a floured board and knead for 6-8 minutes, adding more flour as necessary to prevent sticking.
  • Let dough rest for 5 minutes.
  • Sprinkle board with cornmeal. Roll dough out to 1/2 inch thickness.
  • Cut into rounds and place on cornmeal-covered sheets. Let rise 35-40 minutes.
  • Heat a skillet and cook muffins over low to medium-low heat until golden brown on each side and cooked through the center (6-10 minutes per side).
  • Cool completely on a wire rack before storing.

Notes

Cooking times are approximate and will be affected by the heat of the skillet as well as the size and thickness of the muffins.

For more baking fun, check out this recipe for pumpkin snickerdoodles!

Posted on 2 Comments

Secrets to the Best Banana Nut Bread Recipe

banana bread
best banana nut bread recipe
Want to know what makes a perfect, even textured bread ripe with banana flavor? Read on!
Jump to Recipe

I’ve been trying to stock my freezer lately, in preparation for the arrival of a new baby—and an extended period of time during which I won’t want to cook. Granted, I’m not particularly excited about extra cooking now, when it’s hot outside, and I have a baby heating me up from the inside, and a propane oven that raises the temperature in our small cabin pretty quickly… But there were bananas looking lonely in the freezer, and I thought how nice it would be to have some banana bread on hand for breakfasts. So out they came and I dug out my mom’s best banana nut bread recipe.

My mother’s banana nut bread recipe is hands-down the BEST I’ve tasted. It has better flavor and texture than so many others, and rises nicely to make a large, domed loaf.  Not to mention it also freezes well. You can make it with or without nuts, and I like to pretty it up for Christmas or Valentine’s Day by adding chocolate chips and maraschino cherries. If you’re trying to limit sugar, here’s a link to a lower-sugar variation that my sister developed and her family loves. It’s also dairy-free!

I grew up eating slices of this bread spread thinly with butter, which my husband finds appalling. It is equally tasty plain or with peanut butter. In fact, I commonly make banana bread and peanut butter sandwiches to take along when we’re traveling, because they tend to be less messy than regular PB&J sandwiches.

THE SECRET IS IN THE BANANAS:

You don’t want to use perfectly yellow bananas with no brown spots when making banana bread. As they ripen, the flavor of bananas becomes more developed and the starches convert into sugars. That said, I like to use bananas that are a bit past their peak, let them sit on the counter for a few more days so they have lots of brown spots, and then pop them in the freezer until I have enough time and bananas to make bread. I definitely recommend freezing your bananas first, because then when you thaw them, they’re already mushy, and you don’t end up with chunks of banana in your bread. Ideally, you want the texture to be consistent throughout your bread (except for nuts/add-ins). If you do decide to refrigerate or freeze your bananas, the skins will turn dark brown. Don’t be alarmed! This is normal, and the fruit inside tastes just fine.

best banana nut bread recipe
Freeze bananas a day or two past their peak for deeper banana flavor. This banana’s skin turned darker in the freezer, but the fruit inside is perfectly fine.

NOTE: If you let bananas sit out at room temperature too long, they will start to rot, and both the banana and its skin will turn dark and mushy. Do not use rotten fruit!

A word about milk

One other tip for the best banana nut bread recipe is the sour milk. Cultured buttermilk works just as well. This brings out the sweetness and overall flavor of the bananas, while improving the texture of the bread. It’s easy to sour your milk by adding just a touch of vinegar to it, and letting the mixture sit for a few minutes so it will curdle. I use white vinegar in this recipe, because I don’t want to add any other flavors. Lemon juice would probably work as well, but you might have to use a larger amount in order to curdle the milk.

When baking this bread, don’t be alarmed if it gets pretty dark on top.  The color should be a nice glossy brown when it’s done. This is due to caramelization of the sugars in the bananas themselves, because we used such ripe fruit. To determine doneness, stick a toothpick in the center. If it comes out clean or with just a few moist crumbs, the bread is done. You can also check by pressing lightly on top of the loaf with your finger. It should spring back, not sink.

Print Recipe

Mom’s Banana Bread

Firm-textured and deeply flavorful, this banana bread is a tried and true family favorite.
Prep Time20 minutes
Cook Time1 hour 5 minutes
Total Time1 hour 25 minutes
Course: Breakfast
Keyword: banana bread, Quick bread
Servings: 1 loaf

Ingredients

  • 1/2 cup butter softened
  • 1 cup sugar
  • 2 eggs
  • 3 bananas preferably frozen, thawed
  • 3 tbsp milk + 1/2 tsp vinegar, or use sour milk
  • 1 cup unbleached all-purpose flour
  • 1 cup whole wheat flour
  • 1 tsp baking soda
  • 1/2 tsp salt
  • 1/2 tsp allspice optional
  • 1 cup chopped walnuts or other nuts optional
  • 1/2 cup chocolate chips optional
  • 2 tbsp chopped maraschino cherries optional

Instructions

  • In a large mixing bowl, cream the butter and sugar.
  • Add the eggs, bananas, and sour milk.
  • In a separate bowl, mix together the flour, baking soda, salt, and allspice. Add the dry ingredients to the banana mixture.
  • Fold in any extra ingredients: nuts, chocolate chips, and/or maraschino cherries. Don't mix too much!
  • Turn into a greased 9×5" bread pan. Bake at 350 degrees for 60-70 minutes.

Notes

If your bananas are very small, you may want to use 4 instead of 3.
Posted on 1 Comment

Butterscotch Creme Iced Tea

butterscotch tea
Butterscotch Creme Iced Tea
Looking for a creamy, refreshing summer beverage? This tea is the perfect balance of sweetness and creaminess, blended with flavorful black tea for a tasty summertime treat!
Jump to Recipe

Oh, the long summer days of July. We’ve had a lot of wildfires this summer, and not much rain, which means a lot of smoke. It’s hard to stay inside, especially if you’re a toddler and really don’t understand why Mommy won’t let you go out just because the sun looks red through a grayish haze. Also, the house gets really hot if the windows have to stay closed.  This is the time of year when I don’t feel like cooking or eating heavy meals, but cold drinks are always refreshing—and most welcome to throats scratchy from smoke, if we have been outside.

This iced tea is quickly becoming my drink of choice this summer.  I’ve played around with the recipe, using different kinds of tea, flavorings, and sweeteners.  It’s pretty flexible, which suits me. I like to mix things up!

The inspiration for this recipe came from an iced tea recipe in Let’s Have Tea Together, a Holly Pond Hill book by Susan Wheeler. It is a delightful little book full of stories, recipes, and lovely illustrations. It is written in the spirit of a gentler era when life was not too busy for teatime.

Before coming across this recipe, I had never considered putting a creamy or milky liquid in iced tea.  I like black tea with milk, so it appealed to me. 

This recipe called for sweetened condensed milk, and I happened to have some on hand, so I thought I’d give it a go. Several batches later, I’m glad I did! My husband is also a big fan, and he doesn’t usually drink iced tea.

Disclosure: This post may contain affiliate links. If you click on the links and make a qualified purchase, I may receive a small commission at no extra cost to you.

Teatime Treats

If you’re looking for a treat to accompany your tea, try my banana bread recipe. I love quick breads with tea as an afternoon snack. They are satisfying and flavorful without overpowering sweetness.

Scones are another perfect accompaniment to tea parties! Call up a friend and mix up a batch of cranberry scones or lemon ginger scones!

The basic formula for this drink is strong tea + sweetener + flavoring (optional) + creamy liquid + ice cubes.  As I said, the customization options are endless. 

Butterscotch Creme Iced Tea is the perfect cold and creamy drink for hot summer afternoons! The sweet butterscotch flavor pairs well with creamy milk in a refreshing iced tea.

Tea

I have used regular black tea as well as flavored black teas. My favorite tea to use in this recipe is Butterscotch Blondie from Tazo Tea. It’s one of their dessert teas, which have lower caffeine than, say, an English or Irish Breakfast blend.

You do want to stick with black tea, if you will be adding condensed milk. Green, white, oolong, and herbal teas don’t stand up well to milk. The one exception I can think of is rooibos.  If they use that to make a caffeine-free chai tea, it might work here.

Do brew your tea double-strength, if you will be serving it over ice, because the ice cubes will dilute the beverage as they melt.  I have found that I can get away with using about 1 ½ times as much tea as I normally would, but letting it steep for 15-30 minutes instead of the normal 3-5. For this recipe, I used 6 bags of black tea for 4 cups of water. If you like stronger tea (or actually let the ice cubes melt before drinking it!) then I would recommend 8 bags (or teaspoons of loose tea).

Sweetener

Okay, so this isn’t strictly necessary, especially if you’re using a flavored tea like butterscotch or vanilla.  However, if you do like your iced tea a bit sweeter, make sure you use a liquid form, or else stir in the sugar while the tea is still pretty hot!

Also, remember that different sweeteners have different strengths. You might want to start out with just a little, and then add more if it’s not sweet enough. A little maple syrup goes a long way!

Honey is another good option, and sugar works if you add it to the tea while it’s still hot. I have not personally tried stevia or other sweeteners, but go ahead and experiment!

Flavoring

The original recipe I tried called for both vanilla and maple extracts. In subsequent attempts, I have left the flavoring out when I used flavored teas or sweeteners. This is totally up to you! Vanilla extract + honey is a nice combination if you are using plain black tea.

Creamy Liquid

So far, sweetened condensed milk is the best option I’ve tried.  Sweetened condensed coconut milk should work the same way, and you could certainly experiment with other canned or fresh creamy liquids. I have tried whole milk when serving the tea immediately (not storing for later). This doesn’t add as much creaminess–or sweetness, so you may want to increase the sweetener! Also, it takes a lot more fresh milk than condensed, and this can dilute the tea too much by the time the ice cubes melt.

Ice Cubes

I use regular ol’ water for my ice cubes. You could, however, make ice cubes out of tea, and then you wouldn’t have to make the tea so strong to begin with.

There you have it: a simple, customizable recipe for delicious, creamy iced tea. Infinitely variable, to suit whatever taste you might be craving, all summer long. Let me know what flavor variations you come up with!

Print Recipe

Butterscotch Creme Iced Tea

Cool, creamy, and delicious–sure to be your new favorite summertime drink!
Prep Time15 minutes
Chilling30 minutes
Total Time45 minutes
Course: Drinks
Keyword: Iced Tea
Servings: 4 cups

Ingredients

  • 4 cups Butterscotch flavored black tea
  • 3 tbsp Pure maple syrup
  • 1/2 tsp Pure vanilla extract optional
  • Sweetened condensed milk to taste

Instructions

  • While the tea is warm, but not hot, stir in maple syrup and vanilla extract. Chill
    flavored tea. When ready to serve, stir in sweetened condensed milk to taste or
    until the blend is sweet and cloudy. Pour over ice and enjoy!

Notes

You may substitute regular black tea or other flavored teas, as well as different sweeteners and types of milk or cream.