Posted on 5 Comments

Simple Strawberry Jam with Dutch Jell

Strawberry jam is simple to make with this quick and easy recipe!
strawberry jam is simple to make with this quick and easy recipe!

There is a short way to make jam, and there is a long way. The long way involves cooking fruit and sugar until the mixture begins to thicken on its own. The short way uses added pectin to speed up the process. 

In general, I like to do things the old-fashioned way, which is typically the longer way. However, there are times when I just need to make jam and don’t have all day to do it! This recipe is simple, fail proof, and takes less than an hour from start to finish! Oh, and the jam is also delicious.

Today was one of those days when my to-do list seemed endless and the children clamored constantly for my attention. It was definitely a day for quick jam-making.

I’ve had strawberries sitting in my refrigerator for nearly a week, begging me to turn them into jam. I kept postponing Canning Day because I was busy preparing goodies for a bridal shower. Now that the shower is over and my kitchen is starting to resume its normal appearance, I had time to focus on jam.

This post contains affiliate links. If you click the links and make a purchase, I may receive a small commission. You can read my full disclosure here.

What equipment do you need to make jam?

  • Water bath canner or pressure canner tall enough to cover your jars with an inch of water. You can substitute a large pot if necessary, if you have a rack to hold the jars up off of the bottom of the pot.
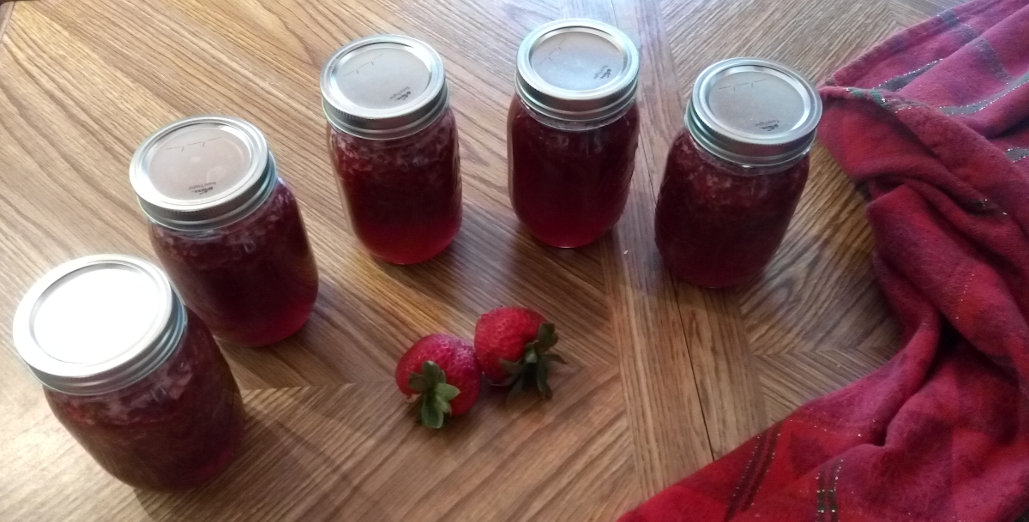
  • Canning jars, lids, and rings. I used 5 pint jars for this recipe.
  • Large stockpot for cooking the jam
  • Potato masher for crushing the berries
  • Wooden spoon
  • Ladle
  • Jar lifter
  • Canning funnel
  • Clean tea towel

The process of making jam using pectin really doesn’t take long once you gather all of your equipment. In fact, what takes the most time is waiting for the water in your water bath canner to boil. I suggest filling that first, before making the jam, so it will be hot by the time you need it.

Sterilizing Jars

There are several different ways to prepare canning jars. The basic concept is that jars and lids need to be sterilized before they are used to store food, or the contents may spoil. Also, the jars should be hot if you are going to fill them with hot jam. Filling cool jars with hot foods may cause the jars to crack.

One way to sterilize jars is to run them through your dishwasher. Another way is to boil them in a pot of water for a few minutes. 

I usually place my empty jars, along with unscrewed rings and lids, in the water bath canner while it is heating. If you don’t want to fish the rings and lids out of a tall pot of boiling water, try boiling them separately in a small pot.

This simple strawberry jam recipe yields 5 pints in under an hour. It is made with Dutch Jell, a natural powdered pectin.

Ingredients

Quick-cook jams can be very simple. For this recipe, you need only strawberries, sugar, and powdered pectin. I use Dutch Jell, but you can substitute a box of another powdered pectin if you wish.

Dutch Jell is a powdered pectin that is sold in bulk packages. I make sure to restock my supply when I visit my in-laws in Pennsylvania, but you can also find it online. The original recipe for strawberry jam from the Dutch Jell company suggests using a rounded 1/3 cup for each batch. This made my jam a bit too gelatinous for my taste, so I just use a level 1/3 cup.

The strawberries should be at their peak of ripeness. If they are underripe, the jam won’t have much flavor. Rinse the berries in cool water and cut off any bad spots with a paring knife.

As for sugar, I have used granulated white sugar and evaporated cane sugar with equally good results. 

Method

Fill your water bath canner with water to about the height of your canning jars. Once you place filled jars in the canner, the water should be deep enough to cover them by about an inch. Place the canner on your stovetop and heat it over the largest burner while you prepare the jam.

If your strawberries are large, cut them into quarters. Small berries may be halved.

Rinse the strawberries under cool water. Hull them and cut off any bad parts with a paring knife. If the berries are large, cut them in quarters; halves are fine for smaller berries. Transfer the berries to a large stockpot. Crush them with a potato masher until they are soupy and no large chunks remain. Unless, of course, you happen to like large chunks in your jam!

Crush the berries in a large stockpot to release the juices. A potato masher works well.

Add the Dutch Jell to the strawberries in the pot and stir well. If you are using a different brand of pectin, read the directions to make sure you add the pectin at the right time.

Measure the sugar into a large bowl. It needs to be added all at once, so don’t wait until the jam is boiling to start measuring it!

Add the sugar to the strawberries all at once.

Bring the berries and Dutch Jell to a boil, stirring frequently. Add the sugar all at once and continue stirring until the mixture begins to foam up. Skim off the light pink foam with a large spoon or a measuring cup. Don’t worry if you don’t get every bit of foam; just stir it back into the jam.

When the jam foams up, skim the light pink foam off the surface. Don't worry about getting every last bit, or you'll remove too much jam along with it.
When the jam foams up, skim the light pink foam off the surface. Don’t worry about getting every last bit, or you’ll remove too much jam along with it.

Once the jam comes to a full rolling boil, continue to cook the jam, stirring constantly, for one minute. Remove from the heat.

Prepare your workspace so that everything is within reach while you’re working with the hot jam. Carefully remove the hot jars, lids, and rings from the boiling water. 

Making strawberry jam: ladling into jars.
Prepare your workspace so that everything is within reach. Place the jar close to the pot of jam to prevent drips.

Set one jar next to the pot of jam. Set the canning funnel in the mouth of the jar. Ladle jam into the jar, leaving ½” of headspace (this should be about level with the bottom of the canning funnel). 

Remove the canning funnel from the jar and set aside. Dip a corner of the clean towel into the pot of hot water. Use it to wipe all around the rim of the jam-filled jar. Sticky residue on the rim can interfere with the seal.

Wipe around the rim of the jar to remove any sticky jam residue.

Place a lid on the jar, then screw a ring on. You may want to hold the hot jar with a towel or pot holder. Screw the ring until it is fingertip-tight. You don’t need to screw it on as hard as you can!

Set the jar into the water bath canner, using the jar lifter. Repeat the process with the remaining jars. If you have some jam remaining which doesn’t quite fill a jar, don’t try to can it. Just refrigerate the partially-full jar after it cools, and consume it first.

Canning strawberry jam: boiling water bath
Use a jar lifter to place jam jars into the canner. Be careful of the hot steam!

Once all the jars have been filled and placed in the water bath canner, check the water to see if it is still boiling. If not, cover with a lid and return to a boil. 

When the water boils, set a timer for ten minutes. The canner does not need to be covered during the boiling water bath. Leave the jars undisturbed in the canner for ten minutes, then remove them one by one with the jar lifter and set aside to cool. 

You will hear a popping sound when each jar seals. This can take a few seconds up to several minutes. 

Mmm, fresh strawberry jam with sourdough bread. What a treat!

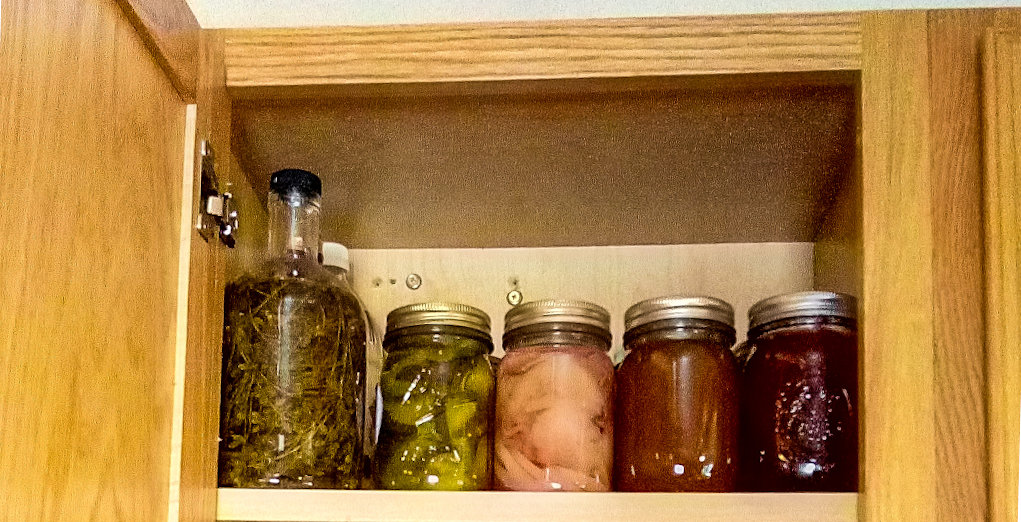
After the jars have cooled, don’t forget to label them with the date and contents! Strawberry jam will keep in sealed jars at room temperature for over a year.

strawberry jam is simple to make with this quick and easy recipe!
Print Recipe
2 from 1 vote

Simple Strawberry Jam with Dutch Jell

Looking for a quick and easy strawberry jam recipe? This recipe yields 5 pints of jam in under an hour!
Prep Time10 minutes
Cook Time10 minutes
Boiling Water Bath10 minutes
Total Time30 minutes
Course: Condiments
Keyword: Jam, Strawberries
Servings: 5 pints

Equipment

  • Water bath canner or pressure canner
  • pint jars, lids, and rings
  • stockpot
  • potato masher
  • wooden spoon
  • ladle
  • jar lifter
  • canning funnel
  • clean tea towel

Ingredients

  • 2 lbs. strawberries rinsed, hulled, and quartered
  • 7 cups sugar
  • 1/3 cup Dutch Jell powdered pectin

Instructions

  • Fill a water bath canner or pressure canner with water to cover your jars. Set it over high heat and bring to a boil.
  • Sterilize jars and lids in boiling water or in your dishwasher.
  • Place strawberries in a large stockpot and crush to release juices. Stir in Dutch Jell. Bring to a boil over medium heat, stirring occasionally.
  • While the strawberries are cooking, measure the sugar into a large bowl. When the strawberries begin to boil, add the sugar all at once and stir well until combined.
  • Return the mixture to a boil, stirring frequently. Skim foam off the surface with a large spoon or a measuring cup. Boil and stir the jam for one minute, then remove from the heat.
  • Ladle jam into hot jars, using a canning funnel. Wipe around the rim of each jar before placing a lid on it. Fingertip-tighten the ring around the mouth of the jar.
  • Use a jar lifter to place the jars into the water bath canner. Boil for 10 minutes, then remove jars to cool.
  • When the jars have cooled, check the seals and label the jars with contents and date. Strawberry jam will keep in sealed jars at room temperature for over a year.

Notes

You may substitute other brands of powdered pectin for the Dutch Jell. 1/3 cup Dutch Jell is equal to one box of powdered pectin. Be sure to read the instructions on the box before proceeding with the recipe.
3 ingredients is all it takes to make delicious strawberry jam in under an hour!
Posted on 17 Comments

How to Live Intentionally at Home

Does your life feel unimportant because you're stuck at home? Here's how to live with intention, no matter where you are.
living intentionally as a homemaker
Does your life feel unimportant because you’re stuck at home? Here’s how to live with intention, no matter where you are.

How do you know that you’re accomplishing anything with your life when your world is your household? I’d wager that every homemaker asks herself this question at some time or another.

It has to do with intention and integrity.

Living intentionally means knowing your purpose in life and setting goals to get you closer to that ultimate purpose.

Integrity is making sure your actions align with your goals, so you’re not professing to believe one thing while actually doing something else.

Here are some practical ideas to help you live with intention and integrity, even on the days when you’d rather be anywhere but home. Especially those days.

1. REMEMBER YOUR PURPOSE

Living intentionally starts here. You can wander through life watching the days come and go listlessly, or you can see each one as a new opportunity to learn, grow, and form yourself into the person you were created to be.

If you want to keep growing, but feel like you’re stuck in a rut, it helps to take a step back and remember where you’re headed.

What is your ultimate goal in the eternal scheme of things? What are the smaller goals that help you get there? How does your current job or situation fit into your dreams and goals?

For example, caring for young children every day might never have been your dream. But if raising your children to the best of your ability is important to you, then this period in your life has a purpose.

You don’t have to feel happy all the time if you know that you’re going the right direction, and moving toward your goal.

But if you’re unhappy and your life goals seem unattainable, maybe you’re aiming at the wrong goal.

Maybe it’s a goal you set for yourself years ago, and you’re not the same person now. In that case, you might need to do some deep thinking about whether or not the goals need to change.

But if your goals are sound, you can feel confident that you’re headed in the right direction. This may not sound like a big deal, but it makes your daily duties more meaningful- and therefore more bearable.

Homemaking isn't the most glamorous job, but t is necessary and worthwhile. Here's how to keep a positive attitude at home by living intentionally.

2. DON’T GET DISTRACTED

It’s great to fix your eyes on a goal, especially when you’re going through tough times. Just be careful that you don’t let that goal absorb all of your attention, or life will slip away from you.

Another bad habit is to let yourself be continually distracted. Media, in its many forms, is the number one distraction for most people today.

It is so easy for us to fall into this habit, myself included! But it’s so destructive. Before you know it, you’re paying more attention to a screen than to your spouse, kids, or God.

When this happens, we find ourselves living a lie: we say that our faith and families are important, but if something else is taking up most of our time, that can’t really be true.

How can we stop getting distracted? Take time to really be present- to live in the moment- at least once a day.

Put away your phone. Shut off your computer. Feel the warm sun or cool rain on your face. Smell the damp earth. Listen to your children. Look your spouse in the eye and have a heartfelt conversation.

It may seem strange at first, accustomed as we are to distractions. But living in the present moment gives your life richness. We are not machines, working mechanically with no self-awareness.

When we take the time to look around and become aware of our surroundings, we can appreciate not only the tangible world around us, but also things like beauty, goodness, and humor. Awareness of these is what makes human life so amazing and precious.

Your life is amazing and precious! Don’t let it slip away while you’re distracted.

3. MAKE YOUR HOME A PLACE WHERE YOU WANT TO BE

Please don’t take this to the extreme. I am not recommending a total renovation of your house here. But if you spend most of your time at home, why not add some personal touches to make it a place where you truly enjoy being?

Perhaps most people don’t need to be told to get creative and make their house look nice. But I admit that I have trouble with it.

I’ve been renting for the past eight years (four different places), and it’s hard for me to justify spending money on furniture or decor items when I know that we’ll be moving again. As a result, none of our furniture matches, and there are only a few pieces that I actually like.

We got a new (used) couch recently, and it made me realize how much I had disliked the old one. I actually enjoy looking at and sitting on this one! What a difference it makes when you like your furniture, instead of just putting up with the least expensive option.

Again, I’m not suggesting you go out and buy lots of new furniture. Maybe all that’s needed is a rearrangement of what you already own.

But if there are pieces you really dislike, see if you can start replacing them slowly. It might take a while; that’s okay. This can be a long-term project.

But this section isn’t only about furniture. What else can you do to make your home a pleasant place to live?

  • Set out a vase of fresh flowers or some potted houseplants
  • Hang some cheery curtains
  • Open a window and enjoy the breeze
  • Bake something delicious
  • Use pretty tablecloths, place mats, or napkins
  • Make a pretty tea shelf or cabinet to store your favorite teas and accessories
  • Light a candle (or two)
  • Clear the clutter
  • Display the things you love where you can see them
  • Turn off unnecessary noise and distractions

What else can you think of?

What should I do tomorrow? Start living intentionally.

4. GET SOME FRESH AIR

Now that you’ve made your house a welcoming and pleasant place to live, it’s time to leave it for a while. Make it a goal to get outside every day, even if it’s just for a few minutes. Sunlight and fresh air can work wonders for a tired, drooping spirit- and you don’t have to live in the tropics! 

I just spent a long, cold, Alaskan winter inside our little cabin. I barely poked my nose outside for over two months. For me, that is no way to live. I need fresh air! When I finally did venture out again, I felt so much better, even though it was still cold. 

Spending time outside, even just 10-15 minutes, refreshes my mind and melts my worries away. Sometimes your house becomes a cocoon insulating you too snugly from the rest of the world. Stepping outside reminds you that there’s a whole big world out there, and you’re part of it!

How can you convince yourself to start spending time outside? Plant some flowers or herbs. Hang your laundry out to dry. Take walks around your neighborhood. Ride a horse- or a bicycle. Go for a hike. Meet a friend for a picnic. 

Even in the winter, there are plenty of outdoor activities: walking, ice skating, snow shoeing, and skiing, to name a few.

Yes, it’s cold in the winter. It’s hot in the summer. Sometimes it’s raining, or windy. Maybe you’re just too busy. I can always come up with an excuse to stay indoors if I don’t feel like it. 

If you find yourself doing this, ask yourself: Would I rather experience a little discomfort and get outside, or stay stuffy and cranky indoors?

If you choose to ignore your excuses and go outside, you won’t regret it!

5. FILL YOUR DAYS WITH MEANING, NOT BUSYNESS

Don’t fall into the trap of thinking you’re productive just because you’re busy. You’re only productive if you’re making progress toward your life goals. 

There are a million things you could do each day, but you don’t have to do all of them. Busyness is not a virtue.

If you’ve thought about your life’s purpose and established goals, you can look at all the things you do each day and determine whether they are helping or hindering your progress toward these goals.

Sometimes something comes up unexpectedly and demands your attention. I’m not talking about those because you can’t control them or prepare for them. But there are probably a lot of things you do each and every day. They’re habits. 

Habits contribute to busyness because we keep doing the same things over and over without really evaluating their effects. Unproductive habits merely waste time and distract us from what’s really important. Before we know it, we don’t have time for anything extra, and maybe not even for the things and people that are truly important.

This is not a good way to live. It’s a recipe for burnout and discouragement. What can you do to fix it?

Start evaluating your habitual actions, and the things you do over the course of a normal day. It’s probably easiest to examine them one at a time, as you start to do something out of habit, instead of all at once.

Ask yourself if the habit is getting you closer to your goal, or driving you farther away from it. Some actions don’t seem to be related at all, initially.

Take, for example, brushing your teeth. This is not a morally good or bad action, and it might not seem connected to any of your life goals. 

But it’s part of caring for your body, and contributes to your overall health. So if you aspire to be healthy, then brushing your teeth helps you accomplish this goal. Likewise, if you aspire to be neat and tidy, brushing your teeth helps with that goal, too.

Some actions might be helpful in small doses, but quickly become counter-productive if you spend too much time on them. I’m thinking of social media specifically, which is a terrific time waster! I am ashamed of how much time slips away from me in this manner when I’m not careful. 

Even if you don’t use social media, don’t think you’re immune to this! There are plenty of other habits that fall into this category.

Make sure your habits are helping you become a person you respect. If they’re not, stop now- and cultivate a new habit in its place. 

This is more effective than merely trying to stop an ingrained habit. If you don’t replace it with something, you will feel like something’s missing, and you’ll be more likely to slide back into the bad habit you stopped. 

Replacing a negative habit with a positive one is essentially distracting yourself. It’s hard to stop a habit, especially if it’s an old one. Cultivating a new habit at the same time really does help, because you probably won’t have time for both!

6. START FRESH EACH MORNING

You probably don’t reevaluate your life’s purpose every single day. It’s not necessary, if you’ve formulated goals and identified what you need to work on to achieve them.

But even if you’ve done this, it’s still easy to get caught up in the multitude of urgent issues demanding your attention. It’s easy to go from one thing to another from morning till night, and repeat this for days or weeks without pause.

By the time you finally raise your head and remember your goals, you might be off track a little- or a lot.

How do you keep your sights focused on eternal goals in the midst of everyday life?

Start every morning with a brief reminder of why you’re here and where you’re going. 

That might be a morning prayer or offering, dedicating all your work and all you do each day to the Lord. It might mean writing down some of your long-term goals and looking at them every day, so you can keep yourself focused on them throughout the day. 

Another practice I find helpful is to start the day by determining the one best thing I can do today. Then I do it. Maybe not first thing in the morning, but I will get it done if I start the day determined to do so.

Your one best thing doesn’t have to be a huge and noble task. Sometimes it’s writing a letter to a friend or family member. Sometimes it’s cleaning up a pile of clutter that you’ve been ignoring. Sometimes it’s asking yourself a difficult question that you don’t want to think about.

Start small. Determining to do one good thing each day might seem like nothing, but even small acts of love keep you aiming upward and moving toward your goals.

When you're home all day, life can feel boring and unimportant. That's why it's so vital to live with intention and integrity. Learn how even mundane, everyday routine has a meaning and purpose.

7. BE GRATEFUL

The best way I know to banish a negative attitude is to be genuinely grateful for your blessings. So many things have been given us, which we did nothing to deserve. Every one of us has many reasons to be grateful.

But you can’t be grateful at all if you’re focused on yourself. (I’ll be the first to admit that I focus inwardly all too often.) This inward focus makes yourself the center of the universe, and it skews all of your relationships. 

That’s why the opposite of love is selfishness, or self-love. Love focuses outward, on other people. It wants the best for them (and not out of false piety, which really glorifies itself). Selfishness focuses inward, and hoards the best for itself.

To have a grateful spirit, you need to know your place in the world. This is called humility: realizing just how small you are, and yet how significant, how precious your life is.

When you can see yourself, other people, and the world itself in their proper relationships, then you can begin to see goodness, and be grateful for it.

You begin to see through the lens of gratefulness, and discover more and more gifts: a dazzlingly clear sky, the soft sound of raindrops, a baby’s tiny hand, or the worn and callused hand of an old man.

Everything is a gift, if you have the sight to see it.

Set your goals intentionally, and live with integrity

You may have noticed a theme here. Each injunction involves pausing to examine some part of your life, and making adjustments when your actions don’t line up with your goals.

That’s not an accident. You can only move upward if you’ve set a true goal, and setting a goal doesn’t guarantee accomplishing it.

You have to be intentional about the way you live your life if you want to accomplish good or great things. Saints and heroes aren’t made by accident. They are formed through discipline and integrity.

Jordan Peterson captures the essence of what it means to “live properly” in his 12 Rules for Life: An Antidote to Chaos:

Orient yourself properly. Then–and only then–concentrate on the day. Set your sights at the Good, the Beautiful, and the True, and then focus pointedly and carefully on the concerns of each moment. Aim continually at Heaven while you work diligently on Earth. Attend fully to the future, in that manner, while attending fully to the present. Then you have the best chance of perfecting both.

12 Rules for Life: An Antidote to Chaos, Jordan B. Peterson

Get your priorities straight first. Think about your purpose and goals. What do you need to change to become a person that you respect? How can you approach each day as a new opportunity to do good? How can you live today in the light of eternity?

If you enjoyed this article, you might be interested in reading more about The Purpose of Homemaking.

Posted on 1 Comment

How to Stock a Pioneer Pantry + Printable Shopping List

How to stock your pantry like a pioneer

A well-stocked pantry conveys a sense of abundance and homely charm. I’ve always loved walk-in pantries with their wonderful variety of goods. They are like mini general stores, stocked with everything the household needs.

Shelves full of jams and pickles breathe of summer’s bounty even in the midst of winter. Bins of root vegetables and squashes sit in the cool corners, while strings of onions hang from the rafters.

Canisters of dry goods proclaim their ever-ready potential to be turned into hearty meals, while herbs and spices lend a fragrant scent to the little room.

This is my dream for some day, but it was a reality for the pioneers, and for many homesteaders today. When confronted with such a pantry, I feel like I stepped into Little House on the Prairie:

“Laura was so delighted with the pantry that she stood in the doorway for several minutes, admiring it.”

Laura Ingalls Wilder, The First Four Years

Nowadays, not everyone needs such an extensive pantry; and pantries should be practical above all else. But homemakers can still benefit from stocking basic supplies that they use all the time, and preserving garden produce.

Even if you don’t live on a homestead, you can still capture a bit of that practical, homely atmosphere by learning how to stock a pantry in your own home.

Getting Started

Two practical questions to consider when you’re planning out your pantry are: 1) What do I need? and 2) Where will I store it?

If you can answer these two questions, you’re well on your way to learning how to stock a pantry like a pioneer!

What should I store in my pantry?

Pantries should be practical. Store ingredients that you use regularly. If you like to bake, then think about which baking ingredients you can stock up on.

If you only bake once every month or two, then it’s probably not a good idea to buy large quantities of flour and sugar. They might look pretty in glass jars with cute labels, but if you won’t use it before it goes bad, then it’s a waste of money, time, and space.

The same principle applies to any food you decide to store. Don’t buy a lot of something just because it lasts a long time. You have to actually plan on eating it! I suggest you try a small quantity of something new before buying 10-20 pounds of it!

Learn how to build your pantry practically, so it suits your family's needs. A well-stocked pantry can supply your family for months! Includes free printable shopping list!

Storage Spaces

Walk-in pantries seem to be luxuries these days. In many houses, the pantry is reduced to a closet, while small houses and cabins like ours don’t even have that!

What do you do if your house doesn’t have a pantry? Get creative. Look at the storage space you do have. Is there a closet under the stairs? A linen closet in the hallway? Extra space in the basement or garage?

When picking a space for your pantry, look for somewhere that is dark, dry, and cool if possible. If you live somewhere humid, dry isn’t always going to happen; just don’t go storing dry goods in a moist environment like under your sink!

If you don’t have any available closets, you can build one! My pantry for the last two years has been a sturdy wooden chest that my husband built. It’s not quite as convenient as an upright closet with shelves, but it works for us.

Another option is to buy an upright cabinet with shelves. You can find these at auctions, estate sales, and of course, furniture stores.

There’s no rule saying you must store all of your “pantry foods” together. If you don’t have a walk-in pantry, you’ll probably end up using cupboards, closets, boxes, and bins.

Start Slowly

Before you rush out to buy ingredients, keep in mind that stocking a pantry can be expensive initially. It involves buying large quantities of many different items.

As you’re learning how to stock a pantry, you may want to start slowly. Buy one or two pantry items per week, instead of trying to build your perfect pantry all at once. Buying items slowly also helps you keep a goal in mind and not buy unnecessary things on a whim.

Here’s a simple plan for building your pantry slowly:

  • Read through the list of pantry staples below and write up a list of which items would be practical for you.
  • Add any other foods you think would be practical for your household.
  • Bring that list with you to the grocery store so you can stock up on items gradually, as they go on sale.
  • Start replacing store bought items with your own dried herbs and home-canned preserves.

If you follow these steps, you will be well on your way to stocking your pantry like a pioneer!

Want to learn how to stock a pantry like a pioneer? This guide to pantry basics and free printable shopping list are just what you need!

The Basic Pantry Staples

No two pantries are exactly alike, so I can’t give you an exact rundown of what you should stock. You might have a special diet or allergies to work with, besides your own preferences.

Still, I know it can be helpful just to see a list, so you can start to envision what foods you would like to stock, and how much space you will need.

Here is my list of pantry staples, based (loosely) on a pioneer household.

Grains and Flours

  • Unbleached white flour
  • Whole wheat flour
  • Whole grain wheat or spelt berries, if you grind your own flour
  • Rolled oats
  • Cornmeal
  • Rice

A note on flour: whole grain flours should not be stored at room temperature for long periods, because the oil in the germ turns rancid. If you do need to store it for a long time, the freezer is best.

Legumes

  • Pinto beans
  • Kidney beans
  • Navy or great northern beans
  • Other beans (black, small red, lima, garbanzo, etc.)
  • Split peas

Nuts & Seeds

  • Almonds
  • Walnuts
  • Pecans
  • Peanuts/ peanut butter
  • Coconut flakes
  • Sunflower seeds
  • Flax, sesame, or other seeds
Want to learn how to stock a pantry like a pioneer? This guide to pantry basics and free printable shopping list are just what you need!
I’ve covered coffee cans with pretty paper and use them to store dried fruits and nuts.

Dried Fruits

  • Raisins or currants
  • Golden raisins
  • Dried cranberries
  • Dates
  • Others: dried apricots, pineapple, prunes, cherries, or blueberries

Vegetables

  • Potatoes
  • Sweet potatoes
  • Onions
  • Garlic
  • Squashes

Herbs & Spices

This category really depends on your taste. I happen to really like herbs and spices, as you can tell!

  • Salt and pepper
  • Sweet spices for baking: allspice, cinnamon, cloves, ginger, nutmeg
  • Spices for cooking: cayenne pepper, chili powder, cumin, dried minced onion, garlic powder, ground mustard, paprika, red pepper flakes, turmeric
  • Herbs for cooking: basil, chives, dill, fennel, marjoram, oregano, parsley, rosemary, sage, tarragon, thyme
  • Seasoning blends: Italian seasoning, taco seasoning, herbs de provence, etc.

Baking Supplies

  • Baking powder
  • Baking soda
  • Cornstarch
  • Cream of tartar
  • Yeast
  • Cocoa powder
  • Chocolate chips/ baking chocolate
  • Vanilla extract
  • Almond extract

Sweeteners

  • Honey
  • Maple Syrup
  • Molasses
  • Sugar (white or evaporated cane/ sucanat)
  • Brown sugar
  • Confectioner’s Sugar

Oils

  • Coconut oil
  • Palm oil
  • Olive oil
  • Others: avocado, sunflower, walnut, etc.

Canned Goods

  • Tomatoes: whole, diced, sauce, paste
  • Corn
  • Beets
  • Pumpkin
  • Beans, any variety
  • Applesauce
  • Peaches, apricots, cherries, or other fruits
Canned goods in a pioneer pantry
Some of last summer’s produce: lemon thyme vinegar, bread & butter pickles, pickled beets & onions, rhubarb orange spread, and strawberry jam.

Preserves

  • Jams and jellies
  • Fruit or flower syrups
  • Pickles
  • Salsa
  • Mincemeat

Miscellaneous

  • Coffee
  • Tea
  • Vinegar: white, red wine, apple cider
  • Worcestershire sauce
  • Soy sauce
  • Dried tomatoes for sauces
  • Dried vegetables for soup
  • Vegetable soup base
  • Pasta
  • Granola and/or cereal
  • Granola bars
  • Crackers or pretzels

My list of pantry essentials is mostly ingredients, as you can see. However, I’ve included a few prepared foods in these lists, because I do stock them.

Sometimes those are homemade, and other times they’re from the store. I try to make most of our food, but it’s not 100% from scratch.

Stock up and Save

One of the perks of having a pantry is that keeping a supply of staples allows you to shop around and find the best prices instead of paying whatever the grocery store asks when you run out of something.

(To keep this cushion, make sure you put an item on your shopping list BEFORE it’s all gone!)

There are a few different ways to find the best prices while stocking up on pantry staples. You can use these methods now as you learn how to stock a pantry, and in the future to keep it well stocked.

Wait for sales

Flour and dried beans may never go on sale at your local grocery store, but that doesn’t mean you can’t take advantage of sales when stocking your pantry.

The best way to use sales to buy multiples of an item when it’s on sale, so you don’t have to buy it when it’s not on sale. This method does require some forethought and planning.

For example, I check the price on peanut butter frequently, even when I don’t need it. That way, I always catch the sales, and never have to buy it when it’s not on sale.

It may take a while to learn which items go on sale in your local stores, and your shopping trips might be a few minutes longer when you’re checking prices, but the savings are worth it!

Wholesale or Co-op

Local co-ops can be a great way to buy in bulk and save money on shipping costs, particularly for large or heavy items.

The basic idea is that several people order together from a company, so they can get a wholesale price and/or a discounted shipping rate.

Some co-ops get shipments only once every few months, while others have their own local stores where members can purchase goods any time.

Some co-ops charge a membership fee, so don’t forget to factor that into the cost of the goods.

Ask your friends or neighbors if there are any co-ops in your area.

Shop with a friend

Even if there aren’t any local co-ops (or they just don’t carry the items you need), you can apply that principle on a smaller scale if you shop with a friend or two.

Our local grocery stores don’t have the best (or freshest) selection of bulk spices. I often split an order of bulk spices from an online supplier with my mother and sister. We split the shipping costs, and sometimes split large packages of herbs and spices.

Do you dream of having a homestead-worthy supply of food to last you through the winter (or just in case)? You can! Even if you don't have a farm or a garden, this guide shows you how to stock your own pantry.

Pantry Food Storage Tips

Learning how to stock a pantry is just the first step. Make sure you also follow these tips to ensure that your food stays consumable!

If you’re wondering about the shelf life of certain items, or how to store them properly, check out this guide to shelf life basics.

Rotate your supply

Use the oldest jars and cans first. You don’t want any food in your pantry to spoil, especially if you’ve taken the trouble to can and preserve it.

An easy way to prevent spoilage is to put the new batch of, say, strawberry jam, behind the older jars.

Of course, you should also label each jar with the date so there is no question of how old it is.

Make sure your pantry foods are safe from pests

Grains and flour are best stored in bins or buckets with tight-fitting lids. Consider transferring pasta from cardboard boxes into glass jars with screw-on lids. You can do the same for beans and rice.

If you would rather keep the food in its original packaging, then store the boxes or bags in a larger tub or bucket, with a tight lid to keep critters out.

Also, keep your pantry clean and tidy. If you spill oats or flour on the floor, sweep up the mess right away so it doesn’t attract bugs.

This guide to stocking a pantry plus FREE printable shopping list will help you prep like a pioneer!

Ready, Set, Go!

Now you know the basics of how to stock a pantry! Ma Ingalls would be proud. Even if it’s not filled with home-canned pickles and jellies right away, it’s still a big step in the right direction.

Remember that pantries are constantly changing, and sometimes there will be more food than others. That’s okay.

FREE Printable Pantry Staples shopping list!

Don’t forget your free printable shopping list! Bring it with you to the grocery store or the co-op, so you have a guide to stocking your pantry. Then post it in your pantry, so you can keep track of your supplies.

If you would like to read more about how to stock a pantry while saving money at the grocery store, check out Ultra Power Saving Mode for your Grocery Budget.

Now that your pantry is fully stocked, check out these simple recipes from pantry staples!

Posted on 3 Comments

9 Steps to Becoming an Efficient Homemaker

How to be a good homemaker: Systems for success
Swamped with housework? Wondering how to be a good homemaker? These 9 tips will help you set up systems to streamline your tasks and make your job easier!

How to be a good homemaker by organizing your schedule

When you become a homemaker, there’s no list of job requirements to follow. There’s no application or interview process, so you might not even know what to expect.

Homemaking is flexible for a reason, because every household functions a little differently. That’s a good thing!

However, it can be frustrating as a new homemaker when you’re trying to figure out what you’re supposed to be doing and how to organize your duties.

It’s easy to become overwhelmed by housework and cooking, whether or not you have kids thrown into the mix.

You want to learn how to be a good homemaker, but there’s no policies & procedures manual.

Here are some tips to organize your daily life in order to become a happier and more efficient homemaker.

1. Get up early

The very first thing you can do to make your day better is to get up before everyone else.

Night owls may scoff at this, and say they function better when they get more sleep.

I get it. I love sleep too. But try it for a week, and see if you feel better.

I used to wake up around 5:45 a.m. without an alarm- before I had kids. Now it’s a chore to drag myself out of bed in the mornings, but the effort is worthwhile.

Granted, there are periods in life when you need lots of sleep. During pregnancy and postpartum when I’m up several times per night, I don’t worry about getting up early, and sleep as much as I can.

But in general, getting up early helps you to start the day on a positive note. You feel like you have a head start on the day, and quiet mornings allow you to focus on organizing your day before the noise and bustle begins.

It’s a wonderful time to pray, stretch, or exercise. You can enjoy a cup of coffee or tea in peace before starting breakfast for the family.

Don’t make the excuse that you have children who wear you out. If your children demand your attention every minute of the day, it’s even more important to carve out some time for yourself when they’re in bed.

And morning is better than evening because you’re fresh and rested instead of exhausted and frustrated.

Getting up early is undoubtedly easier for some people, and harder for others. I find it especially difficult on cold, dark winter mornings.

But everyone can make the effort. Try setting your alarm half an hour earlier for a week, and see what a difference it can make.

2. Make a list

Now that you’re awake early and have some quiet time to think about your day, write out a list of tasks to accomplish.

Note any errands you need to run, appointments for yourself or family members, house cleaning, home maintenance tasks, and food prep that needs to be done today.

Writing everything down ensures that you don’t forget any major task, and also helps you to see what needs to be done so you can plan your day accordingly.

You wouldn’t want to go out to your dentist appointment, and then get home and remember you were supposed to stop at the grocery store as well!

(If you live right in town, I suppose this wouldn’t be such a big deal. Every time I go out, it takes over an hour.)

Anyway, making a list helps you to organize your day and make sure the important tasks actually get remembered.

Some people like to write out a list for the next day before they go to bed. That’s a great idea if your brain tends to be fuzzy before you eat breakfast!

3. Dress for your job

Have you ever noticed how your clothing impacts your emotions and mindset?

Putting on a special dress to go out for dinner evokes feelings of anticipation and excitement. Even normal acts seem more special when you’re all dressed up.

Putting on a uniform puts you in work mode. Your brain is ready to solve problems and meet the demands of the workplace.

Putting on yoga pants and a t-shirt might make you think about exercising, if that’s what you normally do in them.

But if you wear them around the house all day, they fall into the category of leisure wear. And what does that make you think of? Not an efficient homemaker!

If you want your day to be orderly and productive, dress in such a way that tells the world (and yourself) that you mean business.

I’m not saying you should wear a blazer to clean the house. But wear one when you run errands or balance your checkbook if that helps you feel more focused.

And wear an outfit around the house that would work with a blazer; or at any rate, wear something that makes you feel put together and ready to take on the day.

You don’t want to get your nice clothes dirty? Neither do I. That’s why I wear aprons.

This article of clothing is pretty and practical, perfectly suited to the job of a homemaker. You can think of it as your uniform, if you like.

Aren’t you glad you can customize your uniform however you like? I have five aprons, and one is reversible, so I always have one to match my outfit.

4. Make a weekly housekeeping schedule

Do you always forget to clean the microwave? Does the garbage or recycling pile up for weeks?

Nobody’s perfect, and we all have a chore or two that we just don’t like or can’t seem to remember. Making a schedule for those tasks that need to be done every week can help.

If you spread the chores out, then you won’t find yourself trying to tackle all the housework in one day and getting burned out, or constantly forgetting something in your daily duties.

It can help you organize tasks so they get done during the workweek, instead of being pushed to the weekend when your spouse is home. Isn’t it nicer to be able to relax together or go do something fun on the weekend, rather than being stuck at home catching up on chores?

Another benefit of making a housekeeping schedule is that it keeps you from feeling guilty or discouraged on busy days when you don’t have time for much housework.

Planning a light day of housework gives you the flexibility to adapt to unexpected changes or just enjoy the day without feeling like you should be working every minute.

Wednesdays are usually my busiest day, so I don’t plan much housework for that day. If another day is unexpectedly busy, I can always switch my schedule around to make up for it.

What should you include in a weekly housekeeping schedule?

The things that have to happen (or should happen!) every week to keep your house in good running order.

This includes four basic categories: cleaning, laundry, grocery shopping, and food preparation.

There are a lot of individual tasks that fall under cleaning, such as dusting, vacuuming, and cleaning the bathroom.

Laundry and grocery shopping might each need to be done once or twice per week, or you might choose to do a load of laundry every day.

What types of food preparation should you include? If it’s something you do every day and you’re not likely to forget (like making supper), then you don’t have to include it on your weekly schedule.

But if you like to make a big batch of bread or tortillas or marinara sauce once a week, then that would be a good task to include on your weekly schedule. Sometimes I’ve had “Use Sourdough” on my schedule, just so it doesn’t sit abandoned in my fridge for a month!

Read more tips for creating your own weekly housekeeping schedule here!

Are you overwhelmed with laundry and cooking? Does the housework seem to pile up interminably? Here are some simple housekeeping habits to streamline your tasks for an organized home.

5. Limit media consumption

This is the chief enemy of an efficient homemaker. How can you focus on a task if your phone or computer keeps buzzing with updates?

Turn off the TV while you’re working. You don’t need the distraction. Turn off email notifications and social media notifications, or just put your phone away until your housework is done.

You can even designate a particular place for your phone to sit when you’re not using it, as if it was a landline.

I’m not saying that social media and the Internet are bad. But they are distractions, and they can suck you in for hours if you’re not careful.

If you want to be an efficient homemaker, you will need to take an honest look at how much time you spend looking at a screen during the day.

What if you had spent that time on housework? Would your house be cleaner? Better yet, you could spend the extra time on relationships or creative projects. Would you be happier?

Making an effort to reduce screen time can have a huge impact on your satisfaction with your life.

6. Plan meals

I didn’t start out meal planning as a new homemaker. And there were many, many days when I didn’t know what supper would be until I started cooking.

The question would hang over me all day, as I skimmed Pinterest and cookbooks randomly for inspiration.

Now that I have a system of meal planning set up, I no longer dread the question of what’s for dinner. Of course there are still days when my schedule gets upset and I still have to come up with supper ideas on the fly, but these days are now the exception instead of the norm.

Now, when I find new recipes I want to try, I write them down on my meal plan and note the ingredients on my grocery list. I plan multiple meals around the produce and perishable goods on my list that week, so nothing goes to waste.

And if I find a really great deal at the store, I either plan it into my week or freeze it for later. I love having a plan that is flexible enough to work with my life!

If you’re curious about starting a meal plan but not sure if it will help you, read Why You Need a Simple Meal Plan. If you’re ready to dive right in, check out Easing into Meal Planning.

7. Keep up with laundry

I told myself I wasn’t going to talk about laundry here. I am not the queen of laundry.

However, laundry is an important part of any modern homemaker’s duties, so it’s only reasonable to mention it. Keeping up with the laundry is an essential part of keeping your family clothed.

Setting up a laundry schedule is also a great way to ease into a basic housekeeping schedule if you’re having trouble sticking to a chore list.

Just by organizing the one task of laundry throughout the week, you are making progress toward a more organized house.

That being said, there are many ways to do laundry. I think the important thing is that you have a schedule, or at least a general method. Here are some examples:

  • Several seasoned homemakers recommend doing a load of laundry first thing every morning.
  • When I was growing up, my mother did laundry two days per week.
  • I usually wash our clothes only once per week, but I wash cloth diapers two or three days a week in addition to that.

Like I said, the important thing is that you have some sort of method. Having a system prevents laundry from taking over your life (or your house).

I prefer to do all my washing in one go (except for diapers), so I don’t have to think about it for the rest of the week.

However, I do see the benefits of washing a load of laundry every morning. For one thing, it would never pile up and become an unsightly mess.

Organize your washing however you wish- as long as its actually organized. You will see immediate benefits in adding a little more structure to your schedule, and you won’t constantly feel like you’re behind on the washing.

These 9 housekeeping habits will help you organize your time better so you can enjoy your job instead of feeling overwhelmed. Learn how to be a good homemaker by setting up these simple systems.

8. Organize your finances

You are the caretaker of your home and family. Part of that job is keeping the financial state of your household transparent- and apparent.

Do you know how much money comes in and goes out? It’s a really good idea to keep track of your spending: not to impose limits, just for the sake of your sanity!

You can use a simple spreadsheet to track income and expenditures, or try a budgeting app or printable worksheet.

I like the EveryDollar app because it’s free, simple, and you can customize it with your own categories of expenses. (So if you want to set up a pizza fund, go for it!) There’s also a website version, if you don’t fancy budgeting on your phone.

Beyond budgeting, I like to calculate our net worth every year. This gives you a bird’s-eye view of your financial situation.

It can get discouraging if you feel like you’re not saving much from month to month, but if your net worth is increasing, you know you’re on the right track.

9. Find your purpose

I wanted to end with this, not because it’s the least important, but because it completes the rest.

All the things we talked about earlier are tactics that help to streamline your tasks and organize your job as a homemaker. But if you don’t have an underlying purpose in homemaking, the tactics won’t help much.

Some people call this having a vision for what you want your life to look like. If you keep a concrete goal in mind, then you can apply different tactics to help you achieve it.

I prefer to find the meaning in homemaking itself, rather than just seeing it as the means to an end (an organized home, a peaceful sanctuary, a welcoming gathering place for family and friends).

When you find meaning in your work as a homemaker, then the tasks you have to do each day become worthwhile- even if you know you’ll have to repeat them over and over again.

Each individual task has a place in the overall mission or purpose of homemaking. Each becomes an opportunity to love your family.

When you can see that, setting up systems for your tasks makes sense, because organizing them lets you work with more clarity and serenity.

What next?

If you’re new to homemaking and want an overview of basic skills, check out Homemaking 101: The Basics. Or check out my Guide to Intentional Homemaking, which delves into the meaning and purpose of homemaking, as well as showing you how to find joy in this vocation.

Happy homemaking!

~Kimberly