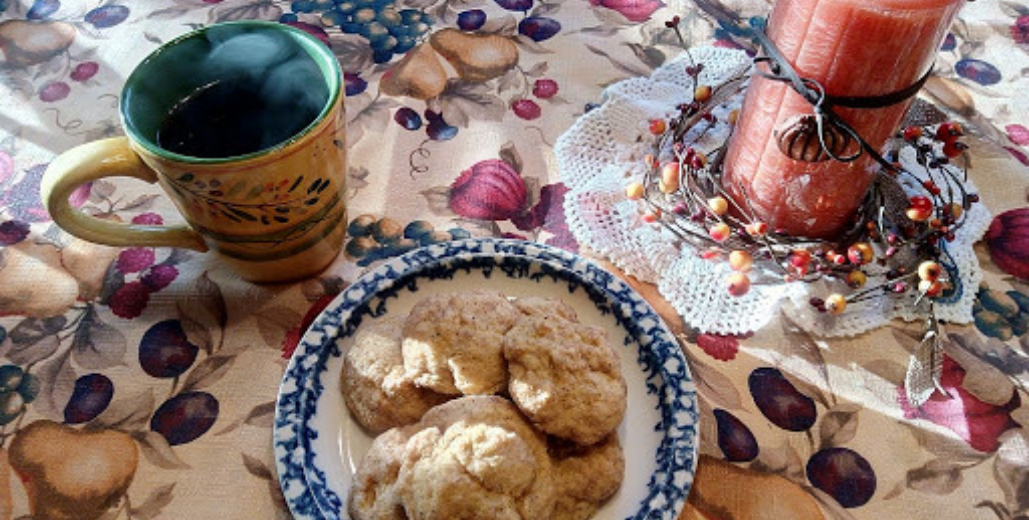
There’s nothing better than a hot drink and a plate of pumpkin spice cookies on a crisp autumn day.
What do you call it when the classic snickerdoodle gets a pumpkin-y makeover? Autumn in a cookie? Snickering pumpkin-doodles? Whatever you want to call them, these soft pumpkin spice cookies are so good that I’ve made three batches in the last month.
They are pleasantly spiced, yet retain the character of snickerdoodles instead of just turning into a pumpkin cookie. You can see from the pictures that the color of these cookies is a very light orange. That’s partly from using homemade pumpkin puree, but it’s also a good clue that the pumpkin flavor is subtle, not overwhelming.
Unexpected Inspiration
I found the original recipe for these in a recently published Amish cookbook. As a whole, the cookbook was disappointing: I was shocked at how many recipes started out with packaged mixes, processed ingredients, or Velveeta. Either those recipes aren’t authentic, or Amish cooking is not what it used to be.
After looking through the cookbook, a handful of the recipes seemed good enough to test. I am very glad I tried this one! Three batches have disappeared pretty quickly in the last few weeks. With a few tweaks of my own, here is a recipe for pumpkin spice cookies that’s fast becoming a family favorite.
Dairy-Free Version
You can even make it dairy-free, if you so desire. I substituted melted coconut oil for the melted butter, and it worked just fine. Make sure your coconut oil doesn’t have a strong coconut flavor, however (this depends on how the coconut oil was processed and refined). Pumpkin and coconut might be a good flavor combination, but then again, it might not!
One other note if you’re using coconut oil: normally when you use this to replace butter, you should use the same amount of coconut oil plus a tablespoon of water. For this recipe, you may either add a tablespoon of water, or just use a bit less flour.
Let’s Make Pumpkin Spice Cookies!
First things first: preheat your oven. Mine is a propane oven, which takes a long time to heat up. Maybe if you have an electric oven, this step isn’t so important to do right away.
Next, mix your dry ingredients together. If you will be using coconut oil instead of butter, consider adding 2 1/4 cups of flour instead of 2 1/2 cups. Otherwise, use the full amount and just add a tablespoon of water in with your liquid ingredients.
In a large bowl or stand mixer, combine the sugar with the pumpkin, egg, and cooled melted butter. The butter doesn’t have to be completely cooled- you just don’t want it hot enough to curdle the egg. Mix thoroughly. Stir the flour mixture into the pumpkin mixture. Don’t overmix.
Roll balls of cookie dough in the sugar-spice mixture.
In a smaller bowl, combine 1/3 cup sugar with remaining spices. Form the cookie dough into 3/4-inch to 1-inch diameter balls. If you make bigger balls, you probably won’t use all the sugar. Roll in sugar mixture and place on ungreased baking sheets. Bake for 8-10 minutes, or until the tops are firm and the bottoms are golden. Cool on a wire rack and enjoy!
Pumpkin and spice and everything nice: that's what these cookies are mafe of! Try these pumpkin spice snickerdoodle cookies for a new twist on a classic!
Prep Time20 minutesmins
Cook Time20 minutesmins
Total Time40 minutesmins
Course: Dessert
Keyword: Cookies, Pumpkin
Servings: 2dozen
Ingredients
2 1/2cupsall-purpose flour
1/2tspbaking soda
1/2tspcream of tartar
1/2tspsalt
1/2tspcinnamon
1/4tspnutmeggrated
1cupsugar
1/2cupbutter or coconut oilmelted and cooled
1/2cuppumpkin puree
1egg
1/3cupsugar
1 1/2tspcinnamon
1/2tspallspice
1/4tspnutmeggrated
Instructions
Preheat oven to 350 degrees.
In a medium bowl, combine flour, baking soda, cream of tartar, salt, 1/2 teaspoon cinnamon, and nutmeg.
In a large bowl, mix 1 cup sugar, melted butter, pumpkin, and egg.
Add flour mixture to pumpkin mixture just until combined. Dough will be soft.
In a small bowl, combine 1/3 cup sugar with remaining cinnamon, allspice, and nutmeg.
Form dough into 1-inch balls. Flatten slightly. Roll in sugar mixture and place 1 1/2" apart on ungreased baking sheets.
Bake at 350 degrees for 8-10 minutes.
Remove to wire rack to cool completely.
Notes
If using coconut oil, add 1 tablespoon of water along with it, or use a little less flour.
Are you stressed from spending too much time in the kitchen? Here’s why you should make simple cooking a habit, with some wiggle room for creativity!
It’s so easy these days to get caught by the lure of fancy cooking. Making meals takes up a fair amount of time each day, and most of us like to keep it interesting. However, there are some good reasons to stick to a simple meal plan, despite the temptation to experiment with elaborate recipes.
The Lure of Gourmet Cooking
There are days (or weeks) when menu planning seems to require too much energy, and then you can end up eating the same dishes week after week. Most of the time, I crave more variety and creativity in cooking–and that’s where the problem starts.
Social media is full of glossy photos of mouth-watering meals. Cookbooks have high-quality, full page pictures displayed alongside the recipes. Of course there’s nothing wrong with that. It’s good advertising, and I am very susceptible to it!
Exotic cuisines generally aren’t my style, and I don’t often try them. But elaborate recipes with fancy ingredients can be pretty tempting, both for the challenge of making them correctly and for the delight in serving (and eating) a fancy dish.
Reasons to Cook Simply
Now, there are several reasons why this is not the best cooking habit. First, to put it plainly, our grocery budget doesn’t accommodate a lot of fancy ingredients. Pantry staples and fresh, whole foods? Yes. But specialty condiments or expensive brands? You won’t find those in my kitchen.
Also, who wants to run to the grocery store every other day because you wanted to make a meal that requires ingredients you don’t usually stock? Not me!
The other negative effects aren’t quite as easy to see at first glance–but they are just as important. These other costs are time and peace of mind. They go hand in hand, because the more time I spend cooking unfamiliar or elaborate recipes, the more stressed I get.
This can be magnified when you’re cooking for a special occasion or a large group of people. The costs of time and mental energy can really add up to make you exhausted and sick of cooking.
Lessons Learned
A few weeks ago, I had found a recipe that looked exciting, and I really wanted to try it. I only had to buy one “special” ingredient, and that’s only because my cilantro died. So it wasn’t a pricey meal, but I could tell it would be labor-intensive.
Add to that the fact that it happened to be my worst day of a nasty cold, and then someone decided it was a good day to clean the house from top to bottom…
Cooking and cleaning all day with a cold made me grumpy (have you tried chopping onions when your eyes are already watery?), and by suppertime, I just wanted to go to bed.
The meal wasn’t anything to write home about, either. I was hoping that it would be amazing and we would end the day on a high note, but instead it just left me wondering why I spent all that time and effort on it.
I could have had a much more peaceful and enjoyable day if I hadn’t tried to cook such an elaborate meal.
So what’s the solution? Never cook fancy meals? Stick to rice and beans for the rest of your life? I don’t think so. Rather, I try to set a simple meal plan and stick to it most of the time, while allowing room for more elaborate meals on special occasions. It’s part of living an organized and simple life.
How A Simple Meal Plan Can Decrease Stress
But doesn’t meal planning take lots of time and complicate your life? you may wonder. It doesn’t have to.
Now, if you sit down with ten cookbooks and a few Pinterest boards full of recipes, then try to choose a week’s worth of meals from that huge selection, it’s going to be overwhelming. It can take hours and leave you feeling frustrated.
I know because that’s one of the methods I tried when I was learning how to plan meals.
But if you go about it with a more reasonable strategy, meal planning can save a lot of time you would have spent staring into the fridge wondering what to cook for dinner.
When you have your meals planned in advance, you don’t have the daily stress of coming up with a meal and hoping you have all the ingredients.
You can just glance at your meal plan in the morning to see if there’s anything to make ahead. If not, you don’t even have to think about dinner until it’s time to start cooking!
This gets cooking out of your head, eliminating stress and giving you time to think about other things.
What is a Simple Meal Plan?
It doesn’t mean you have to eat the same meals over and over again, or only eat desserts on holidays. Not at all. The beauty of a simple meal plan is that you can intentionally schedule a variety of simple recipes so you’re not always stuck making the same four or five meals!
By simple meals, I mean those which you can prepare from ingredients you normally keep on hand, and which don’t involve many different dishes.
Typically for us, this would be a casserole, soup, or one pot meal, along with a vegetable and/or bread. There’s a lot of room for creativity within that framework, so I don’t feel cramped.
Remember that the individual dishes should also be fairly simple- at least as a whole. If each part of the meal takes you two hours to prepare, I wouldn’t call that a simple meal.
When I say that, I’m talking about hands-on cooking time. Of course baking bread or roasting a chicken takes hours, but most of that time you aren’t actually working on it.
Slow food is fine. (It’s ideal in my book!) Elaborate cooking isn’t bad, but for the sake of simplicity, it’s best saved for special occasions.
Meals to Mark the Days
If you eat exotic or fancy meals all the time, how do you mark the meaningful days of the year? Growing up in a tradition of fasting and feasting at different times during the year, I have always seen food as an important way to commemorate holidays, birthdays, and other special occasions.
Preparing special meals on these days is a simple way to make them special, and it doesn’t involve storing bulky decorations or spending a lot of money.
But again, it only seems special in contrast to simpler meals on ordinary days. So my goal in creating a simple meal plan is really to plan special meals on special days, and serve simpler fare the rest of the time.
And when I talk about saving special meals for special days, those come fairly often in our house. Of course big holidays like Christmas and Easter deserve elaborate meals. On birthdays, we let the birthday boy or girl choose the meal, and celebrate with cake and ice cream.
But we also celebrate special feast days in the liturgical calendar: both solemnities (the highest ranking feast), and those saints’ days that have a particular significance to us.
Now, I don’t make huge meals on these days, but they are a good excuse to make dessert or have some food associated with the saint, like Irish food on St. Patrick’s day.
Flexibility is Key
A simple meal plan is a great tool for streamlining your cooking–if you use it that way. On the other hand, if you create a meal plan and then think you absolutely need to stick to the plan, it could end up complicating your life.
Remember my cooking fail example above? The more reasonable option would have been to cut myself some slack that day both for being sick and for deep cleaning the house. I should have substituted an easy meal for the complicated one I had planned.
Keep this in mind when building your simple meal plan. If you plan a week’s or even a month’s worth of meals at a time, remember it’s completely acceptable to adjust the plan as you go.
If a special day comes up and you just don’t have the time or energy to make an elaborate meal, don’t beat yourself up over it. There are much more important things in life!
Balancing Simple with Special
One of my favorite parts about having a simple meal plan is that special days no longer come up unexpectedly and leave me scrambling for a last-minute dessert. I now plan ahead for birthdays and holidays, so I’m sure to have all the ingredients I need.
In my ideal world, the everyday fare in our simple meal plan would be punctuated by bigger Sunday dinners and a few saints’ days each month, plus birthdays and big holidays with their own special meals.
I’m not quite organized enough to do all of this yet, but it’s getting there. And I’m okay with celebrating random days once in a while because I found a recipe I just had to try!
Drying tomatoes in the oven is an easy way to preserve tomatoes when you don’t have enough to can or if you have smaller varieties like grape, cherry, or plum tomatoes.
Are you looking for more ways to use your tomato harvest? Love the flavor of sun-dried tomatoes, but not the price? It’s super easy to make dried tomatoes at home, without any fancy equipment! Read on to learn how to dry them using your oven.
This year, we grew some wonderful golden cherry tomatoes. I love cherry tomatoes, and these were deliciously sweet and juicy. The yield turned out to be larger than I had planned on, and we were getting several cups of tomatoes per week for a while.
What can you do with so many little tomatoes? Salads are great, but you can only use so many that way. I wanted to preserve them somehow, but I thought it would be a waste of time to boil and skin them all for tomato sauce.
Then I stumbled across a recipe that called for sun-dried tomatoes, and that got me thinking about other ways to dry tomatoes. (No way is the sun going to dry my tomatoes in Alaska in September.)
Why make dried tomatoes?
Drying them is a great way to preserve smaller tomatoes like cherry or plum varieties. You don’t have to worry about skins with this method, and the cherry tomatoes need only be cut in half before drying.
The end product is also versatile. You can crush dried tomatoes into a fine powder to add to soups or sauces, rehydrate them and use like canned tomatoes, or just add them to recipes the their dried state for concentrated tomato flavor.
I also like to eat them plain as a snack. Just a bit sweet and full of tomato-ey goodness, they’re kind of like a savory raisin. I believe my toddler thinks they are raisins, in fact.
It’s kind of surprising how much flavor is packed into these little tidbits. You bite into one, and your mouth is suddenly filled with tomato. I don’t think raisins or dried cranberries have quite the same effect.
At any rate, drying tomatoes is a great way to preserve tomatoes if you don’t have a large enough quantity to can, or the fruits are too small to make that method worth the work!
Method
If you live in a hot, dry climate, by all means try sun-drying your tomatoes! And if you have a dehydrator, that method also works well. (For a good dehydrator tutorial, try this one from Grow A Good Life.) But if you find yourself without either of those options, here’s how to dry your tomatoes in the oven.
First, rinse your tomatoes in a colander and remove the stems.
First, wash your tomatoes and remove the stems. I like to use a colander so they can drip dry while I’m doing something else. They don’t need to be completely dry when you put them in the oven, but it’s a good idea to roll them on a towel or let them dry in a colander for a while. You don’t need extra moisture in the oven; after all, it’s supposed to be a sauna, not a steam bath!
Prepare your equipment
Set out some large flat baking pans. If they are made of aluminum, I recommend lining them with parchment paper. Tomatoes can react with aluminum.
I also recommend using pans with sides, not cookie sheets that are flat on three sides. The tomatoes tend to move around a bit–at least when I’m taking them out of the oven!
Set your oven to the lowest temperature setting. Hopefully this is below 200 degrees Fahrenheit. If 200 is the lowest temperature your oven allows you to set, see if there is a “warm” setting and use that.
The goal is to use enough heat to evaporate the water in the tomatoes, but not so much heat that they cook. I have had pretty good success with an oven temperature of 170 degrees, which is the lowest my oven goes.
Prepare the tomatoes
Now that your tomatoes have been sitting for a few minutes, they should be fairly dry and ready to go. If you’re working with cherry tomatoes, slice them in half and lay them, cut side up, on the baking sheets.
If you are using plum tomatoes or anything larger than cherries, you will need to slice them more than once. The thinner the slices, the faster they will dry in the oven; however, you don’t want them falling apart.
Use your judgment and find what works for you, but I would definitely recommend slicing them less than 1/2-inch thick. Otherwise, you will be waiting a long time!
You can put the tomatoes pretty close together on the baking sheets. They are going to shrink, not expand! (You might be surprised at how much they do shrink! This is a very effective way to preserve tomatoes if you don’t have a lot of storage space.)
Drying the tomatoes
When the sheets are ready, place them in the oven. Then walk away for an hour. I check on my tomatoes about once every hour during the drying process.
First, you will see the cut tops of the tomatoes start to dry out. When they are no longer sticky to the touch, after a couple hours of drying (based on my oven temperature of 170 degrees; your times may be different with a different temperature), the tomato slices are ready to be flipped over.
Turning them over allows for more even drying. I turned the cherry tomatoes over 2 or 3 times during the drying process, but larger tomato slices or a different oven temperature may affect the drying time.
When are they done?
After a few hours, the tomato slices will begin to look like raisins. To check to see if they are done, cut into a slice and see if there is any moisture left inside.
Alternatively, try to squish or bend the tomatoes. I dry mine to the point where they feel like old raisins–the ones you don’t really want to eat because they’re hard. They don’t snap when you bend them, but they definitely aren’t squishy.
Note: if you want to make tomato powder, be sure to dry the tomatoes until there is no moisture left inside of them.
You will need to keep checking on the tomatoes throughout the drying process. If the tomatoes were different sizes, the smaller ones will dry faster. They should be removed from the pans when they’re dry, so they don’t burn while you’re waiting for the larger pieces to dry completely.
The actual drying time will vary based on the size of your tomatoes and your oven temperature. My first batch took roughly 4-5 hours, but I did stop in the middle of that and let them sit overnight before finishing the drying process in the morning.
Storage and uses for dried tomatoes
If you store dried tomatoes at room temperature, use small airtight jars.
You can store the dried tomatoes in freezer bags in the freezer, or in a jar with a tight-fitting lid. If you choose this method, use jars that hold about as many tomatoes as you will use at a time.
You don’t want to open and close the jars many times in a humid climate, as moisture in the jar can cause the tomatoes to mold. Packing them in oil solves this problem.
Dried tomatoes can be chopped and added to soups, stews, or sauces, where they will rehydrate in the liquid. Alternatively, you can rehydrate them in boiling water. Just cook them until they are soft and no longer chewy. This can take 20-30 minutes.
To make tomato powder, simply whirl your crisply dried tomatoes in a food processor. You can store this in jars at room temperature and use like a dry form of tomato paste. It’s surprisingly versatile!
That’s really all there is to it. Drying tomatoes is pretty simple, even if you don’t have hot summer sun or a dehydrator. It’s a great way to preserve your garden produce, so you can keep enjoying it all winter long!
For more tips on using your harvest, check out this article on cooking carrots.
Do you want to get away, but think road trips with young kids are unattainable? Here’s a list of ideas to simplify and streamline your next trip.
I love the adventure of setting off on a road trip. It’s an exhilarating feeling to drive out of town with a full tank of gas and no obligation to be back for the next few days. Sure, a road trip with a toddler and infant isn’t as epic as a backpacking trip or some other high-intensity activity, but sometimes it’s okay to enjoy tame adventures–like when you have a month-old baby and a postpartum mama who’s not supposed to be hiking much yet. I’m glad for any activity we can do as a family right now, especially when it involves seeing lots of lovely fall colors.
I know some people shy away from taking their kids on long car rides on the assumption that it would be more stressful than relaxing, but road trips are totally possible even if you have toddlers or young kids. With a little foresight and a lot of patience, they can be enjoyable for everyone.
We’ve spent the past two weekends out of town. LONG weekends: we were only home 2 days in between trips. If we can take road trips with a very active 2 year-old and a 1 month-old baby, pretty much anyone can!
1. Start with a list: specifically, a “Road Trip with a Toddler” list!
This is something I wish I’d done earlier. Like I said, our family has spent the past two weekends away from home, with only two days in the middle to catch up on laundry, cooking, sleep…
Both trips were last-minute opportunities, so planning ahead wasn’t really an option. That’s why we ended up stopping for diapers and TP on our way out of town. But hey, at least we didn’t run out a hundred miles from the grocery store! (Yes, we were that far from civilization.)
Still, I’d rather have it with me before we leave the driveway. That’s why I made a list of basic car trip/camping supplies BEFORE the next unexpected trip comes up. As I mentioned earlier, make sure the list includes everything you will need for a road trip with a toddler, or whatever age your kids are. Little ones seem to require extra things that are easy to forget!
The tricky part about making a master list is that road trips can require different supplies depending on whether you will be camping, staying someplace with complete amenities, or something in between the two. I would err on the side of making the list too detailed, just so important things like TP don’t get forgotten when we do need them! That being said, my master list for road trips is pretty much a camping list. It includes bedding and cooking equipment in addition to more basic things like diapers and a change of clothes.
2. Keep meals simple and quick to prepare
While we’re on the subject of packing, let’s talk about meals. The great thing about road trips is that you can pack as much food as will fit in your cooler. No worrying about weight, or minimizing perishable items so they won’t spoil.
Obviously, the number and type of meals you will need depend on the destination and whether or not you’re camping. If you only need to pack lunches, find foods that can be prepared ahead of time and eaten cold (like sandwiches), or eaten straight from a container. This eliminates cooking and cleanup, which can take more time than you think. These kinds of foods should also be less messy–which is a huge bonus on a road trip with a toddler, believe me!.
Suppertime
For suppers, the best meals for us tend to be something prepared in advance that can easily be reheated in a pot or skillet over a camp stove. Soups, one-pot meals, and casseroles are good options. Don’t underestimate the power of leftovers! When you’ve been on the road all day, a hot supper of leftover baked spaghetti or soup tastes fantastic! Also, it leaves you with only one messy cooking pot to clean.
Tip: if you’re reheating a casserole or one-pot meal, you may need to add a little water to the pot to keep the food from drying out and burning.
Any desserts I pack are self-contained, like cookies or brownies. These don’t require bowls and spoons–which would need to be washed afterward.
Breakfast
When we pack breakfasts for road trips, that usually means we’re camping or staying in a cabin somewhere. We really appreciate hot breakfasts when camping, although the quick and easy option would be cereal or granola bars.
Also, my husband usually cooks breakfast on camping trips, and I’m not going to pass up an opportunity to wake up to the smell of coffee and bacon from the comfort of my sleeping bag!
At breakfast time, we stick to the “one pot plus a coffee pot” rule. You can cook bacon and eggs in the same pan, with a little practice. Cook the bacon first, then push it to the side of the pan when it’s mostly cooked. Then pour the eggs in. Scrambled works best here.
Otherwise, a pot of oatmeal is a good choice, especially on chilly mornings. I like to mix quick oats, brown sugar, cinnamon, and raisins at home, so I have a family-size portion ready to pour into the pot when the water boils.
3. Bring snacks
While not necessarily an actual meal, snacks play an important part in our road trips. Before we had kids, snacks could be a substitute for lunch. Toddlers need more structured meals than that, though. With kids, the role of road trip snacks is largely entertainment: it gives them something else to think about other than being stuck in a car seat.
Now, I would not recommend giving your kids snacks all day on a regular basis, but on road trips it is an effective strategy for preserving harmony. That becomes more important when you’re stuck in a small space with small, loud people.
When choosing snacks to bring along on a road trips with a toddler or young kids, I stick to mostly healthy choices plus one treat. For example, we often take dried fruits, nuts, granola bars, and a bag of cookies or candies. Another good option is to make a big bag of trail mix. That’s handy because you have fewer open packages floating around in the car.
If our driving time is less than five hours, snacks are probably the only car food I will pack. On shorter trips like this, the snacks look less like backpacking food and more like our normal lunches: fresh fruit and vegetables (cut up beforehand, if necessary), muffins or sandwiches, cheese or nuts, and maybe cookies.
After several messy lunches on the road, I’ve given up bringing along homemade sandwich bread. It’s just too crumbly for the car! Instead, we can make sandwiches with buns or bagels.
4. Bring something to listen to
Music is another good distraction when kids get cranky. These days, you have several different options for listening. There’s the radio, if you can get stations to come in where you’re driving. You might be surprised if the only station available is local folk music–or nothing at all.
There’s also Internet radio, if you have a way to play it in your vehicle, or a device with a way to charge it. However, you also need to be able to access the Internet, and our service tends to be spotty or nonexistent frequently. Maybe that’s because most of our road trips happen to be driving through long stretches of Alaskan wilderness.
A final option is bringing a device with music loaded onto it, or physical CDs (or cassettes, if your vehicle is old enough!) We take the old-school approach and keep a stack of CDs in our truck. It keeps me from getting hoarse singing “Over the River and Through the Woods” again and again and again.
Now, music isn’t the only thing you can listen to. Books on tape/CD/whatever are a good alternative, especially if your kids are older. Toddlers aren’t as interested if they can’t see the pictures. Lectures on Philosophy or Economics might be interesting to parents, but good luck hearing them over the kids. (Or if your kids are like mine, talks might put them to sleep!)
5. Give them something to look for
Older kids can play games in the car, but toddlers are a little young for that. One way to keep them engaged is to have them look for some landmark, animal, or special vehicles on the road (tractors, obviously).
If you’ve made the drive before and know what’s coming up soon, that makes it easy. If this is a journey into unknown territory for you, look on a map (or your phone) to find landmarks or natural features like rivers, lakes, and mountains.
Animals can be fun to spot, but it can also be very frustrating to kids if they DON’T see whatever it is they’re looking for. We have made the mistake of telling our two year-old to look for bears, and then he didn’t see any all day. We had better success with moose.
Looking for a certain kind of vehicle may be more applicable if you’re traveling on a busy highway. Little boys are probably more interested in pointing out tractors and dump trucks, but little girls could be engaged to find baby blue or yellow cars.
6. Streamline your stops
Stops are inevitable on a road trip with a toddler or young child, so it’s a good idea to be prepared for them. That means having a plan so that each stop doesn’t take an hour. I’m not talking about a rigid, down-to-the-minute schedule–just a basic idea of what needs to happen before everyone gets back in the car.
It may not seem important to have a plan, but it’s so easy to get caught off guard by things like, “Wait, did we change both kids’ diapers, or just the baby’s?”
For our family right now, having a plan pretty much means I feed the baby whenever we stop, and my husband is in charge of anything else that needs to happen. On our last two road trips with the kids, he changed the two year-old’s diapers and ran around with him outside every time we stopped.
If you have kids of several different ages, you could put each older kid in charge of a younger sibling during stops. That way, everyone gets a bathroom break and nobody wanders off by himself. (This only works if you have kids old enough to take responsibility for someone else.)
7. Lower your standards… at least for sleep
If your road trip includes a night or more away from home, be prepared to miss some sleep. If you have young children, you already know that ANYTHING outside their normal routine can disrupt their sleep. Spending hours stuck in a car seat, coupled with going to bed in a strange place–maybe even without a bed, if you’re camping–is a recipe for a bad night.
I don’t say this to turn you away from attempting a road trip with a toddler or baby. Not at all. I just personally find it easier to accept the fact that I probably won’t sleep before it happens, rather than be unpleasantly surprised. I figure one night of poor sleep is nothing to sneeze at. Two, and I start getting grumpy if I don’t get any coffee. Three, and I tell my husband no more trips for a while…
8. Stay flexible and remember it’s an adventure!
Last on my list, but probably one of the most important tips for traveling with kids: leave some wiggle room in your plans, and keep a sense of humor. You never know what might come up and throw a wrench in your plans. From unexpected sicknesses or injuries to flat tires or the steering rack coming loose in the middle of a deep canyon with scree slopes on both sides of the road, you can’t be prepared for everything.
One of the most important things you can do in a situation like that (besides attending to the immediate need) is to keep the atmosphere positive. The last thing you want is the entire family stressed and in tears. Remember it’s all part of the adventure.
These are my recommendations to make your road trip with a toddler less of a headache and more of a pleasant experience. It’s not as hard as it seems to enjoy traveling with young kids; you just need to have a game plan. I hope you find my tips helpful. If you have any other suggestions for traveling with children, leave a comment below. I would love to hear from you!
For more ideas about simplifying and streamlining your day-to-day life, check out this post on developing a simple meal plan.
Hi, I’m Kimberly! I’m an Alaskan wife and mother who loves simple, old-fashioned living. If you’re looking for country-style recipes from scratch or simple homemaking ideas, pour yourself a cup of tea and join me!


 Hi, I’m Kimberly! I’m an Alaskan wife and mother who loves simple, old-fashioned living. If you’re looking for country-style recipes from scratch or simple homemaking ideas, pour yourself a cup of tea and join me!