Posted on Leave a comment

Autumn Chicken Dinner Recipe

chicken dinner recipe
This no-fuss chicken dinner recipe will leave your kitchen smelling like fall and your family asking for seconds.

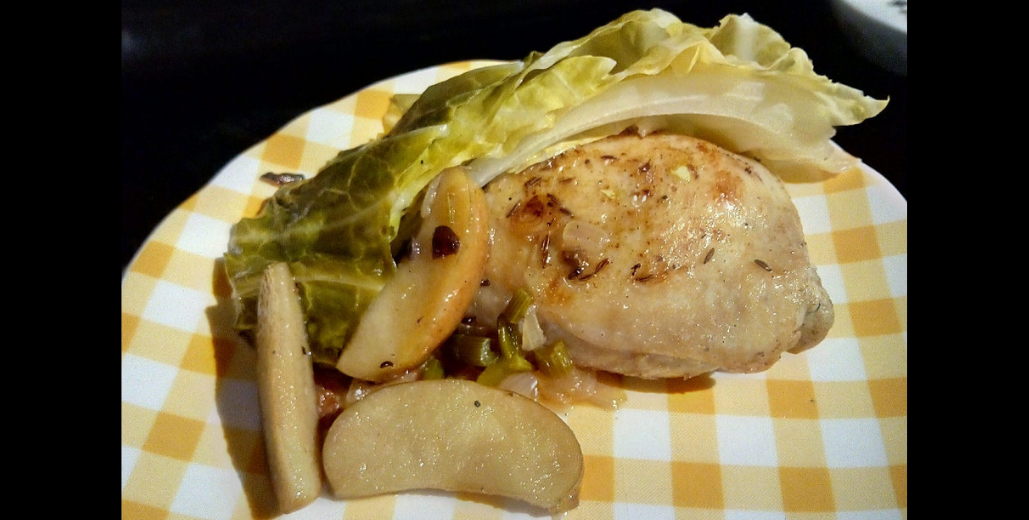
Fall is in full swing outside. The trees are gold, the bushes are red, and the garden is starting to look sparsely populated. On a chilly evening, what’s better than to step from the brisk air outside into a warm, cozy kitchen filled with the appetizing aromas of apples, celery, and cabbage? Here’s a chicken dinner recipe that combines all of these flavors in one simple meal.

The flavors of fall combine in an easy meal that’s tasty enough to keep your family coming back for seconds. It’s a one-pot meal, so clean-up won’t take all evening. It’s an inexpensive supper in its own right, and the cost can drop even more if you have a garden or raise chickens.

A Fortuitous Mischance

This recipe is a classic example of my cooking style. I already had a plan for dinner, but then realized I had a cabbage to deal with. So I found another chicken dinner recipe that looked appetizing, and started reading the list of ingredients. Nope, don’t have that. Not that one either. I could maybe substitute something else…

In the end, my meal turned out so different from the original recipe that the resemblance is hard to see. I still want to make that original recipe, whenever I have the right ingredients on hand!

That being said, there is a lot of room for experimenting and adapting this recipe. I used what I had and it turned out very well, but these particular ingredients aren’t the only ones that will work together. Use what you have and let me know if you come up with any great combinations!

Ingredients

I used chicken thighs with the skin on. This helped keep moisture in the meat, and it wasn’t dry at all. If you have a bigger package of thighs or a whole chicken, the recipe doubles just fine. You will want to brown the meat in batches, though.

The type of fat you decide to use should complement the other flavors in the dish. I chose bacon fat for this reason, but butter would be fine as well. I wouldn’t recommend olive oil in this dish.

Vegetables

The celery I had was from my mother’s garden. It didn’t get very big this year, so the stalks were narrow and the flavor was strong. I chopped it pretty finely because of this. If I was using celery from the store instead, I might leave it in bigger chunks for texture and flavor.

I used a normal green cabbage, because I find the flavor more to my taste than red cabbage. However, if you prefer red cabbage, or happen to have a different variety on hand, by all means try it!

The apple(s) used should ideally be tart cooking apples, but feel free to use whatever you have available. Also, use more than one apple if you want to highlight that flavor, or if you have smaller apples. I really miss Pennsylvania apple orchards this time of year. The selection of apple varieties that make it to interior Alaska is pretty limited.

Method

To begin, set a Dutch oven over medium heat. Add a couple spoonfuls of bacon fat and let it melt while you chop some celery and onions. The fat should be hot enough to make the veggies sizzle when you put them in.

Cook, stirring occasionally, until the onion and celery are translucent. If I’m feeling impatient, I will cover the pot so they cook faster.

Remove the veggies and set aside when they are cooked. Use a slotted spoon if you have one, or else tilt the pot so you don’t remove all the fat along with the veggies. You need that for cooking the chicken!

Browning the Chicken

Add the chicken pieces to the Dutch oven. If the pot looks too dry, add another half tablespoon of fat. Alternatively, cook the chicken skin side down at first, to release fat from the skin.

If you’re worried about burning it, turn the heat down to medium-low. Remember you’re just trying to brown the meat at this point. It will have plenty of time to cook in later steps. Flip the pieces over after 3-5 minutes to brown the other side.

chicken dinner recipe
Brown the chicken on both sides.

When the chicken is browned on both sides, return the celery and onions to the Dutch oven. Next, add the apple cider vinegar, Marsala wine, salt, pepper, and caraway seeds.

Give everything a good stir, then arrange the cabbage slices over the chicken. They don’t need to be down in the liquid at the bottom of the pan; once the lid is on, they will steam just fine.

Put the lid on and walk away

Cover and cook for about 20-25 minutes, until the cabbage is crisp-tender, or nearly at the point you want to eat it. Toss some apple slices in and replace the lid. Cook for another 10-15 minutes until the apples are fork tender. Your kitchen should be smelling pretty wonderful at this point!

This is really a no-fuss supper. My favorite kind! Chop everything up, light the stove, and give it a stir now and then. The times listed for cooking are variable and forgiving. I’m pretty sure the cabbage doesn’t mind an extra ten minutes of steaming away atop the chicken if you’re busy with something else.

So the next time you’re wondering what to do with a cabbage, give this chicken dinner recipe a try. Or you could even buy one for the purpose.

Autumn Chicken Dinner

A home-style chicken dinner with great fall flavors of apples and cabbage, this one-pot meal is a quick and easy supper for busy families.
Prep Time5 minutes
Cook Time55 minutes
Total Time1 hour
Course: Main Course
Keyword: Chicken, Main Dish
Servings: 4

Ingredients

  • 2 tbsp bacon fat
  • 1/3 cup chopped onions
  • 1/3 cup chopped celery
  • 4 chicken thighs
  • 2 tbsp apple cider vinegar
  • 3 tbsp marsala wine
  • 1 tsp caraway seed
  • 1/2 tsp salt
  • 1/4 tsp pepper
  • 1/2 small head of cabbage cut into 4 wedges
  • 1 medium apple cut into 12 wedges

Instructions

  • In a Dutch oven over medium heat, saute onions and celery in bacon fat for 5 minutes or until tender. Remove mixture from pan with a slotted spoon and set aside.
  • Add the chicken thighs to the pan and cook until lightly browned on both sides, 5-8 minutes.
  • Return vegetables to pan along with chicken. Add vinegar, wine, caraway seed, salt, and pepper. Place cabbage wedges on top of chicken. Cover and cook until chicken is tender and cabbage is crisp-tender, 20-25 minutes.
  • Top with apples. Cover and continue cooking another 10-15 minutes until apples are fork tender.

For more autumn-inspired recipes, check out this one for pumpkin spice snickerdoodles!

Posted on Leave a comment

5 Ways to Cook Carrots

5 ways to cook carrots

Fresh Ideas for Carrot Recipes

5 carrot recipes
Have an abundance of carrots? Looking for new ways to prepare them? Here’s a handy list of carrot recipes to work these bright orange vegetables into your meal.

Bright blue skies, cool mornings, no more mosquitoes… summer is coming to a close. It’s not quite fall yet; the leaves have just started to turn yellow, and I’m still waiting on the first frost to pick cranberries. This is the season of abundance from the garden. Here’s a selection of carrot recipes to give you some fresh ideas for using produce!

Of course there are plenty of earlier crops, and some will come later, but just now I am so thankful that my kitchen runneth over with a plenitude of tomatoes, peppers, green beans, beets, carrots, and the occasional squash from a friend’s garden.

The moose ate all of our broccoli this year, and most of the lettuce, but we still have quite a colorful harvest.

I love it when I don’t even have to think about buying vegetables at the grocery store–and the home grown ones always taste so much fresher! There’s not much better than just-picked produce that you grew yourself.

My toddler was helping me pick carrots this morning, and it was a job to convince him that we needed to wash the funny three-legged carrot before he could eat it! Our carrots aren’t huge, but most of them are 5-6 inches long and very tasty.

I won’t be surprised if we end up eating most of them fresh, but for those of you with larger carrot patches (or who don’t enjoy fresh carrots), here’s some inspiration for carrot recipes:

Carrot Recipes

Soup

Autumn is the perfect time to make a big pot of soup, as the days start to get a little chilly and there are lots of vegetables ripening.

Vegetable soup, with or without meat, is simple to prepare and also freezes very well. This makes it doubly beneficial for me: I’m preserving vegetables (without spending all day blanching or canning) and putting meals in the freezer at the same time!

Of course there’s also cream of carrot soup if you need to use up more carrots. I am very fond of carrot soup, but don’t try to freeze this one! Cream-based soups do not tolerate freezing.

Spiced Carrots

Carrots are one of those funny vegetables that tastes equally good with savory or sweet flavors. When we were growing up, Mom would often add butter, cinnamon, and a bit of brown sugar to a pot of carrots as soon as they were crisp-tender and drained.

Another good combination is orange juice, orange peel, and ground ginger, along with a pat of butter. Use about 1/2 teaspoon of ground spices per 10 medium size carrots, and a tablespoon or two of butter and orange juice.

Minted Carrots

This is one of my favorite carrot recipes. I’m always looking for ways to use fresh mint, and it makes a nice accent to the carrots. I like to use apple mint, since the flavor is milder than spearmint or peppermint.

I combined orange juice, orange peel, and a pat of butter with cooked carrots, then stirred in about a tablespoon of chopped apple mint just before serving. This was only for 3 servings of carrots, so feel free to use more mint if you’re making a big pot!

Roasted Carrots

Roasting lends itself well to many root vegetables. The long cooking time bring out the flavors and the sugars in carrots, potatoes, sweet potatoes, turnips, parsnips, onions, and more.

Try tossing large chunks of vegetables with olive oil, sea salt, and herbs. Rosemary, savory, and thyme are all good options. Bake at 350 degrees for 45-60 minutes, or until tender.

Another variation is to roast at a higher temperature for a shorter time. This results in a crisper texture and possibly charred edges. You do have to keep an eye on them!

Make sure the carrots and any other vegetables are in smallish pieces so they will actually cook through. Toss with olive oil and seasonings, and make sure you only have a single layer of vegetables in your pan.

Bake at 425 degrees for 30-45 minutes, but DO start checking on them after half an hour!

Carrot Chips

While these involve the same cooking technique as roasting, the end result is so different that I think they deserve their own category.

The basic concept is just like potato chips: you want to slice carrots as thinly as possible, coat them with oil, add salt and seasonings if you wish, then roast at a high temperature for a short time.

Ideally, you want to use large carrots for this recipe, and cut them on the diagonal for maximum surface area. It’s probably not worth the time to cut up small carrots (or even the narrow ends of large ones).

If you would like an actual recipe to follow, check out this one from Mother Would Know. She lists different oven temperatures and cooking times, so you don’t have to guess!

What are your favorite carrot recipes?

Well, there you have it: five different carrot recipes. From creamy soups to crispy chips, in a main dish or starring on their own, carrots are a great way to work some vitamin A into your meals. Do you have a favorite carrot recipe that doesn’t appear here? Let me know!

For more ways to use your garden-fresh produce, check out this post on how to dry tomatoes in the oven.

Posted on Leave a comment

Hearty English Muffins

Hearty English Muffins
English muffins are a simple, versatile bread that can be made into toast, sandwiches, or even mini pizzas.
Jump to Recipe

Toast is a breakfast staple around here, and English muffins are one of my favorite kinds of bread to toast. They come in individual servings, they don’t tend to get crumbs everywhere like a big loaf, and their texture when toasted is just right: not too dry, nor too chewy. Then there’s the added bonus of complementing just about any topping you could come up with. From butter, nut butters, jam, or honey to bacon and eggs or pizza toppings, English muffins are surprisingly versatile.

Recently, most of my English muffins have been made with sourdough, but today I wanted something fluffier and heartier. I know those two words don’t seem to go together, but compared to the sourdough muffins, these have much more of a rise, so there’s just more to them. They are quite delicious fresh from the skillet to the toaster, but don’t burn your mouth!

Making the dough

English muffin dough behaves like any yeast bread dough. Dissolve the yeast in the “wet” ingredients, then stir in the flour and salt. I like to add about 4 cups of flour at first, then the rest 1/2 cup at a time. When the dough gets too stiff to stir, turn it out onto a floured counter or board. Knead it thoroughly, adding flour as needed, until the ball of dough is smooth and elastic. You want a fairly stiff consistency, so the muffins won’t fall and lose their rise when you transfer them to the skillet.

rolling dough
Roll out the dough to about 1/2 inch thick. The muffins should double their height by the time they’re done cooking.

Let the dough rest for 5 minutes, then sprinkle some cornmeal onto the counter and roll it out 1/2 inch thick. Don’t worry about making a perfect rectangle; you will be cutting it up anyway. You can make the muffins whatever size you want. If a biscuit cutter seems too small, try using an upside-down glass or small bowl to cut the dough. While the muffins will double their height, they won’t get much bigger in diameter. Combine any remaining scraps of dough and form them into another muffin or two. They don’t all have to be the same size.

 English muffins on baking sheet
Let the muffins rise on cornmeal-covered sheets for 35-40 minutes.

Once you have the muffins cut out, place them on cornmeal-covered baking sheets to rise. You don’t need to grease the sheets. The muffins only need 35-40 minutes to rise, but a bit longer isn’t a problem.

Skillet Tips

When the muffins have risen, heat a large, heavy skillet over medium-low heat. Cast iron works best. Place muffins in the skillet, making sure both sides are coated with cornmeal. Don’t overcrowd the skillet, but it’s not a problem if the muffins are touching just a little.

Don’t crowd the muffins in the skillet. It’s fine if the edges barely touch.

If you’ve never cooked anything on a dry skillet, you may have to play around with the temperature, so keep checking your muffins while they cook. I cook mine somewhere between low and medium low, depending on how fast they are cooking–and my level of patience!

Flip the muffins over carefully after the first side has cooked. Don’t squish them down in the pan–you don’t want to lose the rise! It’s best to use a heat-proof spatula to avoid burnt fingers.

In an ideal world, every muffin will get cooked to a nice golden brown on each side, without any gooiness in the center. In my world, either the edges cook too fast and the center gets underdone, or one side ends up much darker than the other, or there’s a diaper explosion and I come back to a smoking skillet…

English muffins
English muffins should be cooked until golden brown on both sides and cooked through the middle.

If the center does seem a bit underdone, you have a few options for recovery. First, you can try putting the muffins back in the pan on low heat. This is only a good option if the edges aren’t already pretty dark.

Second, you can bake the muffins in a 350 degree oven for 5-10 minutes. Check on them frequently, especially if they were still hot when you put them in the oven.

Third, if the center is only a little underdone, I usually end up just storing the muffins in the refrigerator and toasting them thoroughly when they come out.

Storing English Muffins

You can store your English muffins in an airtight bag at room temperature for about a week. Cool the muffins completely before putting them in a plastic bag. Alternatively, you may store them in the refrigerator. They also freeze very well, and you can toast them straight from the freezer. Breakfast doesn’t get any more convenient than that!

Hearty English Muffins

Thick and fluffy, these are not your typical grocery store muffins. With superior flavor and hearty texture, these will be a welcome addition to your breakfast table.
Prep Time15 minutes
Cook Time40 minutes
Resting Time45 minutes
Total Time1 hour 40 minutes
Course: Breakfast
Keyword: Bread, Muffins
Servings: 12 muffins

Ingredients

  • 1 cup warm water
  • 2 1/4 tsp active dry yeast
  • 2 tbsp honey
  • 1 cup milk
  • 3 tbsp butter softened
  • 1 1/2 tsp salt
  • 2 1/2 cups whole wheat flour
  • 3-3 1/2 cups unbleached flour
  • cornmeal

Instructions

  • In a large bowl, dissolve yeast in warm water. Add honey, butter, and milk. Stir in salt.
  • Stir in whole wheat flour and 1 1/2 cups unbleached flour. Add more flour 1/2 cup at a time until dough is too stiff to stir.
  • Turn dough out onto a floured board and knead for 6-8 minutes, adding more flour as necessary to prevent sticking.
  • Let dough rest for 5 minutes.
  • Sprinkle board with cornmeal. Roll dough out to 1/2 inch thickness.
  • Cut into rounds and place on cornmeal-covered sheets. Let rise 35-40 minutes.
  • Heat a skillet and cook muffins over low to medium-low heat until golden brown on each side and cooked through the center (6-10 minutes per side).
  • Cool completely on a wire rack before storing.

Notes

Cooking times are approximate and will be affected by the heat of the skillet as well as the size and thickness of the muffins.

For more baking fun, check out this recipe for pumpkin snickerdoodles!

Posted on 2 Comments

Secrets to the Best Banana Nut Bread Recipe

banana bread
best banana nut bread recipe
Want to know what makes a perfect, even textured bread ripe with banana flavor? Read on!
Jump to Recipe

I’ve been trying to stock my freezer lately, in preparation for the arrival of a new baby—and an extended period of time during which I won’t want to cook. Granted, I’m not particularly excited about extra cooking now, when it’s hot outside, and I have a baby heating me up from the inside, and a propane oven that raises the temperature in our small cabin pretty quickly… But there were bananas looking lonely in the freezer, and I thought how nice it would be to have some banana bread on hand for breakfasts. So out they came and I dug out my mom’s best banana nut bread recipe.

My mother’s banana nut bread recipe is hands-down the BEST I’ve tasted. It has better flavor and texture than so many others, and rises nicely to make a large, domed loaf.  Not to mention it also freezes well. You can make it with or without nuts, and I like to pretty it up for Christmas or Valentine’s Day by adding chocolate chips and maraschino cherries. If you’re trying to limit sugar, here’s a link to a lower-sugar variation that my sister developed and her family loves. It’s also dairy-free!

I grew up eating slices of this bread spread thinly with butter, which my husband finds appalling. It is equally tasty plain or with peanut butter. In fact, I commonly make banana bread and peanut butter sandwiches to take along when we’re traveling, because they tend to be less messy than regular PB&J sandwiches.

THE SECRET IS IN THE BANANAS:

You don’t want to use perfectly yellow bananas with no brown spots when making banana bread. As they ripen, the flavor of bananas becomes more developed and the starches convert into sugars. That said, I like to use bananas that are a bit past their peak, let them sit on the counter for a few more days so they have lots of brown spots, and then pop them in the freezer until I have enough time and bananas to make bread. I definitely recommend freezing your bananas first, because then when you thaw them, they’re already mushy, and you don’t end up with chunks of banana in your bread. Ideally, you want the texture to be consistent throughout your bread (except for nuts/add-ins). If you do decide to refrigerate or freeze your bananas, the skins will turn dark brown. Don’t be alarmed! This is normal, and the fruit inside tastes just fine.

best banana nut bread recipe
Freeze bananas a day or two past their peak for deeper banana flavor. This banana’s skin turned darker in the freezer, but the fruit inside is perfectly fine.

NOTE: If you let bananas sit out at room temperature too long, they will start to rot, and both the banana and its skin will turn dark and mushy. Do not use rotten fruit!

A word about milk

One other tip for the best banana nut bread recipe is the sour milk. Cultured buttermilk works just as well. This brings out the sweetness and overall flavor of the bananas, while improving the texture of the bread. It’s easy to sour your milk by adding just a touch of vinegar to it, and letting the mixture sit for a few minutes so it will curdle. I use white vinegar in this recipe, because I don’t want to add any other flavors. Lemon juice would probably work as well, but you might have to use a larger amount in order to curdle the milk.

When baking this bread, don’t be alarmed if it gets pretty dark on top.  The color should be a nice glossy brown when it’s done. This is due to caramelization of the sugars in the bananas themselves, because we used such ripe fruit. To determine doneness, stick a toothpick in the center. If it comes out clean or with just a few moist crumbs, the bread is done. You can also check by pressing lightly on top of the loaf with your finger. It should spring back, not sink.

Print Recipe

Mom’s Banana Bread

Firm-textured and deeply flavorful, this banana bread is a tried and true family favorite.
Prep Time20 minutes
Cook Time1 hour 5 minutes
Total Time1 hour 25 minutes
Course: Breakfast
Keyword: banana bread, Quick bread
Servings: 1 loaf

Ingredients

  • 1/2 cup butter softened
  • 1 cup sugar
  • 2 eggs
  • 3 bananas preferably frozen, thawed
  • 3 tbsp milk + 1/2 tsp vinegar, or use sour milk
  • 1 cup unbleached all-purpose flour
  • 1 cup whole wheat flour
  • 1 tsp baking soda
  • 1/2 tsp salt
  • 1/2 tsp allspice optional
  • 1 cup chopped walnuts or other nuts optional
  • 1/2 cup chocolate chips optional
  • 2 tbsp chopped maraschino cherries optional

Instructions

  • In a large mixing bowl, cream the butter and sugar.
  • Add the eggs, bananas, and sour milk.
  • In a separate bowl, mix together the flour, baking soda, salt, and allspice. Add the dry ingredients to the banana mixture.
  • Fold in any extra ingredients: nuts, chocolate chips, and/or maraschino cherries. Don't mix too much!
  • Turn into a greased 9×5" bread pan. Bake at 350 degrees for 60-70 minutes.

Notes

If your bananas are very small, you may want to use 4 instead of 3.