Posted on 1 Comment

How to make All Natural Facial Toner at Home

organic and all-natural ingredients make this refreshing skin toner a bottle full of goodness!
natural myrtle skin toner
organic and all-natural ingredients make this refreshing skin toner a bottle full of goodness!

Does your beauty routine need a refresh? Dry winter skin, changing seasons with different humidity levels, and stress can all contribute to uneven skin tone. Toners can help with retaining moisture and making your skin soft and even-toned. But commercial toners, even the expensive ones, are often full of chemicals. If you can’t pronounce them and don’t know what they do, there’s a pretty good chance you don’t need them on your skin, which readily absorbs harmful ingredients as well as beneficial ones.

I have been gradually going through all of our household consumables–cleaning products as well as hair, skin, and beauty items–and replacing the chemical-laden varieties with natural, homemade alternatives. Some recipes for homemade products are intimidating, but this one is quite simple! Just mix everything together, give it a good stir, bottle, label, and you’re all set!

Why Should You Use an All Natural Facial Toner?

Skin toners contain astringents, which reduce excess oil, as well as tone and clarify the skin. They can help shrink pores in the surface of the skin, which makes your skin look softer and more even. Commercial varieties often contain a high concentration of alcohol, which can dry your skin out too much, and leaves an unwelcome sting and scent.

The solution? Make your own! When you make your own skin toner, you control the ingredients, so nothing irritating or harmful goes on your skin.

This recipe uses a gentle, organic witch hazel extract, combined with rose water and essential oils, to make a natural preparation which is gentle enough for sensitive skin. If you want an all natural facial toner that clarifies and tones your face without harsh chemicals that strip you of necessary moisture, try this simple recipe! You will love how fresh and radiant it makes your face feel!

Should You Use Witch Hazel in Facial Toners?

No, and yes. It depends on your skin and which one you buy.

Not all witch hazel preparations are made the same way. Many varieties contain a high proportion of alcohol to witch hazel extract, which, as we said before, can dry out your skin unduly and might cause irritation. Other preparations marked “alcohol-free” are technically hydrosols instead of extracts. These are fine to use if your skin is extra dry and sensitive, but the concentration of witch hazel is rather low. I prefer to use a double-distilled witch hazel extract from Mountain Rose Herbs, which contains 85% witch hazel and 15% alcohol.

Witch hazel has been used for its astringent properties for centuries. The bark is boiled, and the resulting liquid is steam distilled to obtain a concentrated, therapeutic witch hazel extract. Witch hazel is classified as a mild astringent. It can reduce inflammation in skin cells, even out skin tone and texture, and help your skin absorb other nutrients.

Witch Hazel Toners vs. Astringents

Witch hazel is used on its own or with alcohol and other ingredients in astringents, for the purpose of removing excess oil, unclogging pores, soothing irritated skin, and decreasing the appearance of acne eruptions. If you have oily, acne-prone skin, witch hazel makes a great single-ingredient astringent, which is completely natural and not as harsh as astringents which also contain high concentrations of isopropyl alcohol and salicylic acid.

This wonderful botanical extract can also be used in facial toners, such as this recipe. Toners are gentler than astringents. Their purpose is to even out skin tone and texture, not necessarily to treat acne or oily skin. Toners are suitable for all skin types, especially dry and sensitive types.

When diluted with other ingredients, witch hazel makes a great addition to facial toners. In this recipe, I use organic witch hazel extract as a base for my toner.

Other ingredients in this natural skin toner recipe are rose water and essential oils.

all natural lemon myrtle facial toner

Why Should You Use Rose Water in a Facial Toner?

Rose water has classically been used in skincare products, especially for the face. It cools and refreshes skin, and confers a light floral aroma. Rose petals are prized for their soothing, rejuvenating, and healing properties.

While rose essential oil is the best source of these therapeutic properties, it is quite expensive. Rose water is a more economical way to obtain some of the benefits and fragrance of rose petals for use in your own skincare preparations.

What are floral waters?

Floral waters, including rose water, are preparations made from water and flower petals. Some preparations also include alcohol. They contain properties of the flower, such as scent, color, and therapeutic benefits unique to the flower used.

This might sound like essential oils, but floral waters are not nearly as concentrated as those. Rose water and other floral waters are suitable for using directly on your skin, unlike essential oils, which must be heavily diluted first.

Even though the scent and therapeutic properties of rose water is much less concentrated than rose essential oil, it is still effective in skincare and beauty regimens. Rose water and other floral waters have reputedly been used since ancient civilizations.

How to Make Floral Waters

There are four different ways to make floral waters:

  1. Steam distillation: Fresh flower petals are distilled with water. The steam releases therapeutic properties of the flower petals. Once the steam is cooled and condensed again into water, the water now contains those beneficial and fragrant properties. This method of distillation is most often used to produce essential oils, and the floral water (or hydrosol) is a by-product. Hydrosols contain trace amounts of essential oils.
  2. Extraction: To make a floral extract, place fresh or dried flower petals in a glass jar with a tightly-fitting lid. Pour over the petals enough distilled water, vodka, vinegar, or witch hazel extract to cover by an inch or so. Cover tightly and shake. Keep the jar in a dark place away from direct sunlight. Shake every day for 2-4 weeks. Strain the liquid and keep in a glass jar away from direct sunlight.
  3. Infusion/Tisane: Floral infusions are made by simmering flower petals in distilled water. Just like an herbal tea!
  4. Dilution: By diluting essential oils in water with the aid of an emulsifier, you can also make a kind of floral water. These are not technically true floral waters, but they are generally interchangeable.

If you are interested in making your own rose water, the Country Hill Cottage has a simple infusion recipe.

Myrtle Essential Oil Benefits for Skin

Common Myrtle, or Myrtus communis, has many therapeutic properties, including astringent, antiseptic, deodorant, expectorant, anxiolytic, and respiratory aid.

Myrtle has been used since the time of the Ancient Greeks, who associated the plant with Aphrodite, the goddess of love and beauty. The Greeks also used myrtle leaves as medicine. Myrtle essential oil has been shown to be an effective antibiotic, antifungal, and antiviral agent.

Myrtle Essential Oil is a gentle yet hardworking essential oil for skincare. It can help to even out skin tone, reduce inflammation, and cleanse the skin of dead cells and microorganisms that cause acne. Myrtle oil has been studied in Korea for its beneficial effects in treating acne.

Myrtle essential oil has a fresh, green, woody aroma. I included it in this facial toner recipe chiefly for its astringent property, but also for its lovely fresh scent!

organic and all-natural ingredients make this refreshing skin toner a bottle full of goodness!

Recipe Notes

This recipe also calls for a small amount of lemon essential oil. I used it mostly for the scent. Citrus oils are known to cause sun sensitivity if used on the skin, so avoid exposure to direct sunlight soon after applying this toner. If you are concerned or your skin is very sensitive, just omit the lemon oil from the recipe!

ingredients for myrtle toner
Simple, natural ingredients make the best skincare products you can’t buy in stores!

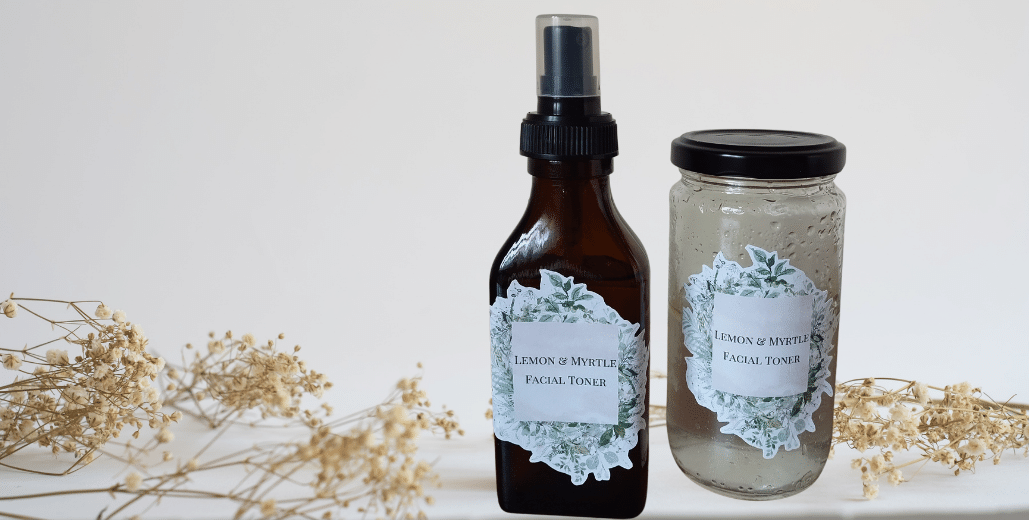
Making the toner is very simple. All you need is a bowl or jar to mix everything, a funnel for pouring, and a glass spray bottle. I used the bottle that my rose water came in (I ordered it here), but you can use any small glass or plastic bottle with a spritz/spray top.

Keep in mind that the recipe makes 8 ounces of toner, so if your bottle is smaller than that, you will need another jar to store the extra toner in!

Mix up these four simple ingredients, and concoct your own all natural facial toner today! If you do make it, please leave a review! I really appreciate it!

Lemon & Myrtle Facial Toner

This refreshing all natural facial toner is mild and suitable for all skin types. Enjoy soft, even skin with a lovely fresh scent!
Prep Time5 minutes
Total Time5 minutes
Keyword: Lemon, Myrtle, Rose water, Skincare, Toner
Yield: 8 ounces
Author: kimberly

Equipment

  • 1 10-oz. jar or small bowl
  • 1 small glass spray bottle
  • 1 funnel

Materials

  • 5 ounces witch hazel extract
  • 3 ounces rose water
  • 30 drops myrtle essential oil
  • 10 drops lemon essential oil

Instructions

  • Combine the witch hazel extract and rose water in a small bowl or 10-ounce jar.
  • Add the essential oils. Stir or shake to combine.
  • Position funnel in spray bottle and pour toner into bottle. Cap with lid. If you have extra toner, store it in a glass jar with a tightly-fitting lid.

Notes

Lemon essential oil can make skin sensitive to sunlight. Avoid direct sun exposure immediately after applying toner. If you are concerned about this, omit the lemon oil.
Posted on 1 Comment

Iced Pumpkin Scones Recipe

These iced pumpkin spiced scones drizzled with a sweet cream cheese glaze will grace any autumn table.
Tea and scones, anyone? You won't have to ask twice, when the tantalizing aroma of these pumpkin spice scones wafts through the house!
Tea and scones, anyone? You won’t have to ask twice, when the tantalizing aroma of these pumpkin spice scones wafts through the house!

Need a festive, fall-themed treat to add to your tea table or harvest gathering? These iced pumpkin scones perfectly complement the season of blustery weather and brilliant colors. Pair them with soup on a chilly day, or serve among other dainties for an autumn tea party. Whenever you bake these, don’t expect them to last long! The aroma of these scones fresh from the oven is enough to draw eager taste-testers!

I can’t recall where the original recipe for these scones came from, but I have been making this version for the past year. The sweetly spiced orange-hued scones with a drizzle of cream cheese glaze atop seems just the right combination of sweet and spice. I hope your family enjoys these iced pumpkin scones as much as mine does!

Method

Preheat your oven to 425 degrees F. Butter a large, rimmed baking sheet and set it aside.

Combine the dry ingredients in a large mixing bowl: add the flour, sugar, salt, baking powder, baking soda, and spices. Stir to combine.

You can use all-purpose flour or a lower-gluten whole wheat flour in this recipe. I have made these scones with a mixture of half all-purpose and half white whole wheat flour. You could also use whole wheat pastry flour, as this has a lower gluten content.

A word on gluten

Why is lower gluten important? Gluten is formed by two proteins in a grain when they are exposed to moisture. This compound makes a dough stronger and more elastic. Flours with a high gluten content make yeasted breads rise better, so it is good for using in those recipes. Bread flour, pizza flour, and hard red whole wheat flours have high gluten content, up to 13%. Sometimes bakers even add extra gluten to their flour with a dough enhancer, if they need a dough to be especially strong.

However, gluten can make delicate cakes, pastries, and quick breads tough in texture. I like my scones light and feathery, so I look for lower-gluten flours and use a gentle hand when kneading.

Cake flour has the lowest gluten content of any flour, at 7 to 8% gluten. It has been subjected to a harsh bleaching process which strips the grain of vitamins and minerals, as well as weakening the gluten. Pastry flour is another good option for light-textured baked goods, at 8 to 9% gluten. It is made from a different type of wheat than bread flours, usually a soft spring wheat. You can find pastry flour in white or whole wheat varieties.

All-purpose flour is a combination of different types of flour, so its gluten content ranges from 9 to 12% depending on the brand. The point of all-purpose flour is that it can be used for any type of baked good, from yeasted breads to pastries. However, if you want a nice high rise to your yeast breads or the lightest, flakiest pastry, then it might be better to use a different type of flour.

I like to use a mixture of unbleached all-purpose flour and whole wheat flour in my baking. For yeast breads and pancakes, I use whole wheat flour made from hard red wheat. For scones, muffins, and quick breads, I use white whole wheat flour, which has a gluten content similar to all-purpose flour. (King Arthur White Whole Wheat Flour has 12.2% gluten.) And for the lightest cakes, I use straight all-purpose flour. Cake flour has an unpleasant flavor due to bleaching, in my opinion.

If you would like to learn more about gluten, this article on the Gluten Content of Flours is helpful.

Back to the recipe…

Making iced pumpkin scones
When the butter and cream cheese are incorporated into the flour mixture, it should look crumbly.

Once your dry ingredients are combined, cut in the butter and cream cheese with a pastry blender or a fork. It works best when they are cold, so keep them in the refrigerator until you are ready to use them. I add the butter and cream cheese together, even though the textures are slightly different. The pieces are small enough when they are about the size of peas and the mixture looks crumbly.

In a smaller bowl, combine the pumpkin puree, eggs, and cream. Whisk lightly, then pour into the flour mixture. Stir until the mixture forms a soft dough. Add a little more cream if necessary.

Place the ball of dough onto a floured board. Knead it very gently a few times, then shape it into one large or two small flat discs. If you want to make large scones, shape the dough into one large disc about 3/4-inch to 1-inch high. If you wish to make smaller scones, divide the dough in half and shape each half into a disc about 1/2-inch high.

Pat the dough gently into one large or two small discs, then cut into wedges with a sharp knife.

Use a large, sharp knife to cut the dough into wedges: 8 wedges per disc makes a nice size. Arrange the scones on the prepared baking sheet so that the edges are not quite touching.

Bake the scones for 12-15 minutes, or until the edges are lightly browned. The larger scones may take a few more minutes to bake.

Make the glaze

Meanwhile, prepare the glaze. Combine the cream cheese, butter, and powdered sugar in a small bowl and mix well. Drizzle in cream or milk until the glaze reaches the desired consistency. If you are using regular cream cheese, add a few drops of vanilla extract or a pinch of cinnamon. Otherwise, pumpkin-spiced cream cheese spread makes a fun alternative! I have made it both ways, and both are delicious.

Making iced pumpkin scones
You can bake 8 large or 16 small scones on one large baking sheet. Separate the scones slightly before baking, so the edges are not quite touching.

Cool the scones on a wire rack for 10 minutes before glazing. Scones are best enjoyed the day they are baked, but you may store them, tightly covered, for 1-2 days if necessary.

Happy baking!

~Kimberly

Iced Pumpkin Scones

Let these pumpkin scones bring the flavors of fall to your tea table! With their lovely orange hue and sweet spices, these scones will be requested again and again.
Prep Time15 minutes
Cook Time15 minutes
Total Time30 minutes
Course: Breads, Teatime
Keyword: Pumpkin, Scones, Tea Party
Servings: 8 scones
Author: kimberly

Ingredients

  • 2-1/4 cups all-purpose flour unbleached
  • 1/2 cup sugar scant
  • 1/2 tsp salt
  • 1/2 tsp baking soda
  • 1-1/2 tsp baking powder
  • 1/4 tsp grated nutmeg
  • 1/4 tsp ground cloves
  • 1-1/2 tsp ground cinnamon
  • 1/4 tsp ground ginger
  • 1/2 cup pumpkin puree
  • 2 ounces cream cheese
  • 4 tbsp butter cold
  • 2 eggs
  • 1/4 cup cream

Cream Cheese Glaze

  • 1 ounce cream cheese or pumpkin-spice cream cheese spread
  • 1 tbsp butter softened
  • 1/2 cup confectioner's sugar
  • 1/4 tsp vanilla extract optional
  • 3-4 tbsp cream or milk

Instructions

  • Preheat your oven to 425 degrees Fahrenheit. Butter a large rimmed baking sheet.
  • In a large mixing bowl, combine the flour, sugar, salt, baking soda, baking powder, and spices. Cut in the cream cheese and butter with a pastry blender or fork until the pieces of butter are the size of small peas.
  • In a small bowl, mix the pumpkin puree, eggs, and cream or milk. Stir the pumpkin mixture into the flour mixture until a soft dough forms. Remove the dough to a floured board and knead very gently a few times.
  • Shape the dough into a large, flat disc about 3/4 to 1 inch tall. Use a large, sharp knife to cut the disc into eight wedges. Transfer the wedges to the buttered sheet. Bake for 12-15 minutes, or until the edges are lightly browned.
  • For glaze, combine the cream cheese, butter, and powdered sugar. Add the vanilla, if using, and dribble in the cream a little at a time until the glaze reaches the desired consistency.

Notes

You may use regular cream cheese, neufchatel cheese, or pumpkin-spice flavored cream cheese in this recipe.
Instead of making 8 large scones, you may form the dough into 2 discs and cut them into 16 smaller scones.
Tea and scones, anyone? You won't have to ask twice, when the tantalizing aroma of these pumpkin spice scones wafts through the house!
Posted on Leave a comment

Pumpkin Chocolate Chip Muffins

There's a secret ingredient in these pumpkin chocolate chip muffins which makes them especially moist, and healthier too!
There’s a secret ingredient in these pumpkin chocolate chip muffins which makes them especially moist, and healthier too!

As soon as the weather turns cool and rainy, I start thinking about fall baking. I crave warm, comforting breads and baked goodies with plenty of spices and flavors of apples and pumpkin. These pumpkin chocolate chip muffins have been one of my go-to recipes for quite a few years. I can whip up a batch in about 5 minutes now, so you know I have made this recipe pretty often!

There are a couple of things which set this recipe apart from other pumpkin muffins. First, many pumpkin bread or muffin recipes call for quite a lot of vegetable oil. I don’t like to use heavily processed oils like that, so I usually substitute olive oil in recipes which call for vegetable oil. But nobody wants their pumpkin muffins to taste like olive oil! I solved that problem by using applesauce in place of the oil!

You do need some type of fat or oil, or the muffins won’t have the right texture. But I’ve found that a little bit of melted butter in addition to the applesauce works well. Thus, I get both apples and pumpkins in these muffins, though the apple flavor isn’t strong enough to taste.

Making a better muffin

Applesauce makes these muffins especially moist, without the residual greasiness you sometimes get with muffins that have lots of oil in them. So these pumpkin chocolate chip muffins are healthier and have a better texture! That’s a double win!

To increase the nutritional value of these muffins even further, use whole wheat flour for all or part of the flour this recipe calls for. I’ve written the recipe for using 1 cup of whole wheat flour and 2 cups of unbleached all-purpose flour, but you are welcome to use all whole wheat flour if you like. I recommend using a whole wheat pastry flour or white whole wheat flour in this recipe.

Method

Making pumpkin chocolate chip muffins

Preheat your oven to 400 degrees F. Butter your muffin tins, or line them with paper cupcake liners. Set aside.

In a large mixing bowl, combine the applesauce, pumpkin puree, eggs, melted butter, and sugar. Stir well to combine. In another bowl, sift the flour with the salt, baking powder, cinnamon, ginger, nutmeg, and cloves. Stir the flour mixture gently into the pumpkin mixture. When it is almost combined, stir in the chocolate chips until no streaks of flour remain.

Fill the muffin cups 3/4 full with batter. (If you are using large bakery-size muffin tins, fill them about 2/3 full.) Bake for 18-20 minutes, until the top of a muffin springs back when touched lightly. Cool in pans for 2 minutes, then remove to a wire rack to cool completely.

When the muffins are cool, store tightly covered at room temperature for up to 3 days.

Enjoy!

Note: This recipe makes more or fewer muffins, depending on what size of muffin tins you use. For example, the last time I baked these, I made 18 standard-size muffins and 6 large bakery-size muffins, for a total of 24 muffins. If you use all standard-size muffin tins, expect to make 30 muffins. If you use all large-size muffin tins, expect to make about 15.

There's a secret ingredient in these pumpkin chocolate chip muffins which makes them especially moist, and healthier too!

Pumpkin Chocolate Chip Muffins

Applesauce makes these muffins especially moist, without any residual greasiness from oil. That makes these muffins both healthier and the perfect texture!
Prep Time10 minutes
Cook Time20 minutes
Total Time30 minutes
Course: Breads, Breakfast
Cuisine: American
Keyword: Apple, Chocolate, Muffins, Pumpkin
Servings: 30 muffins
Author: kimberly

Ingredients

  • 15 ounces pumpkin puree
  • 1 cup applesauce unsweetened
  • 4 eggs
  • 1-1/4 cups sugar
  • 1/2 cup butter melted
  • 2 cups all-purpose flour unbleached
  • 1 cup whole wheat flour
  • 2 tsp baking soda
  • 2 tsp baking powder
  • 1 tsp salt
  • 1 tsp ground cinnamon
  • 1/2 tsp grated nutmeg
  • 1/2 tsp ground cloves
  • 1/2 tsp ground ginger
  • 1 cup chocolate chips

Instructions

  • Preheat your oven to 400 degrees F. Prepare your muffin tins with butter or paper cupcake liners.
  • In a large mixing bowl, beat the pumpkin, applesauce, eggs, sugar, and melted butter until smooth.
  • In another bowl, sift the flour with the baking soda, baking powder, salt, and spices. Add to the pumpkin mixture and stir until nearly combined. Stir in chocolate chips until no streaks of flour remain.
  • Spoon the batter into the prepared muffin tins. Bake for 18-20 minutes, or until the top of a muffin springs back when touched lightly. Cool in pan for 2 minutes before removing to a wire rack to cool completely.
There's a secret ingredient in these pumpkin chocolate chip muffins which makes them especially moist, and healthier too!

If you like these muffins, try some of these other fall recipes: Pumpkin Snickerdoodles or Apple Cinnamon Baked Oatmeal!

Posted on Leave a comment

Cranberry + White Chocolate Oatmeal Cookies

Tart cranberries and luscious white chocolate pair perfectly in these quick and easy cookies! They're sure to become your family's favorites.

Fresh cranberries in a cookie? Yes indeed! There’s something about these cookies that makes them an instant family favorite. In fact, they have become legendary in my family, thanks to my sister Bethany who loves to bake them.

While they are quite simple to make, the white chocolate and tangy cranberries make an unforgettable combination that will have you baking them again and again. And don’t expect these cookies to sit around in your cookie tin–once your family gets a sniff, they will be gone as soon as they’re cool enough to touch! (My husband admitted to consuming five cookies in one sitting the last time I made them!)

Method

Preheat your oven to 350 degrees F. You will need to bake these cookies in several batches, so it is helpful to have at least two baking sheets. Lightly butter the sheets and set them aside. While these are buttery drop cookies, the fresh berries tend to stick to the pans, so that’s why I recommend buttering them. Alternatively, you may line the baking sheets with parchment paper.

In a large mixing bowl, cream together the butter and brown sugar. Brown sugar makes these cookies soft, and lends a subtle depth of flavor. You may find it easier to use an electric mixer to make the dough, but if your butter is soft enough, a wooden spoon works just fine.

Add the eggs and vanilla extract, and stir well to combine.

In a medium-size mixing bowl, sift together the flour, oats, baking soda, and salt. Add them to the creamed mixture, and mix thoroughly. Fold in the white chocolate chips and cranberries.

Using Fresh Berries in Cookie Dough

For this recipe, I use lingonberries, or lowbush cranberries, as they are commonly called in Alaska. This is a smaller cousin of the cranberry, which tastes very similar. (They are more intensely tart, if you ask me.) These berries grow wild in Alaska, Canada, the Pacific Northwest, and parts of Northern Europe.

Lingonberries are ideal to use in this recipe because they are small and firm. If you cannot get lingonberries where you live, you may substitute regular (fresh) cranberries. Since those are bigger and tend to be less juicy, you may wish to chop them coarsely before adding them to the cookie dough.

When folding berries into cookie dough, you must work quickly and gently, or the berries will burst. Then you will have pink-streaked cookies and flat, chewy berries instead of whole, juicy ones. I like to use frozen berries, so they don’t burst or squish as easily. If you have trouble incorporating the berries into the cookie dough, err on the side of less mixing. You can always press stray berries into the top and sides of each cookie after you form them on your baking sheet.

Tart cranberries and luscious white chocolate pair perfectly in these quick and easy cookies! They're sure to become your family's favorites.

Baking the Cookies

Drop the dough by tablespoonfuls onto the buttered baking sheets, spacing them 2″ apart. Press any stray berries and white chocolate chips into the cookie dough. Bake for 8-10 minutes, until the edges of the cookies are lightly browned.

Let the baked cookies rest on the pans for 2 minutes, then remove them to a wire rack to cool completely. The cookies will be fragile at first, so letting them rest on the pans for a few minutes gives them a chance to firm up.

These cookies will keep in an airtight container at room temperature for up to a week. They also freeze well, and may be stored in the freezer for up to 3 months.

Enjoy!

Tart cranberries and luscious white chocolate pair perfectly in these quick and easy cookies! They're sure to become your family's favorites.

Cranberry + White Chocolate Oatmeal Cookies

Tart cranberries and luscious white chocolate pair perfectly in these easy drop cookies. They make a pretty addition to holiday cookie trays, but they are delicious all year long!
Prep Time15 minutes
Cook Time20 minutes
Total Time35 minutes
Course: Dessert
Cuisine: American
Keyword: Christmas, Cookies, Cranberry, Oatmeal, White Chocolate
Servings: 50 cookies
Author: kimberly

Ingredients

  • 3/4 cup butter softened
  • 1-1/2 cups brown sugar
  • 2 eggs
  • 1 tsp vanilla extract
  • 1-3/4 cups flour unbleached
  • 1-1/2 cups quick oats
  • 1 tsp baking soda
  • 1/4 tsp salt
  • 1 cup white chocolate chips
  • 1 cup lingonberries or cranberries fresh or frozen

Instructions

  • Preheat oven to 350 degrees F. Lightly butter two baking sheets and set aside.
  • In a large mixing bowl, cream together the butter and brown sugar. Add the eggs and vanilla, and mix well.
  • In another bowl, sift together the flour, oats, baking soda, and salt. Stir into creamed mixture until thoroughly combined. Dough will be stiff.
  • Fold in white chocolate and cranberries. Do not overmix, or the berries will burst and turn the dough pink.
  • Drop cookies by tablespoon onto buttered sheets. Bake for 8-10 minutes, or until the edges are lightly browned. Cool on sheets for 2 minutes, then remove to a wire rack to cool completely.