Posted on 2 Comments

Secrets to the Best Banana Nut Bread Recipe

banana bread
best banana nut bread recipe
Want to know what makes a perfect, even textured bread ripe with banana flavor? Read on!
Jump to Recipe

I’ve been trying to stock my freezer lately, in preparation for the arrival of a new baby—and an extended period of time during which I won’t want to cook. Granted, I’m not particularly excited about extra cooking now, when it’s hot outside, and I have a baby heating me up from the inside, and a propane oven that raises the temperature in our small cabin pretty quickly… But there were bananas looking lonely in the freezer, and I thought how nice it would be to have some banana bread on hand for breakfasts. So out they came and I dug out my mom’s best banana nut bread recipe.

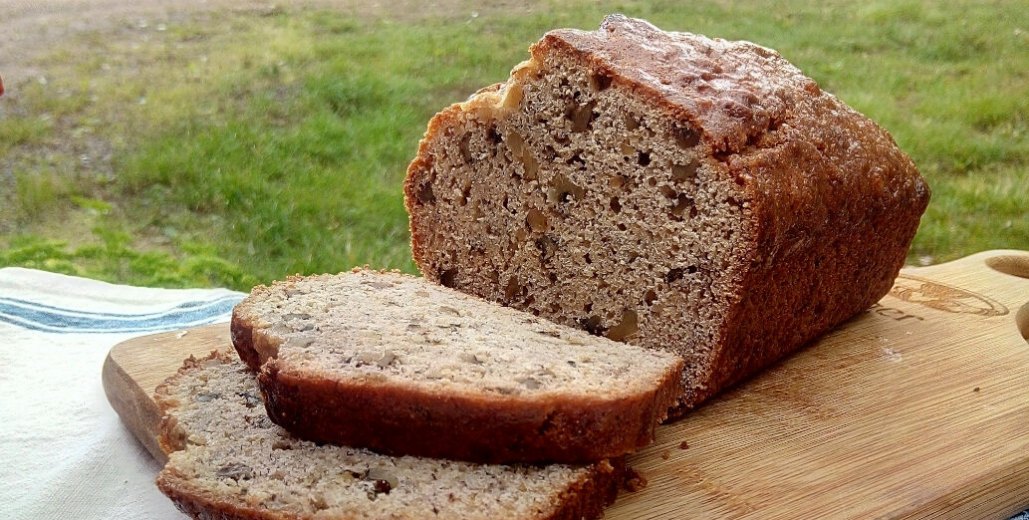
My mother’s banana nut bread recipe is hands-down the BEST I’ve tasted. It has better flavor and texture than so many others, and rises nicely to make a large, domed loaf.  Not to mention it also freezes well. You can make it with or without nuts, and I like to pretty it up for Christmas or Valentine’s Day by adding chocolate chips and maraschino cherries. If you’re trying to limit sugar, here’s a link to a lower-sugar variation that my sister developed and her family loves. It’s also dairy-free!

I grew up eating slices of this bread spread thinly with butter, which my husband finds appalling. It is equally tasty plain or with peanut butter. In fact, I commonly make banana bread and peanut butter sandwiches to take along when we’re traveling, because they tend to be less messy than regular PB&J sandwiches.

THE SECRET IS IN THE BANANAS:

You don’t want to use perfectly yellow bananas with no brown spots when making banana bread. As they ripen, the flavor of bananas becomes more developed and the starches convert into sugars. That said, I like to use bananas that are a bit past their peak, let them sit on the counter for a few more days so they have lots of brown spots, and then pop them in the freezer until I have enough time and bananas to make bread. I definitely recommend freezing your bananas first, because then when you thaw them, they’re already mushy, and you don’t end up with chunks of banana in your bread. Ideally, you want the texture to be consistent throughout your bread (except for nuts/add-ins). If you do decide to refrigerate or freeze your bananas, the skins will turn dark brown. Don’t be alarmed! This is normal, and the fruit inside tastes just fine.

best banana nut bread recipe
Freeze bananas a day or two past their peak for deeper banana flavor. This banana’s skin turned darker in the freezer, but the fruit inside is perfectly fine.

NOTE: If you let bananas sit out at room temperature too long, they will start to rot, and both the banana and its skin will turn dark and mushy. Do not use rotten fruit!

A word about milk

One other tip for the best banana nut bread recipe is the sour milk. Cultured buttermilk works just as well. This brings out the sweetness and overall flavor of the bananas, while improving the texture of the bread. It’s easy to sour your milk by adding just a touch of vinegar to it, and letting the mixture sit for a few minutes so it will curdle. I use white vinegar in this recipe, because I don’t want to add any other flavors. Lemon juice would probably work as well, but you might have to use a larger amount in order to curdle the milk.

When baking this bread, don’t be alarmed if it gets pretty dark on top.  The color should be a nice glossy brown when it’s done. This is due to caramelization of the sugars in the bananas themselves, because we used such ripe fruit. To determine doneness, stick a toothpick in the center. If it comes out clean or with just a few moist crumbs, the bread is done. You can also check by pressing lightly on top of the loaf with your finger. It should spring back, not sink.

Print Recipe

Mom’s Banana Bread

Firm-textured and deeply flavorful, this banana bread is a tried and true family favorite.
Prep Time20 minutes
Cook Time1 hour 5 minutes
Total Time1 hour 25 minutes
Course: Breakfast
Keyword: banana bread, Quick bread
Servings: 1 loaf

Ingredients

  • 1/2 cup butter softened
  • 1 cup sugar
  • 2 eggs
  • 3 bananas preferably frozen, thawed
  • 3 tbsp milk + 1/2 tsp vinegar, or use sour milk
  • 1 cup unbleached all-purpose flour
  • 1 cup whole wheat flour
  • 1 tsp baking soda
  • 1/2 tsp salt
  • 1/2 tsp allspice optional
  • 1 cup chopped walnuts or other nuts optional
  • 1/2 cup chocolate chips optional
  • 2 tbsp chopped maraschino cherries optional

Instructions

  • In a large mixing bowl, cream the butter and sugar.
  • Add the eggs, bananas, and sour milk.
  • In a separate bowl, mix together the flour, baking soda, salt, and allspice. Add the dry ingredients to the banana mixture.
  • Fold in any extra ingredients: nuts, chocolate chips, and/or maraschino cherries. Don't mix too much!
  • Turn into a greased 9×5" bread pan. Bake at 350 degrees for 60-70 minutes.

Notes

If your bananas are very small, you may want to use 4 instead of 3.
Posted on 1 Comment

Butterscotch Creme Iced Tea

butterscotch tea
Butterscotch Creme Iced Tea
Looking for a creamy, refreshing summer beverage? This tea is the perfect balance of sweetness and creaminess, blended with flavorful black tea for a tasty summertime treat!
Jump to Recipe

Oh, the long summer days of July. We’ve had a lot of wildfires this summer, and not much rain, which means a lot of smoke. It’s hard to stay inside, especially if you’re a toddler and really don’t understand why Mommy won’t let you go out just because the sun looks red through a grayish haze. Also, the house gets really hot if the windows have to stay closed.  This is the time of year when I don’t feel like cooking or eating heavy meals, but cold drinks are always refreshing—and most welcome to throats scratchy from smoke, if we have been outside.

This iced tea is quickly becoming my drink of choice this summer.  I’ve played around with the recipe, using different kinds of tea, flavorings, and sweeteners.  It’s pretty flexible, which suits me. I like to mix things up!

The inspiration for this recipe came from an iced tea recipe in Let’s Have Tea Together, a Holly Pond Hill book by Susan Wheeler. It is a delightful little book full of stories, recipes, and lovely illustrations. It is written in the spirit of a gentler era when life was not too busy for teatime.

Before coming across this recipe, I had never considered putting a creamy or milky liquid in iced tea.  I like black tea with milk, so it appealed to me. 

This recipe called for sweetened condensed milk, and I happened to have some on hand, so I thought I’d give it a go. Several batches later, I’m glad I did! My husband is also a big fan, and he doesn’t usually drink iced tea.

Disclosure: This post may contain affiliate links. If you click on the links and make a qualified purchase, I may receive a small commission at no extra cost to you.

Teatime Treats

If you’re looking for a treat to accompany your tea, try my banana bread recipe. I love quick breads with tea as an afternoon snack. They are satisfying and flavorful without overpowering sweetness.

Scones are another perfect accompaniment to tea parties! Call up a friend and mix up a batch of cranberry scones or lemon ginger scones!

The basic formula for this drink is strong tea + sweetener + flavoring (optional) + creamy liquid + ice cubes.  As I said, the customization options are endless. 

Butterscotch Creme Iced Tea is the perfect cold and creamy drink for hot summer afternoons! The sweet butterscotch flavor pairs well with creamy milk in a refreshing iced tea.

Tea

I have used regular black tea as well as flavored black teas. My favorite tea to use in this recipe is Butterscotch Blondie from Tazo Tea. It’s one of their dessert teas, which have lower caffeine than, say, an English or Irish Breakfast blend.

You do want to stick with black tea, if you will be adding condensed milk. Green, white, oolong, and herbal teas don’t stand up well to milk. The one exception I can think of is rooibos.  If they use that to make a caffeine-free chai tea, it might work here.

Do brew your tea double-strength, if you will be serving it over ice, because the ice cubes will dilute the beverage as they melt.  I have found that I can get away with using about 1 ½ times as much tea as I normally would, but letting it steep for 15-30 minutes instead of the normal 3-5. For this recipe, I used 6 bags of black tea for 4 cups of water. If you like stronger tea (or actually let the ice cubes melt before drinking it!) then I would recommend 8 bags (or teaspoons of loose tea).

Sweetener

Okay, so this isn’t strictly necessary, especially if you’re using a flavored tea like butterscotch or vanilla.  However, if you do like your iced tea a bit sweeter, make sure you use a liquid form, or else stir in the sugar while the tea is still pretty hot!

Also, remember that different sweeteners have different strengths. You might want to start out with just a little, and then add more if it’s not sweet enough. A little maple syrup goes a long way!

Honey is another good option, and sugar works if you add it to the tea while it’s still hot. I have not personally tried stevia or other sweeteners, but go ahead and experiment!

Flavoring

The original recipe I tried called for both vanilla and maple extracts. In subsequent attempts, I have left the flavoring out when I used flavored teas or sweeteners. This is totally up to you! Vanilla extract + honey is a nice combination if you are using plain black tea.

Creamy Liquid

So far, sweetened condensed milk is the best option I’ve tried.  Sweetened condensed coconut milk should work the same way, and you could certainly experiment with other canned or fresh creamy liquids. I have tried whole milk when serving the tea immediately (not storing for later). This doesn’t add as much creaminess–or sweetness, so you may want to increase the sweetener! Also, it takes a lot more fresh milk than condensed, and this can dilute the tea too much by the time the ice cubes melt.

Ice Cubes

I use regular ol’ water for my ice cubes. You could, however, make ice cubes out of tea, and then you wouldn’t have to make the tea so strong to begin with.

There you have it: a simple, customizable recipe for delicious, creamy iced tea. Infinitely variable, to suit whatever taste you might be craving, all summer long. Let me know what flavor variations you come up with!

Print Recipe

Butterscotch Creme Iced Tea

Cool, creamy, and delicious–sure to be your new favorite summertime drink!
Prep Time15 minutes
Chilling30 minutes
Total Time45 minutes
Course: Drinks
Keyword: Iced Tea
Servings: 4 cups

Ingredients

  • 4 cups Butterscotch flavored black tea
  • 3 tbsp Pure maple syrup
  • 1/2 tsp Pure vanilla extract optional
  • Sweetened condensed milk to taste

Instructions

  • While the tea is warm, but not hot, stir in maple syrup and vanilla extract. Chill
    flavored tea. When ready to serve, stir in sweetened condensed milk to taste or
    until the blend is sweet and cloudy. Pour over ice and enjoy!

Notes

You may substitute regular black tea or other flavored teas, as well as different sweeteners and types of milk or cream.
Posted on 9 Comments

5 Perks of Living Little

benefits of tiny house living

Unexpected Benefits of Tiny House Living

benefits of tiny house living
Here are five unexpected benefits of living in a tiny house or otherwise close quarters. You might be surprised at the positive effects on family life!

While I don’t really consider myself to be a member of the tiny house movement, our family does happen to live in a pretty small space.  We were going for the Alaskan cabin experience, which usually means small. So we get to enjoy some unlooked-for benefits of tiny house living without even trying!

The 576-square foot cabin we’re renting is a good size for our family at this point, but as kids get bigger (and possibly more numerous), private bedrooms would be appreciated!

That’s a ways down the road, however, and for now we are perfectly satisfied with our 2-room place.  I am particularly excited that one of the two rooms is a bathroom with running water, which is a huge improvement on our last cabin, if you ask me!

Dry cabin living requires a lot more effort for basic things like bathing, washing dishes, and doing laundry. In fact, it can seem like those tasks make up your entire life. It was rewarding, but I’m not sure I would happily return to a house without plumbing.

Anyway, as I said before, we are saving up to buy a place with actual bedrooms. But I really do like the idea—and the actual experience—of living in a small space.  Here are a few of the benefits of tiny house living:

1. It brings your family closer—literally!

This may seem like a no-brainer, but you’d be surprised at what a positive difference it can make in family dynamics. If you have the option of shutting a door, you can isolate yourself from others even within your own house. If not, you’re forced to learn how to get along with those closest to you. It’s amazing how much your sense of family unity grows merely as a result of being in close proximity to one another. Even my husband commented on the difference after staying in a “normal-size” house for a few days: he said it’s too easy to lose people in a house that size. Being an introvert myself, it took me a bit longer to appreciate the constant company, but I do now see the value of it for family relationships.

2. It keeps you from accumulating too much stuff.

If you don’t enjoy wading through a morass of belongings on your way to bed, you simply live with less stuff. While this can be true for any size of home, a smaller space inevitably means less storage space—and believe me, you realize this quickly if you’re transitioning to a smaller home than you lived in previously! Nobody wants to live with cardboard boxes stacked against every wall, and that eyesore can be a wonderful incentive to declutter your life. Furthermore, it’s easy to refrain from buying unnecessary stuff if you know you don’t have anywhere to put it! Or to politely decline gifts from well-meaning relatives and friends. If they’ve seen your small house, they should understand.

3. It makes you appreciate what you do have.

This one goes along with the previous reason. If you don’t have a lot of storage space, you begin to realize which items are more important or useful than others. When you realize this, you appreciate the really useful items more. To give you a small example, we own one plastic sippy cup.  Our toddler loves it. That’s HIS cup. If he had three to choose from, none of them would be as special as this one.  Of course, this concept applies to more than just dishes.  Kitchen appliances, bedding, books, music, craft supplies, holiday decorations… the list goes on and on.  We only have so much space, and sometime it’s hard to let go of things, but it is very freeing when you no longer feel stifled by all of your stuff!

benefits of tiny house living

4. It encourages you to spend more time outside.

Okay, so this depends to some extent on what type of area you live in: urban, suburban, or rural. We’re lucky enough to have several acres of woods around our cabin, and a decent neighborhood to walk through. However, I’d wager that even if you live smack-dab in the middle of a city, a small apartment would still be an incentive to get out more.  Remember what I said about a small space meaning constant company?  As a mother and an introvert, I find it quite a relief to send that “constant company” outside when it gets too loud.  I also appreciate my daily walks—both for the exercise and for the chance to clear my mind. Fresh air does wonders for mind and body alike!

5. When you lose something, there aren’t too many places for it to hide! 

I don’t know how many times we’ve turned the house topsy-turvy looking for car keys, backpacking gear, a can of clams… The point is, it doesn’t take very long to thoroughly search our house and find what we’re looking for.  There are only so many pieces of furniture to look underneath, and only one closet to ransack.

(By the way, having closet space at all is a huge benefit! Remember this when you’re looking at different tiny houses or cabins. You don’t realize what a difference it makes until you have to hang your clothes on a rack next to your bed!)

I remember when I was growing up, things would just go missing and never be found again—or at least not until months or years later.  That doesn’t happen in our tiny cabin!  (Except with socks, occasionally…) This is one perk that may sound funny, but really comes in handy.

I could go on, but I think those are the main things I’ve come to appreciate about our small-scale abodes over the last 2+ years.

What about you? What makes you excited about living little? Have you learned any lessons along the way? Leave a comment below! I would love to hear from you!

For more on simple living, check out this post on making a simple meal plan!

Posted on 9 Comments

The Disappearing Art of Homemaking

the disappearing art of homemaking
art of homemaking
Homemaking skills help you transform your house into a beautiful, unique home that reflects your priorities.

The first time I heard the term “homemaker,” I was fairly young and thought it was a strange concept. A person who makes a house a home? That’s just a mother, right? Why do you need a specific word to describe what they do? In my limited social experience at the time, I thought nearly all mothers stayed home and took care of their families. As I got older, I realized that not all mothers are homemakers, and the importance and significance of homemaking skills started to become clearer to me. I started to appreciate the regularity of our home life as I had more opportunities to compare it to other households—which were often more chaotic.

Still, it wasn’t until I got married and set up a “real” household of my own (as opposed to living alone or with other young women for several years through college and beyond) that I fully appreciated the domestic skill set my mother instilled in her girls.

All of a sudden there were dress shirts to iron, buttons to mend, and meals to cook every single night (somehow my husband doesn’t consider tortilla chips and salsa to be an adequate evening meal)—and I knew how to do it. Sure, it takes a while to get used to any new living arrangement, but I had a much easier time of it than many other women.

Disclosure: This post contains affiliate links. If you click the link and make a qualified purchase, I may receive a small commission at no additional cost to you.

Who Teaches Homemaking?

It seems that fewer and fewer girls are learning these arts of making their homes a pleasant and welcoming place to be. For several generations now, homemaking has been an unpopular pastime—ever since the Emancipation of the Beleaguered Housewife. Even home economics courses, which used to be offered in high schools, aren’t even an option anymore, unless you buy them yourself.

(If you are looking for a good home economics course, I highly recommend Training Our Daughters to be Keepers at Home, by Ann Ward. This is one of the books my mother has used with her girls. It is very thorough, and is designed to be used over a period of several years, beginning around age 10-12. Older girls can certainly benefit from it, but they will likely progress faster. This book covers all the homemaking basics as well as some extras like making candles and greeting cards!)

I understand that the life of a stay-at-home parent doesn’t appeal to everyone, but there are plenty of women—including myself—who are perfectly happy to focus most of their time and energy on home and family.  There are many others who work outside the home, but still desire to make their homes comfortable, welcoming, and well organized.

Homemaking skills help anyone turn their house into a home, regardless of occupation, income level, social status, whatever. You can use them on a farm or homestead, in an apartment complex or condo, or in a cute little house in the suburbs.

Left by the Wayside

I think it’s a shame that these skills have fallen by the wayside in mainstream American society. I wouldn’t discourage anyone from pursuing a professional career—after all, I myself did that—but I think we need to educate the next generation about these skills as well as professional options. 

The problem with schools—and society in general—focusing on preparing women to succeed in the workforce and concurrently discouraging the idea that women can find happiness and fulfillment in raising a family, is that women who decide to start a family are often sadly unprepared for it.

My mother is one who had to learn many of these skills on her own. She enjoyed sewing in high school, but other homemaking skills were not a big part of her education. That’s why she made sure her daughters would be prepared for whichever path their lives would take. 

A Different Path

The focus on work, work, work outside the home really limits women from pursuing other paths in life, which they might find more fulfilling than a traditional 9 to 5 job, however prestigious it may be.

In my own experience, I enjoyed actually helping patients as well as the intellectual challenges of being a healthcare provider.  I did not enjoy trying to work with the healthcare system and huge insurance companies, which often limited my patients’ options as far as which tests or treatments they were “eligible” for.

My current job as a full-time wife and mother is so much more meaningful to me. Not only do my children rely on me constantly to care for them physically and emotionally, but I have the chance to make a huge difference in my family’s life and well-being. Instead of trying to fix the poor health habits of my former patients, I now have the opportunity to prevent illness by helping my family stay healthy.

The same applies to mental health. By keeping our home life organized and running smoothly (most of the time!) I am setting my children up to succeed.  Numerous studies have shown that children from chaotic home environments score poorly in social as well as educational settings, compared to those kids from stable home environments.

A Jumping-off Place

Basic homemaking skills equip you to take on new challenges, and give you confidence to launch out into new waters.  Maybe I’ve never canned tomato sauce, but I have canned salsa, and that gives me the courage to try something new even if I find it intimidating.

These skills are the tools you need to be a home artist. You will be empowered to make your home beautiful and unique, not just a reflection of whatever décor collection is trending at your local department store.

They give you the freedom to be yourself, to delve into family and cultural traditions or come up with new ways of doing things.

Choose Your Priorities

So now that you want to become a home ninja, how do you learn these mysterious secrets of making a house into a home? What are they, exactly? Your list will vary depending on the type of lifestyle you live (milking yaks probably isn’t a useful skill for most of us), but I think this list is a good place to start:

Cooking and baking, Gardening and food preservation, Ironing and mending, Cleaning and organizing, Home management, Family finances and budgeting, and Hospitality. There are many other skills you could add to the list. Pretty much anything related to the functioning of a home could fit.

Excited for the journey

That list may look intimidating, but don’t get discouraged! I didn’t start out as an expert in all of these areas either. But it sure is useful to have a basic general knowledge of these skills. You never know when they will come in handy around the house, or even turn into a profitable business venture.

You can learn these skills and feel confident in your role as a homemaker. My goal is to provide you with the knowledge and skills to run a simple, efficient household with confidence. I think you will be amazed at how your creativity blossoms when you start to learn the basics of these skills.

Additional Resources for Homemaking Skills

I love the blog Like Mother, Like Daughter. They have great resources on a number of the homemaking skills listed above!

Training Our Daughters to be Keepers at Home, by Ann Ward, is a home economics course designed for girls starting around age 10-12. This is a very thorough resource, covering all the homemaking skills we talked about and more!

The Prairie Homestead Cookbook and The Fannie Farmer Cookbook are perfect for beginners because they teach you how to cook with step-by-step instructions. Read this article for more of my favorite cookbooks!

Check out some of my articles on specific homemaking skills: Meal Planning, How to Make Your First Meal Plan, Frugal Grocery Shopping, and Hospitality!

Read more about The Purpose of Homemaking here.