Posted on 3 Comments

The One Thing You Should Do Every Morning to Increase Productivity

Do you know the one thing you can do each morning to increase your productivity at home?
How did our grandmothers get so much done in a day? Here's a simple tip that will boost your productivity at home.
How did our grandmothers get so much done in a day? Here’s a simple tip that will boost your productivity at home.

Do you find yourself stuck in a rut, just trying to get through the day and finish everything that needs to be done? Do you feel like you can’t accomplish anything? Maybe you start one task, then go on to another without finishing the first. Wouldn’t it be great if there was a flip you could switch on your brain to throw it into Productive Mode?

Well, there’s no magical switch that I know of, but there is something you can do to boost your productivity and give you more focus, even when you spend all day at home. 

It’s very simple, and only takes a few minutes in the morning. But it makes a huge impact on your mindset and productivity throughout the day. I know it helps keep me focused and moving forward, even on mornings when I would rather still be in bed. What is this one thing every successful homemaker or work-from-home-er does every morning?

Dress intentionally for your day

If someone showed up to an interview wearing pajamas or yoga pants, would you take her seriously? Would you think she looks like a responsible, hardworking employee who will be an asset to your company? 

Not likely. You would probably think that someone who cares so little about her appearance isn’t likely to care about her job.

And you would be right. Our attire reflects our level of respect for an occasion, person, or occupation. That’s why we dress a little nicer for church, parties, date night, or important meetings.

Professionals often wear suits or uniforms to work every day, because their jobs are worthy of respect. But do you ever stop to think about how you dress for everyday? 

Maybe you think it doesn’t matter, since you work at home where no one will see you except your family members. Wait just a minute! Aren’t your family members the most important people in your life? If I respect and love my family, I want to give them my best. Part of that is dressing like a lady. 

Moreover, dressing intentionally for your job makes you take it seriously. Homemaking is an important job, and it deserves your respect.

Attire affects your actions

Did you know that the clothes you wear actually impact your attitude and thinking ability? If productivity is your goal, regardless of your occupation, dressing with intention can help. Several studies have shown that dressing in a professional manner (instead of casual clothing or loungewear) can increase abstract thinking and negotiation skills. 

How do you apply that to homemaking, exactly? I’m not going to wear a blazer or a white blouse to hang laundry and change diapers any time soon!  But I have noticed that I do feel much better on the days when I wear a dress, compared to the days when I’m still in my exercise clothes at noon.

It’s hard to take yourself seriously when you’re wearing an old t-shirt and sweatpants. So put some thought into your attire, and find an outfit that’s suited to your job but also makes you feel put together and ready for your day.

You will feel better about yourself and your role, and you will begin to be more productive as well!

How do you dress intentionally for homemaking?

Let’s be clear: I’m not recommending that you should start wearing a suit or a uniform every day. That would not be suited to your role in the home. 

I aim for outfits that are both pretty and practical. That way, I can treat myself and my job with respect. 

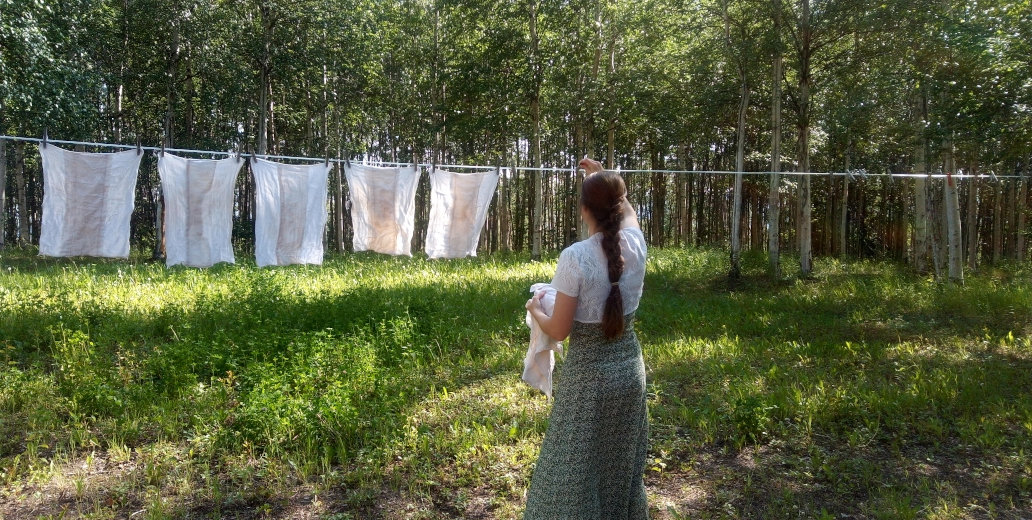
I feel best when I’m wearing a dress. That doesn’t happen often right now, since I have a baby and most of my dresses aren’t nursing-friendly. However, a pretty skirt and blouse or even a well-fitting top and jeans can be good substitutes.

There is no specific uniform for homemakers (thank goodness!), but dressing tastefully and neatly is always attractive.

Dressing like a lady doesn't have to be fancy. Pretty aprons make housework more fun!
Pretty aprons make housework more fun!

Love those aprons!

If you’re still skeptical about wearing nice clothes for housework, let me introduce you to aprons. These are some of my favorite items of clothing, and for good reason! Aprons allow me to wear pretty clothes all day long without getting them dirty (unless your baby has a talent for wiping his grubby hands on the places an apron doesn’t cover!). 

If you get one with fun prints or trims, it can also add a pretty touch to a plain outfit. When I wear a dress and an apron all day, I feel like an old-fashioned housewife. That might not be appealing to everyone, but you can still rock an apron and jeans! I’ve done that too.

I have four or five aprons right now, all in different styles, colors, and prints. I can match them to my outfit, mood, or task. When I don an apron, that means business. It helps me to get in the mode of working steadily through my to-do list, despite any hindrances that may arise.

Of course, your attire should be suited to the tasks you need to accomplish each day. There will probably be days when it’s completely reasonable to wear old clothes for particularly messy tasks. But those exceptions don’t change the standard of neat, careful dressing which is so important to your mindset and mood.

Why does dressing like a lady make you more productive? 

You don’t need to get dressed up in heels and pearls to do the cooking and cleaning, but wearing attractive, well-fitting clothes will help you to feel more poised and confident in your role as a homemaker.

As I mentioned above, there have been a number of interesting studies about people’s responses to clothing (their own or that of others). Even if you don’t think your clothes are particularly important, there is apparently some sort of inner mechanism that pays close attention to a person’s attire. 

You may have heard the old saying, “Dress for the job you want, not the job you have.” This doesn’t mean that you should wear something unsuitable for your present position; rather, it means that scaling up your dress code just a notch can boost your confidence.

I’ve heard numerous women say that they are treated better when they wear a dress. I myself have experienced this on several occasions, but more important to me is the way wearing a dress makes me feel. 

Wearing a dress around the house makes me feel like I've just stepped into the pages of "Little House on the Prairie!"
Wearing a dress around the house makes me feel like I’ve just stepped into the pages of “Little House on the Prairie!”

It doesn’t have to be a fancy dress for date night: even a casual dress or a coordinating skirt and blouse makes me feel more positive and confident. I tend to smile more, stand straighter, and look about me more often. I also have an easier time focusing and organizing my tasks.

Of course there are still the usual distractions and annoyances, no matter what you choose to wear, but dressing like a lady somehow prompts me to act like a lady and sail through them serenely.

Bonus Points: Hair and Makeup

Speaking of dressing like a lady, it doesn’t stop with clothing. A lady’s appearance is neat and clean: well-kept is a fitting description. If you wouldn’t go out without curling your hair (or at least brushing it!) and a swipe of lipstick, try to keep that ladylike appearance at home. 

I’m not saying you should dress up on sick days or a lazy vacation weekend, but at least on your work days when you have homemaking tasks to accomplish.

This is a hard one for me, but I do feel better if my hair isn’t tumbling out of a messy bun all day long! Taking a few extra minutes to fix my hair neatly in the morning really makes me feel put together and ready for the day.

And that’s the goal, isn’t it? We would all like to feel confident and ready to handle whatever life throws at us each day.

Last but not least, smile!

There’s no doubt that the type of clothing you wear impacts your productivity and confidence. But there’s something even more important than clothes could ever be: your attitude. 

If you’re sullen and grumpy all day, no apron is going to change that. Not even a tailored suit would! 

A cheerful countenance and positive attitude, on the other hand, starts you out on the right foot and sets you up for a more pleasant day. It sets off a chain of positive interactions with others around you, which in turn helps you to stay positive!

Now, most of us have days occasionally when we just wish we could stay in bed and not have to face the world. (Well, I have those days, anyway.) When I’m feeling grouchy and everything seems dark, it’s even more important for me to take a few minutes by myself to get ready for the day. Then I can freshen up my attitude at the same time.

So the secret to success as a homemaker is to start with a positive attitude and then dress like a lady. Make this a habit, and you will become more poised and purposeful in your home.

Happy homemaking!

~Kimberly

Do you know this one simple tip to increase your productivity every day, even when your work is at home?
Posted on 1 Comment

Lovely Lemon Ginger Scones

With their sweet lemon glaze and bursts of ginger, these tender scones will tantalize your tastebuds!
With their sweet lemon glaze and bursts of zingy ginger, these tender scones will tantalize your tastebuds!

Lemon scone recipes have always been frustrating to me. On the one hand, I want a zingy lemon flavor; but on the other hand, it can’t be too sour. And I like my scones to be light and delicate in texture.

I think perhaps the reason it’s so hard to achieve this combination is that lemon juice is usually used to flavor lemon scones. However, fruit juices are not the best liquids to use in scones, as they tend to make the dough heavy. Cream is much better if you’re trying to make flaky scones.

Searching for the best lemon scone recipe

Earlier this week, I decided it was time to solve my scone conundrum. Armed with some scone lore, a few tested recipes, and plenty of lemons, we rolled up our sleeves and got to work.

My two year-old even helped to squeeze some lemons, until I caught him trying to drink all the lemon juice! He informed me that “it is pretty sour.” That didn’t seem to deter him!

My son loves to help in the kitchen!

I adapted one frustrating recipe (which I’ve been making for years, always saying I need to find a better version), and came out with these lovely lemon ginger scones.

I knew that it would take a lot of lemon juice to get the flavor I wanted, but that would ruin the texture of my scones. So I opted to use a minimal amount of juice and add more lemon zest instead.

The scones rose beautifully, but their flavor was still very light, so I made a lemon glaze to add just the right amount of sweet, lemony flavor.

Ginger is a nice complement to the lemon. I used candied ginger for zing, but it’s not enough to overpower the lemon. Chopped finely, it adds little bursts of flavor to liven up the scones.

That might be flavorful enough for some, but I love lemons! If you want even more lemon flavor, I suggest serving these delightful scones with lemon curd. Now that’s a lemon scone!

Candied ginger and fresh lemon juice & zest pair nicely in these scones.

Method

Preheat your oven to 425 degrees Fahrenheit. Butter a large baking sheet and set aside.

In a large bowl, combine the flour, sugar, salt, and baking powder. Give the mixture a good stir.

Cut the butter into chunks, then add it to the flour mixture. Using a pastry blender or a fork, cut in the butter until it is in pea-sized pieces.

Beat the eggs lightly with a fork, and mix in the lemon juice and half & half cream. Fresh lemon juice is best, because the flavor is stronger. You can substitute bottled lemon juice in a pinch.

For the cream, there are a few different options. I generally use half & half cream, but you can use heavy cream if you prefer. Whole milk will also work just fine, although the texture might be a bit less flaky. Sometimes I use part cream and part milk.

Pour the liquids into the flour mixture and stir gently to combine. Add the lemon zest and chopped, candied ginger, and stir until the dough comes together.

Turn the dough out onto a lightly floured board or countertop and knead it gently 6-8 times. Gentle kneading is key for making light, feathery scones.

A gentle touch is important when shaping the scone dough!

Pat the dough out gently into an 8- or 9-inch round. It will be about 3/4″ thick. Using a large, sharp knife, cut the round into eight wedges. Transfer the scones to the buttered baking sheet, separating them by at least 1/2″.

Brush the scones with a little milk for a pretty finish. Milk doesn’t turn out as shiny as eggs when brushed oved breads, but it adds a nice touch. You may sprinkle the scones with sugar before baking if you don’t wish to make a lemon glaze.

Brushing the scones with milk before baking gives them a delicate, almost pearly finish.

Bake for 12-15 minutes, until the bottoms are golden brown and the edges begin to brown. Remove from the baking sheet to a wire rack to cool.

For the glaze, measure the powdered sugar into a bowl. Cut in the butter with a fork until the mixture looks crumbly. Drizzle in about a tablespoon of lemon juice, and mix well. If the glaze still seems too thick, drizzle in a bit more lemon juice, but no more than a teaspoon at a time, until it reaches the desired consistency.

These light and tender lemon ginger scones have a sweet lemony glaze and zingy bursts of candied ginger.

When the scones are cool, drizzle them with the lemon glaze. Enjoy!

Happy baking!

~Kimberly

Lemon Ginger Scones

These feathery scones will tantalize your tastebuds with their sweet lemon glaze and bursts of zingy candied ginger.
Prep Time15 minutes
Cook Time15 minutes
Total Time30 minutes
Course: Breads
Keyword: Bread, Ginger, Lemon, Scones, Tea Party
Servings: 8 scones

Ingredients

  • 2 cups all-purpose flour unbleached
  • 4 tbsp sugar
  • 1 tsp salt
  • 2 1/2 tsp baking powder
  • 4 tbsp cold butter cubed
  • 2 eggs lightly beaten
  • 1/2 cup cream or milk + extra for brushing over scones
  • 4 tbsp lemon juice divided
  • 1 tsp lemon zest
  • 2 tbsp candied ginger finely chopped
  • 3/4 cup confectioner's sugar
  • 1 1/2 tbsp butter

Instructions

  • Preheat your oven to 425 degrees F. Butter a large baking sheet and set aside.
  • In a large bowl, combine the flour, sugar, salt, and baking powder. Cut in butter until it is in pea-sized pieces.
  • Combine eggs, cream, and lemon juice. Pour into flour mixture and stir gently.
  • Add lemon zest and candied ginger. Mix until just combined.
  • Turn dough out onto a floured board. Knead gently 6-8 times. Pat into an 8- or 9-inch round. Cut into 8 wedges with a sharp knife.
  • Transfer scones to the prepared baking sheet. Brush tops of scones with milk. Bake for 12-15 minutes, until edges are lightly browned. Remove to a wire rack to cool.
  • Make the glaze: cut the butter into the confectioner's sugar with a fork until crumbly. Drizzle in 1 tbsp of lemon juice and mix thoroughly. If needed, drizzle in more lemon juice, but no more than 1 tsp at a time, until the desired consistency is reached.
  • Drizzle glaze over scones when cool.

Notes

If desired, sprinkle sugar over the tops of scones before baking them instead of glazing them.
Posted on 1 Comment

Lemon Thyme Tea Cookies

These lovely lemon thyme tea cookies have a bright lemon and herbal flavor that's sure to delight!
These lovely lemon thyme tea cookies have a bright lemon and herbal flavor that’s sure to delight!

Lemon thyme is one of my favorite herbs to grow, and I’m always looking for new ways to use it. These delicate lemon thyme tea cookies are the perfect backdrop for the bright herbal flavor of lemon thyme. They are an elegant addition to any tea party!

I made these cookies for a bridal shower a few weeks ago, and the bride-to-be liked them so much that she requested them for her wedding as well! I was happy to oblige, because not only are these cookies dainty and delicious, they’re also quite simple to make.

In fact, as far as cookie recipes go, this one definitely belongs in the category of easy, no-fuss recipes.

I based this recipe on a lavender tea cookie, because I thought that recipe provided a nice balance of sweet and floral notes. Instead of dried lavender flowers, I used dried lemon thyme leaves, fresh lemon zest, and a bit of lemon extract.

That sounds like a lot of lemon, but the flavor really isn’t overpowering. These sweet cookies have just enough lemon to complement a nice cup of tea.

If you like herbal flavors, or just want a new cookie recipe to try, I suggest you make a batch of these summery lemon thyme tea cookies. I think you will be pleasantly surprised at their delicate flavoring.

Head over to The Tea Caddy for some of my favorite teas to pair them with!

These lemony tea cookies pair perfectly with your favorite tea for a special occasion or just a quiet afternoon with a friend.

What is Lemon Thyme?

Lemon thyme is not, perhaps, a very common herb – in gardens or in kitchens. I should know, because I have a hard time finding recipes to use it in!

Lemon thyme (Thymus citriodorus) is a variant of common English or German thyme (Thymus vulgaris). It looks just like common thyme, but smells and tastes like lemon. And thyme. It’s pretty wonderful!

Apparently, it is unknown whether this plant is a natural variant of common thyme, or a hybrid of two different plants. In any case, it comes from the Mediterranean region and has been around for at least 200 years. The plant can be found in the South of France, Italy, Spain, and northern Africa. You can read more about lemon thyme here.

Ingredient Notes

Shortening Options

If you don’t like to use hydrogenated shortening, there are other options. You can use all butter, but the cookies won’t be quite as soft, and they are more likely to spread out while baking unless you chill the dough thoroughly first.

Another option is to use palmfruit shortening (or palm oil), which is naturally solid at room temperature. This oil is not hydrogenated, so it does not cause the unwanted effects of regular vegetable shortening. This is what I typically use when a recipe calls for shortening.

Lemon Thyme

For this recipe, I use whole dried leaves of the lemon thyme plant. For some, seeing leaves in their cookie might be off-putting. I understand, and you are welcome to crush your lemon thyme leaves first if this is an issue! My family is used to seeing herbs in their food, so it doesn’t bother them any more. I happen to like seeing the little leaves curling through my cookie!

I have only used dried lemon thyme in this recipe, but fresh leaves should work just as well. Recipes often call for a greater amount of fresh herbs than dried; however, I would recommend starting with the same amount if you are substituting fresh lemon thyme. A cookie chock-full of leaves might not look very appetizing, even if you do like herbs!

These lemony tea cookies pair perfectly with your favorite tea for a special occasion or just a quiet afternoon with a friend.

Method

Before you start, make sure your butter is at room temperature. Cold butter won’t mix well with shortening, resulting in an uneven texture.

Cream the butter, shortening, and sugar together in a large mixing bowl until light and fluffy. Add the eggs, vanilla, and lemon extract, mixing until combined.

In another bowl, combine the flour, baking powder, and salt. Stir in lemon thyme leaves and lemon zest. Gradually add the flour mixture to the butter mixture until combined.

Chill the dough in the refrigerator for 20-30 minutes. I usually just put the entire mixing bowl in the fridge. You can skip this step if you’re not particular about the shape of the cookies. Chilling the dough does help them to stay more compact and rounded, if that is the shape you want.

Heat your oven to 375 degrees Fahrenheit. I do this while the cookies are chilling, because my oven takes a long time to heat up!

Form the cookies into 3/4″ balls and place on ungreased baking sheets. Bake for 8-10 minutes, or until the bottoms are golden brown. Cooling the baking sheets between batches helps to prevent the cookies from spreading out too much.

Remove the cookies from the baking sheets to cool, and enjoy the delicious fragrance of lemon thyme tea cookies wafting through your kitchen!

Happy baking!

~Kimberly

Lemon Thyme Tea Cookies

These lovely little cookies will add a touch of simple elegance to any tea party. With their bright lemon and herbal flavors, these dainty treats are perfect for special occasions.
Prep Time15 minutes
Cook Time30 minutes
Chilling20 minutes
Total Time1 hour 5 minutes
Course: Dessert
Keyword: Cookies, Lemon Thyme, Tea Party
Servings: 5 dozen

Ingredients

  • 1/2 cup butter softened
  • 1/2 cup shortening
  • 1 1/4 cups sugar
  • 2 eggs
  • 1 tsp vanilla extract
  • 1/2 tsp lemon extract
  • 2 1/4 cups all-purpose flour unbleached
  • 1/2 tsp salt
  • 1 tsp baking powder
  • 4 tsp lemon thyme leaves dried
  • 1 tsp lemon zest

Instructions

  • Cream together the butter, shortening, and sugar in a large mixing bowl until light and fluffy.
  • Add eggs, vanilla, and lemon extracts, and mix until combined.
  • In another bowl, combine the flour, salt, and baking powder. Stir in the lemon thyme and lemon zest.
  • Gradually add the flour mixture to the creamed mixture until combined.
  • Chill the dough for 20-30 minutes.
  • Heat the oven to 375 degrees F. Form the dough into 3/4" balls and place on ungreased baking sheets.
  • Bake for 8-10 minutes, until the bottoms of the cookies are golden brown.
Posted on 5 Comments

Simple Strawberry Jam with Dutch Jell

Strawberry jam is simple to make with this quick and easy recipe!
strawberry jam is simple to make with this quick and easy recipe!

There is a short way to make jam, and there is a long way. The long way involves cooking fruit and sugar until the mixture begins to thicken on its own. The short way uses added pectin to speed up the process. 

In general, I like to do things the old-fashioned way, which is typically the longer way. However, there are times when I just need to make jam and don’t have all day to do it! This recipe is simple, fail proof, and takes less than an hour from start to finish! Oh, and the jam is also delicious.

Today was one of those days when my to-do list seemed endless and the children clamored constantly for my attention. It was definitely a day for quick jam-making.

I’ve had strawberries sitting in my refrigerator for nearly a week, begging me to turn them into jam. I kept postponing Canning Day because I was busy preparing goodies for a bridal shower. Now that the shower is over and my kitchen is starting to resume its normal appearance, I had time to focus on jam.

This post contains affiliate links. If you click the links and make a purchase, I may receive a small commission. You can read my full disclosure here.

What equipment do you need to make jam?

  • Water bath canner or pressure canner tall enough to cover your jars with an inch of water. You can substitute a large pot if necessary, if you have a rack to hold the jars up off of the bottom of the pot.
  • Canning jars, lids, and rings. I used 5 pint jars for this recipe.
  • Large stockpot for cooking the jam
  • Potato masher for crushing the berries
  • Wooden spoon
  • Ladle
  • Jar lifter
  • Canning funnel
  • Clean tea towel

The process of making jam using pectin really doesn’t take long once you gather all of your equipment. In fact, what takes the most time is waiting for the water in your water bath canner to boil. I suggest filling that first, before making the jam, so it will be hot by the time you need it.

Sterilizing Jars

There are several different ways to prepare canning jars. The basic concept is that jars and lids need to be sterilized before they are used to store food, or the contents may spoil. Also, the jars should be hot if you are going to fill them with hot jam. Filling cool jars with hot foods may cause the jars to crack.

One way to sterilize jars is to run them through your dishwasher. Another way is to boil them in a pot of water for a few minutes. 

I usually place my empty jars, along with unscrewed rings and lids, in the water bath canner while it is heating. If you don’t want to fish the rings and lids out of a tall pot of boiling water, try boiling them separately in a small pot.

This simple strawberry jam recipe yields 5 pints in under an hour. It is made with Dutch Jell, a natural powdered pectin.

Ingredients

Quick-cook jams can be very simple. For this recipe, you need only strawberries, sugar, and powdered pectin. I use Dutch Jell, but you can substitute a box of another powdered pectin if you wish.

Dutch Jell is a powdered pectin that is sold in bulk packages. I make sure to restock my supply when I visit my in-laws in Pennsylvania, but you can also find it online. The original recipe for strawberry jam from the Dutch Jell company suggests using a rounded 1/3 cup for each batch. This made my jam a bit too gelatinous for my taste, so I just use a level 1/3 cup.

The strawberries should be at their peak of ripeness. If they are underripe, the jam won’t have much flavor. Rinse the berries in cool water and cut off any bad spots with a paring knife.

As for sugar, I have used granulated white sugar and evaporated cane sugar with equally good results. 

Method

Fill your water bath canner with water to about the height of your canning jars. Once you place filled jars in the canner, the water should be deep enough to cover them by about an inch. Place the canner on your stovetop and heat it over the largest burner while you prepare the jam.

If your strawberries are large, cut them into quarters. Small berries may be halved.

Rinse the strawberries under cool water. Hull them and cut off any bad parts with a paring knife. If the berries are large, cut them in quarters; halves are fine for smaller berries. Transfer the berries to a large stockpot. Crush them with a potato masher until they are soupy and no large chunks remain. Unless, of course, you happen to like large chunks in your jam!

Crush the berries in a large stockpot to release the juices. A potato masher works well.

Add the Dutch Jell to the strawberries in the pot and stir well. If you are using a different brand of pectin, read the directions to make sure you add the pectin at the right time.

Measure the sugar into a large bowl. It needs to be added all at once, so don’t wait until the jam is boiling to start measuring it!

Add the sugar to the strawberries all at once.

Bring the berries and Dutch Jell to a boil, stirring frequently. Add the sugar all at once and continue stirring until the mixture begins to foam up. Skim off the light pink foam with a large spoon or a measuring cup. Don’t worry if you don’t get every bit of foam; just stir it back into the jam.

When the jam foams up, skim the light pink foam off the surface. Don't worry about getting every last bit, or you'll remove too much jam along with it.
When the jam foams up, skim the light pink foam off the surface. Don’t worry about getting every last bit, or you’ll remove too much jam along with it.

Once the jam comes to a full rolling boil, continue to cook the jam, stirring constantly, for one minute. Remove from the heat.

Prepare your workspace so that everything is within reach while you’re working with the hot jam. Carefully remove the hot jars, lids, and rings from the boiling water. 

Making strawberry jam: ladling into jars.
Prepare your workspace so that everything is within reach. Place the jar close to the pot of jam to prevent drips.

Set one jar next to the pot of jam. Set the canning funnel in the mouth of the jar. Ladle jam into the jar, leaving ½” of headspace (this should be about level with the bottom of the canning funnel). 

Remove the canning funnel from the jar and set aside. Dip a corner of the clean towel into the pot of hot water. Use it to wipe all around the rim of the jam-filled jar. Sticky residue on the rim can interfere with the seal.

Wipe around the rim of the jar to remove any sticky jam residue.

Place a lid on the jar, then screw a ring on. You may want to hold the hot jar with a towel or pot holder. Screw the ring until it is fingertip-tight. You don’t need to screw it on as hard as you can!

Set the jar into the water bath canner, using the jar lifter. Repeat the process with the remaining jars. If you have some jam remaining which doesn’t quite fill a jar, don’t try to can it. Just refrigerate the partially-full jar after it cools, and consume it first.

Canning strawberry jam: boiling water bath
Use a jar lifter to place jam jars into the canner. Be careful of the hot steam!

Once all the jars have been filled and placed in the water bath canner, check the water to see if it is still boiling. If not, cover with a lid and return to a boil. 

When the water boils, set a timer for ten minutes. The canner does not need to be covered during the boiling water bath. Leave the jars undisturbed in the canner for ten minutes, then remove them one by one with the jar lifter and set aside to cool. 

You will hear a popping sound when each jar seals. This can take a few seconds up to several minutes. 

Mmm, fresh strawberry jam with sourdough bread. What a treat!

After the jars have cooled, don’t forget to label them with the date and contents! Strawberry jam will keep in sealed jars at room temperature for over a year.

strawberry jam is simple to make with this quick and easy recipe!
Print Recipe
2 from 1 vote

Simple Strawberry Jam with Dutch Jell

Looking for a quick and easy strawberry jam recipe? This recipe yields 5 pints of jam in under an hour!
Prep Time10 minutes
Cook Time10 minutes
Boiling Water Bath10 minutes
Total Time30 minutes
Course: Condiments
Keyword: Jam, Strawberries
Servings: 5 pints

Equipment

  • Water bath canner or pressure canner
  • pint jars, lids, and rings
  • stockpot
  • potato masher
  • wooden spoon
  • ladle
  • jar lifter
  • canning funnel
  • clean tea towel

Ingredients

  • 2 lbs. strawberries rinsed, hulled, and quartered
  • 7 cups sugar
  • 1/3 cup Dutch Jell powdered pectin

Instructions

  • Fill a water bath canner or pressure canner with water to cover your jars. Set it over high heat and bring to a boil.
  • Sterilize jars and lids in boiling water or in your dishwasher.
  • Place strawberries in a large stockpot and crush to release juices. Stir in Dutch Jell. Bring to a boil over medium heat, stirring occasionally.
  • While the strawberries are cooking, measure the sugar into a large bowl. When the strawberries begin to boil, add the sugar all at once and stir well until combined.
  • Return the mixture to a boil, stirring frequently. Skim foam off the surface with a large spoon or a measuring cup. Boil and stir the jam for one minute, then remove from the heat.
  • Ladle jam into hot jars, using a canning funnel. Wipe around the rim of each jar before placing a lid on it. Fingertip-tighten the ring around the mouth of the jar.
  • Use a jar lifter to place the jars into the water bath canner. Boil for 10 minutes, then remove jars to cool.
  • When the jars have cooled, check the seals and label the jars with contents and date. Strawberry jam will keep in sealed jars at room temperature for over a year.

Notes

You may substitute other brands of powdered pectin for the Dutch Jell. 1/3 cup Dutch Jell is equal to one box of powdered pectin. Be sure to read the instructions on the box before proceeding with the recipe.
3 ingredients is all it takes to make delicious strawberry jam in under an hour!