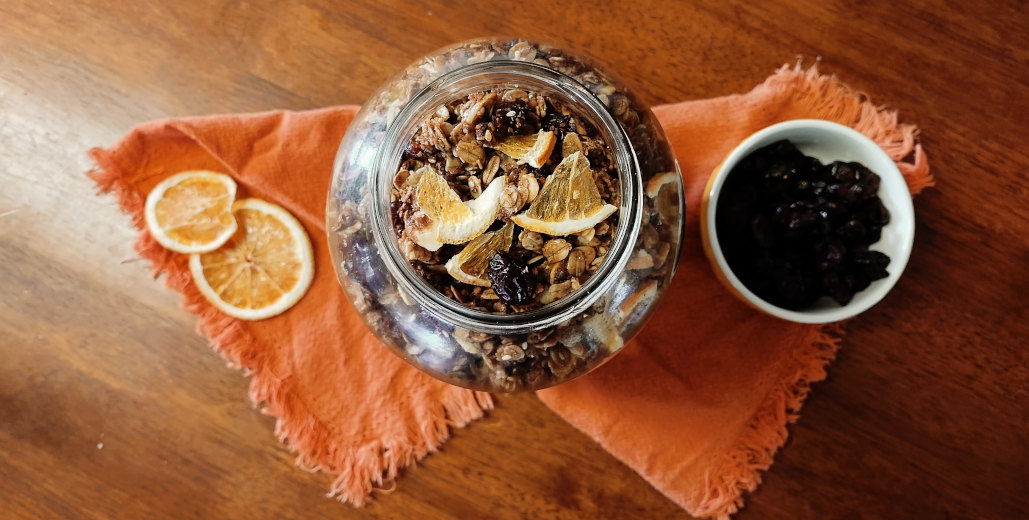
Another season, another granola recipe… but this one is so good! It’s quick, easy, healthful, delicious, and full of ingredients you already have in your cupboard. What more could you want? Pretty. It’s also pretty. Who wouldn’t want to scatter jewel-hued cranberries and dried oranges on top of their yogurt? I definitely do.
I have a confession to make: this granola recipe came from another granola recipe that was supposed to have chocolate chips in it. I intended to make it as written. With chocolate.
I couldn’t do it, though. While I do love chocolate, I do not generally approve of it for breakfast, except topping homemade Chocolate Danishes to celebrate the kids’ name days. Even for lunch, chocolate in granola just seems a little too decadent.
And by the time the pans of granola were in the oven, I looked back over the list of ingredients and realized I had made so many changes to the original recipe that I might as well write a new one. So here you go!
Ingredients
Oats
You know this one. Granola essential.
Rye flour
I find that adding a bit of flour helps the granola to clump together better. And surely I’m not the only one who picks the clumps out to eat them first? You are welcome to substitute any whole grain flour. I just like the nuttiness of rye.
Wheat bran
Fiber is good for you. Most of you. If you don’t need any extra in your diet, replace it with wheat germ.
Salt
Who doesn’t like a sweet-and-salty mix? (If you don’t, reduce the amount to 1/4 teaspoon.)
Cinnamon
Because I cannot cook or bake anything without opening my spice drawer…
Desiccated Coconut
I love coconut in granola. You probably know that by now.
Sliced almonds
Use any nuts you like. Chop them roughly if they’re large, like walnuts.
Flax Seeds
Seeds are pretty and crunchy. Use whatever you have. Sometimes I substitute sesame seeds here.
Butter
Everything is better with butter! And browned butter is best of all. But if dairy is a problem, use all coconut oil.
Coconut oil
I really like coconut oil in granola, but you can substitute avocado oil if you like. Or more butter, of course.
Honey
It really doesn’t matter whether or not you use raw honey in this recipe, as the granola is baked in the oven anyway. But I generally only have raw honey around, so that’s what I use.
Date syrup
This one is optional. Use all honey or all date syrup, or just leave the date syrup out if you want a less sweet granola. I like to use date syrup as a sweetener when I don’t desire a strong flavor of honey or maple syrup. You could also use brown sugar.
Vanilla and Almond extract
For a delightful aroma and flavor! Also optional.
Dried Cranberries
Some day I want to dry my own cranberries, but that day has not come yet. Until then, I use apple juice-sweetened dried cranberries.
Dried Orange slices
You can make your own here, or buy them from a bulk food store or specialty shop. I buy mine from Azure Standard. My kids call them “candied oranges.” If they only knew…
Method
You will need a large mixing bowl and a small skillet or saucepan, plus two large rimmed baking sheets or 9×13″ pans.
Preheat the oven to 300 degrees F. Line the pans with parchment paper, if you like, to prevent the granola from sticking. Sometimes I do, and sometimes I don’t bother. It does make cleanup a lot easier.
In the skillet, melt the butter over low heat. Add the coconut oil and honey, and stir to combine.
Measure the dry ingredients into the mixing bowl: everything except the dried fruit. Mix it up, then drizzle the butter mixture over the dry grains and nuts. Stir well with a wooden spoon. Make sure you incorporate all the dry bits at the bottom of the bowl.
Divide the granola mixture evenly between the two pans, and spread it out to the edges. Place the pans in the oven, as close to the center as possible.
Bake for about 1 hour, stirring the granola and rotating the pans every 15 minutes. Be gentle when you stir it, to keep some clumps intact. Those are the best parts!
The granola is done when it turns golden brown and smells delicious!
Stir the granola one more time (gently!) when you remove it from the oven, then let it cool on the pans.
When it is cool, pour the granola into a large, clean bowl. Mix in the dried cranberries and dried orange slices. Pour into an airtight container. This granola will keep happily in your pantry for a week or two.
Preheat the oven to 300 degrees F. Line two large rimmed baking sheets or 13×9" pans with parchment paper.
In a saucepan, melt the butter and coconut oil over low heat.
Remove from the heat and stir in the honey, date syrup, vanilla and almond extracts. Set aside to cool slightly.
In a large mixing bowl, combine the oats, rye flour, wheat bran, coconut, almonds, flax seeds, salt, and cinnamon. Give it a stir.
Pour the butter mixture over the dry oat mixture. Stir well to combine.
Spread the granola mixture evenly between the prepared pans. Bake for about 1 hour, removing the pans every 15 minutes to stir gently and rotate pans in the oven.
The granola is done when it is golden brown and smells delicious. Remove from the oven, stir gently, and let it cool on the pans.
When the granola is cool, mix in the dried cranberries and dried orange slices. Store in an airtight container for up to 2 weeks.
Notes
This recipe makes a sweet-and-salty granola. If you don’t want to taste any salt, decrease the amount to 1/2 teaspoon.Do not add the dried fruit to the granola until after it bakes to prevent burning.
Why is it so hard to find time to sit down and write a letter these days? Oh, there are myriad excuses: children constantly clamoring for attention, unending household chores to complete, projects at school or work with looming deadlines, et cetera. It all comes down to being too busy, of course. Too busy doing what? Too busy for what?
The dangers of being too busy
When someone says that he is “too busy,” it could be a particularly hectic hour or day, in which circumstances arise which require immediate attention, and throw off his normal schedule. We could call this acute busyness. However, if you find yourself saying you are “too busy” frequently–and not just because you would rather not attend that function anyway–you might have a case of chronic busyness.
Chronic busyness is a problem. It is detrimental to your health physically, psychologically, and spiritually. Physically, it robs time that you could have spent taking care of yourself. People who are always too busy don’t have time for exercise or cooking nutritious meals. They have elevated cortisol levels, which causes adrenal fatigue and puts unnecessary stress on vital organs. Psychologically, it can cause anxiety and emotional imbalances or burnout. Spiritually, it leads to neglect of prayer, worship, and works of mercy.
Chronic busyness also damages your relationships, if you keep putting them on the back burner until some point in the distant future when you will have more time for that sort of thing. You can’t put relationships on hold continually and expect to have a great marriage or friendship. Chronic busyness may seem complicated, but it boils down to weakness of character: laziness, distractibility, or vague anxiety stemming from acedia.
What is Acedia?
Acedia is an ancient Greek term. It comes from the word kēdos, which means “care, concern, or grief.” Acedia refers to spiritual sloth, which is a lack of care about anything, particularly spiritual things. Cassian described acedia as “a combination of listlessness, undirected anxiety, and inability to concentrate.” (Institutes, Book X) Acedia can cause laziness, apathy, perhaps even depression or despair. It is listed as one of the seven deadly sins for a reason! Unfortunately, acedia doesn’t get a lot of press, so you may not even realize it’s something to watch out for.
Some people see acedia as merely an emotion of boredom and listlessness, but it is more than that. Acedia is not caring and not doing. It is apathy and sloth. What does this have to do with relationships? Acedia slowly kills relationships. It makes you too busy to spend time with people; or if you do, acedia makes you too frazzled or distracted to really attend to the other person.
Ousting Acedia
Combating acedia necessitates diligence. Indeed, that is the main requirement for fighting this vice. Since acedia is a lack of caring and acting, the remedy is to make yourself care about God and other folks, and act rightly toward them. How do you make yourself care? Remember, this is not just a feeling. Caring is about your will, not your emotions. If a sluggishness of emotion gets in the way, try reading some books that will reorient your will toward the good. I suggest C.S. Lewis.
Acting as if you care can also help to lead your feelings in the right direction. Think about how you would act if you deeply cared about the people in your home, school, or workplace. Now go do those things. It will be distasteful at first, but it will get easier. Pray for grace to see the right thing to do, and do it!
How to build good relationships
Now, what would a lady do who loved her husband dearly? She would show her love by greeting him cheerfully when he enters the room, finding and doing little things to make his day easier, being affectionate and courteous in manner, and making a point to converse with him in a time and place without distraction, so she can fully attend to him.
Likewise, how would a lady act toward a dear friend? She would, above all, desire the friend’s good and always try to help her achieve it. She would be eager to speak to her friend, whether in person, by phone, or by writing. (I might note here that text messages are really not the same as writing a letter, because tone and emotion are completely eliminated and often misjudged by the recipient.) She would desire to spend time with the friend, if possible, joining good conversation with pleasurable activity. How often? I am not about to prescribe a set number or hours or minutes, but good friendships require diligent care and attention.
Of course, this goes further than family and friends. You can be a good neighbor by, first of all, speaking to your neighbors: introducing yourself, greeting them when you meet, chatting for a few minutes, perhaps even helping out with an errand or lending a cup of sugar once in a while.
Helping out a fellow student with homework or lending a hand to a stressed coworker doesn’t have to take more than a few minutes. Making eye contact with the grocery store cashier and thanking him with a warm smile doesn’t take any time at all. Being polite to the customer service representative who is not solving your problem might be a little harder; try to remember that you are talking to someone else’s husband, wife, mother, or best friend!
Widening your heart
Showing that you have time for another person can make a huge difference in both of your lives. Putting more effort into your relationships will make you a better friend, spouse, parent, and sibling. More than that, it will enlarge your heart so that you will start to see everyone you meet as a human person, and not just an object. If acedia is a lack of heart that is eating away at your relationships, then intentionally cultivating them results in greatness of heart: magnanimity.
If the capricious spring breezes and surprise showers have you dreaming of warmer days and sun-drenched fields of flowers, this recipe is for you! Close your eyes and enjoy the aroma and flavors of midsummer, no matter what the weather may be doing outside!
What’s better than your favorite granola recipe? A new favorite! My family eats a lot of yogurt and granola, and I like to switch up my recipes so nobody gets bored. Okay, maybe it’s so I don’t get bored making the same recipe over and over again! Regardless, I am always ready to try out a new flavor combination, and when I saw this combination of lavender and blueberries, I knew I had to try it.
Baking with Flowers
If you have never used flowers in your cooking or baking, you are in for a real treat! Flowers have such delicate flavors that they can be easily overpowered by stronger spices or botanical extracts, but the faint aroma they lend to this granola is simply exquisite! It elevates this recipe from just another batch of granola to an experience of summer’s bounty in your bowl.
I have fallen in love with Frances Bissell’s books on baking and cooking with flowers, and am now the delighted owner of all three: The Floral Baker, The Fragrant Pantry, and The Scented Kitchen! (These links will take you to Amazon.com, where you can find the books if you wish.)
Her books include recipes for incorporating fresh and dried flowers into recipes, as well as floral essences. Some of the recipes I have tried include Strawberry-Rose Petal Jam, Saffron Tea Bread, and a Lavender-flavored Limoncello. Of course, the availability of fresh flowers depends on your locale and the time of year, so many of these recipes must be prepared in the summer; but others rely on convenient bottled essences like rose water, orange blossom water, or culinary lavender essence.
I love how these books provide a springboard for one’s own ideas and inspirations about floral concoctions. For example, you could take her idea for strawberry-rose petal jam and turn it into a floral syrup instead. Or, of course, you could use different fruits or flowers that are available in your own season and climate.
These cookbooks have opened up a whole new realm of culinary possibilities to me, and I highly recommend them to anyone who loves flowers, or merely experimenting with different flavor combinations.
This particular recipe does not come from one of Frances Bissell’s books, but rather from the Whip & Wander blog. I have adapted it with my own preference of granola ingredients, including rather more coconut than the original!
I also wanted a stronger lavender scent and flavor, so I bumped up the amount of dried lavender and added some culinary lavender essence. I also decreased or eliminated many of the spices in the original recipe, not because I don’t like them, but because I wanted a simpler backdrop for the lavender and blueberry flavors.
And what a grand combination that is! I would never have thought to pair those two, but the sweet-tangy flavor of dried blueberries is just perfect with the delicate whiff of lavender. It’s like having breakfast in the garden in late July.
The granola should be golden brown, but not burnt. The coconut flakes will turn brown first, so keep an eye on them.
Ingredients
Oats
Most granola recipes start with rolled oats, but you are not limited to that, of course. I have used a rolled 7-grain cereal with success, although the final texture is a bit chewier. Experiment with different rolled grains if you like!
Nuts & Seeds
This recipe uses raw pecans, pepitas, flaked coconut, golden flax seeds, and sesame seeds. These may all be pre-soaked, if you have the time and energy. Soaking nuts before roasting them does improve their digestibility and nutrient value.
If you have a nut allergy, by all means substitute a different nut! Likewise, if small seeds are hard on your digestion, it’s perfectly fine to leave them out. I would suggest adding a bit of wheat germ or bran instead, if you can tolerate it.
Coconut Oil
I used a combination of coconut oil and coconut butter in this recipe, mostly because that’s what I had on hand. It is perfectly fine to use all coconut oil or all coconut butter. Coconut butter is made of pureed dried coconut flakes, just as peanut butter is made of pureed peanuts. It has a stronger coconut flavor, more protein, and less fat than coconut oil. For the purposes of this recipe, either ingredient works fine.
Lavender Essence
Lavender essence is a floral extract, usually made with either alcohol or vegetable glycerin. You can make your own, or find it in specialty shops. (Or here on Amazon.) If you can’t find culinary grade lavender essence, feel free to omit it. You do NOT want to use a skin product processed with preservatives!
Method
You will need one or two rimmed baking pans, depending on the size of your oven. I happen to be living with quite a small oven at this point in time, so I used two 13×9-inch baking pans. However, a standard rimmed half-sheet pan also works just fine for granola, as long as it fits in your oven!
Line your baking sheets with parchment paper, if you like. Honestly, I usually just don’t bother with parchment paper for granola, as you will be stirring the pan frequently and there is less risk of burnt bits sticking to the pan.
Preheat your oven to 300 degrees F. You don’t want to bake granola at a higher temperature, or the top will brown too quickly, while the underlayer does not cook through.
Melt your coconut oil or butter while the oven is heating. I like to use the pan I will cook the granola in, to save on dishes. Just pop it in the oven for a few minutes; coconut oil melts pretty quickly.
In a large bowl, combine all of your grains, nuts, and seeds. I used rolled oats, raw pecans, pepitas (pumpkin seeds), flaked coconut, golden flax seeds, and sesame seeds. Sprinkle in the lavender flowers, cinnamon, and salt, and give the mixture a good stir.
When your coconut oil or butter is melted, pour it into a small bowl or glass measuring cup along with the honey, vanilla extract, and lavender essence.
Pour the liquid ingredients over the oat mixture, and give it all a good stir with a wooden spoon. The liquid should be evenly distributed, so there are no dry patches anywhere.
Spread the granola mixture into your baking pan(s), and bake for about 45 minutes, stirring every 15 minutes. If you are using two pans, you will need to rotate them as well.
The granola is done when it is golden brown on top. It should not be dark. The granola will still appear soft; it will crisp up as it cools.
Cool the granola in the pans. Continue to stir occasionally as it cools, or it will stick to the pans. Stir in the dried blueberries at this point. The reason you don’t want to cook them along with the granola is that dried fruits and berries will get too dried out and possibly scorched in the oven.
When the granola is completely cool, transfer it to an airtight container and store at room temperature for up to a month. But it probably won’t last that long!
This granola also makes a great gift. Put some in a glass jar and tie with a pretty ribbon and decorative label.
Liven up your mornings with the luscious flavors of lavender flowers and tangy dried blueberries. Whether you stir it into yogurt parfaits or sprinkle on top of muffins, this quick and easy recipe is sure to become a favorite!
Preheat your oven to 300 degrees F. Place the coconut oil or coconut butter in a heatproof dish or rimmed baking pan in the oven for a few minutes to melt.
In a large mixing bowl, combine the oats, pecans, pepitas, coconut flakes, flax seeds, sesame seeds, and lavender flowers. Sprinkle in the cinnamon, nutmeg, and salt.
In a small bowl or glass measuring cup, combine the honey, melted coconut oil, vanilla extract, and lavender essence. Stir well to combine.
Pour the liquid ingredients over the oat mixture and mix thoroughly with a wooden spoon to combine. The liquid should be evenly distributed so that there are no dry patches.
Spread the oat mixture into one or two baking pans. You will need two 13×9-inch pans or one large rimmed half-sheet pan.
Bake for about 45 minutes, stirring the granola every 15 minutes and rotating pans if you are using more than one. The granola should look golden, but not dark. It will crisp up as it cools.
Cool the granola in the pans. Stir in the dried blueberries last, and store in an airtight container at room temperature for up to 1 month.
Notes
You may use all coconut oil, all coconut butter, or a combination of the two. Coconut butter gives a more intense coconut flavor, while coconut oil has more fat and produces a glossier granola.Feel free to substitute different nuts and seeds, according to your preference and what you have on hand!Any dried fruits or berries should be added after the granola is cooked, to prevent burning and excessive drying.
How is your grocery budget doing lately? Straining at the seams? Mine has been growing inexplicably every month–and I don’t think it can all be ascribed to the kids eating more! After staring, dismayed, at last month’s figures, something definitely needed to change.
So, I decided to revisit my old grocery shopping tips and price book. Scratch that: those prices are outdated and just depressing when I compare them to the current tags in the grocery store. It was time to make a new price book. The way I shop for groceries has changed over the years, depending on where we are living, number of mouths to feed, budget, etc. I needed the new price book to reflect that, so I made a spreadsheet with room to compare prices from several different kinds of retailers.
In a typical month, I will buy groceries at a traditional grocery store, a bulk foods store or wholesale supplier, a natural foods co-op, and sometimes an online retailer or specialty shop.
The Secret to Finding the Best Deals on Groceries
Why would anyone want to make grocery shopping so complicated, you ask? I think of it as a kind of game, searching to find the best prices on grocery staples to fit my family and my budget. However, it’s hard to play this game without a good price reference. You may think, “Oh look: peanut butter is on sale. It’s a great deal!”
But is it really? To know the answer to that question, you would have to compare the sale price of peanut butter at store A to the regular and/or sale prices of peanut butter at stores B, C, and D.
To do that, you need a price book.
What is a price book?
A price book is a notebook or spreadsheet in which you log the prices of items you typically buy. Use one row or line for each item, and make sure there is space to write prices from several different stores. Bring it along with you to the grocery store and note down the prices of apples, milk, peanut butter, or whatever you typically buy. Or copy prices off your receipt once you get home. (This is a much easier option if your shopping trip involves young children!)
Next time you head to a different store, take your price book along again. It will give you a reference for prices at the other stores, so you won’t have to stand in front of the peanut butter display wondering whether this sale is actually worth it. And you won’t have to try to keep hundreds of grocery prices stored in your brain! Your price book will absolutely save you money, because you can quickly and easily compare prices across brands and stores.
Of course, comparing prices is even more difficult when comparing containers of different size. You may remember that a good price on natural peanut butter is $6.99 at Safeway. But if you shop at a different store, the brand might be different, and the container size might vary as well.
How do you compare the prices of a quart jar of peanut butter to a gallon pail? The key lies in comparing unit prices.
What are unit prices?
Unit prices are those little numbers on the corners of the price tags in the store, which tell you the item’s price per unit of measurement. Items are typically measured in pounds, ounces, and fluid ounces, though other units of measurement may be used. For example, if a quart jar of peanut butter (32 oz) costs $6.99, then the unit price will be 6.99/32= $0.22 per ounce.
Unit prices are useful when you are comparing across different brands and sizes of containers. They can help you determine whether or not the larger size container is actually a better deal. IT ISN’T ALWAYS! A smaller container of store brand peanut butter may actually be less expensive than a larger container of brand name peanut butter. Check those unit prices!
How do you compare the unit prices for two items if they use different units of measurement?
This is where it gets tricky. Thank goodness for smart phones with calculators! You could also bring a calculator with you to the store, or else make a note of the price and size of container, and add it to your price book at home.
Here’s what to do: if the unit price for a 32-oz. jar of peanut butter is $0.22 per ounce, and the unit price of a 9-lb. pail of peanut butter is $4.75 per pound, don’t panic! Remember, 16 ounces = 1 pound, so just convert the unit price of the pail of peanut butter to ounces: 4.75/16= $0.30 per ounce. Now you can see that the pail of peanut butter, while a larger size, is actually more expensive per ounce of peanut butter than the 32-ounce jar.
Here’s a quick tip for faster shopping excursions when you don’t have a calculator:
A general rule when comparing one particular item across brands, in similar size containers, is that items measured in a larger unit will be less expensive. For example, if one brand of canned tomatoes is $1.19 per pound, and another brand is $0.14 per ounce, the can measured in ounces is probably more expensive than the can measured in pounds.
Remember, this rule only holds when comparing items in similarly sized packages. In the peanut butter example above, the large pail of peanut butter turned out to be more expensive than the smaller jar.
How do price books help you save money?
You already know how price books help you compare unit prices across brands and stores, to help you determine which jar of peanut butter or tomatoes is the best deal. But is there anything else price books can tell you?
Yes! Price books can help you compare items which are not identical, but are used in similar ways. How many different ways can you buy green beans, for instance? Fresh, frozen, canned, and even pickled if you’re lucky. Now, you can use those beans in most of the same recipes (except the pickles, of course!) But do you always think about comparing the price of fresh vs. frozen beans? Your price book can show you right away what the difference is.
Another example is fats and oils used for cooking. Have you ever compared the prices of olive oil and coconut oil, for instance? What about butter? Price books make it easy to see at a glance which one is less expensive per pound or fluid ounce. Maybe you could adapt your recipes to use more of the cooking fat which is least expensive.
Price books can also help you spot a good sale a mile away! Once you get used to checking unit prices and learn which products are the best deal, you won’t be so quick to jump at a sale on the fancy Italian brand of canned tomatoes. However, you will notice right away when the summer produce prices drop below the cost of canned and frozen produce.
Price books can show you where you are spending your money, when it comes to brand names or organic items. Lately, I have been trying to balance buying some organic products when the prices are similar to non-organic, or if it is an item I think is more important to be free from pesticides. If you go the extra step of comparing organic and non-organic items in your price book, it can give you that much more information about your grocery expenditures. In a lean month, you might decide to opt for non-organic products instead of vaguely assuring yourself that it doesn’t make much of a difference to your budget.
Of course I’m not saying you always need to choose the least expensive option for every item you buy! The point of a price book is to give you information, not force your choice. An informed choice is the best one.
Price Books and Sales
Price books are useful for comparing unit prices for the same or similar items across brands and stores, but are they really any use when it comes to sales?
Actually, price books are your best friend when it comes to shopping sales. This is what you need to do to get the most out of sales:
Note down SALE PRICE, SALE DATE, and HOW OFTEN the item goes on sale. You can do this on a separate page of your price book if you want, or on the bottom of the page for each item.
This will allow you to not only buy items when they are on a great sale, but also stock up enough to last you through to the next sale (presuming the item is shelf stable, or you are able to preserve it). For example, condiments like ketchup and mustard typically go on sale before Memorial Day, July 4th, and sometimes Labor Day (in the United States). You won’t likely find them on sale before Thanksgiving, however; so make sure you buy enough during the summer sales to last you until next summer.
Fresh produce goes on sale in the summer, or when the produce is ripe on farms closest to you. Frozen fruits and vegetables often go on sale in the spring or early summer, as stores are trying to clear out last year’s stock to make room for the next batch.
How to Make Your Own Price Book
Enough about the whys, here’s the how to:
There are two different ways to make a price book: you can make a physical book using a notebook and pen, or you can make a spreadsheet on the computer and either print it off or just keep an electronic log of prices.
Making a Physical Price Book
To make a physical price book, you will need some kind of notebook. I like smallish spiral-bound notebooks with a lot of pages! Use a separate page for each item. We will use eggs as an example. On the first line, write the name of the store where you found the item: “Safeway.” Then write the unit price: “$2.60/dozen.” Next to the unit price, write the cost of the package: “$12.99/5 dozen.” Skip a line underneath, so you can write in sale prices. Go to the next line and write the name of another store where you can buy eggs: “Costco.” Continue with the unit prices and package price as above.
Is this starting to sound like a lot of work? Don’t overwhelm yourself by trying to write down prices on every single item you buy all at once. I save my receipts and enter prices over the course of several weeks, whenever I have a few spare minutes. This project does take a while to complete, but it is well worthwhile in reducing grocery expenditures over the long term.
TIP
Does your grocery store have an app or website? Use this to check prices and enter them in your price book before you shop!
The one downside to a physical notebook is that you can’t add pages later. Whether you organize your price book alphabetically or by category (produce, meat & fish, etc.) there is always a chance you might miss an item. I suggest making a list of all the items you want to include in your price book on a separate sheet of paper and looking it over a few times before copying the items into your price book. You can always write in more entries at the end of the notebook, if all else fails.
Making a Digital Price Book
The second option is to make a spreadsheet on your computer. If you would like to go this route, I’ve already done most of the work for you! You can grab a copy of my Grocery Price Book Template, print it off, and simply write in the names of the stores you shop at and the prices of the items.
I tried to make my template thorough, but it does reflect the items I buy, and your list will most likely be different. I included several blank lines in each category for you to write in items not found on my list.
If you prefer to keep your spreadsheet in a digital format, or if my list is widely different than yours, I am happy to share my Grocery Price Book Digital Template with you. You will need to access Google Docs to open the document. Please SAVE A COPY to your own Google Drive before you edit anything! Otherwise you will be editing the master copy for everyone.
Get A Free Grocery Price Book Template
Click the button below the image to download a PDF of my blank Grocery Price Book Template.
Hi, I’m Kimberly! I’m an Alaskan wife and mother who loves simple, old-fashioned living. If you’re looking for country-style recipes from scratch or simple homemaking ideas, pour yourself a cup of tea and join me!


 Hi, I’m Kimberly! I’m an Alaskan wife and mother who loves simple, old-fashioned living. If you’re looking for country-style recipes from scratch or simple homemaking ideas, pour yourself a cup of tea and join me!